16 Recession-Proof Products You Can Sell Online
Is the economy in a recession right now? It depends on who you ask and has proven to be a surprisingly contentious question.
And, of course, recent tariff changes and shifts in U.S. trade policy have started up a whole new wave of speculation. It’s really tough to know what they economic impacts will be. Recession? Inflation? Both at the same time? It’s anyone’s guess.
But no matter what, you can prepare for the maybe-happening, maybe-not-happening recession by focusing on recession-proof products. Weirdly, some items just seem to sell more when the economy is bad. It’s a good idea to keep some of them stocked in your eCommerce store.
This might sound too good to be true, but it’s not. Some products just happen to sell well, or even better, when the economy is bad. And we can prove that statement with real data from the recessions of 2001, 2008, and 2020.
We all know the economy swings up and down wildly. No one knows why the market does what it does. What we do know is that recessions will happen from time to time. It’s inevitable.
Trying to guess when a recession is going to happen is a fool’s errand. A much better idea? Always have room in your inventory for products that sell well in a recession. That way, when one comes, you’re ready!
So with that in mind, we’re going to talk about 16 recession-proof products that will keep money rolling in even when the economy isn’t doing so hot.
What makes a product recession-proof according to economists?
Scroll down a bit more if you are in a hurry to get to the list.
Otherwise, pay attention, because when you understand why certain products do better when the economy sours, you’ll be able to improvise. And that’s much more useful than following a list!
Think about the kind of companies that perform well in recessions. Utility companies do well. Tobacco, alcohol, fast food, and soft drinks do well. Consumer staple companies like Kimberly-Clark, Colgate-Palmolive, Procter & Gamble, and Johnson & Johnson do well.
In short, necessities and vices don’t suffer when recessions come. This may sound like bad news since many consumer products sold online are luxuries purchased with discretionary income. But it’s not: and there’s a simple principle at work behind the changes in consumer behavior during a recession.
Cheaper products perform better in a recession.
I know. I know. But it’s worth saying because it helps us understand some important second-order effects.
Think about it: if you sell something inexpensive, such as Hershey’s Kiss chocolates, you might benefit from the economic downturn. A Big Mac is a lot cheaper than dinner night at a fancy sit-down restaurant. Camping is cheaper than a lavish vacation. Repairing a car is cheaper than buying a new one.
And I think it’s important that note that this is even more critical now. Recent tariffs will probably raise the price floor on many imported goods, making inexpensive domestic or substitute products more attractive.
In a Harvard Business Review article from 2023, M. Berk Talay, professor at University of Massachusetts Lowell, made the following statement. “A recession might be the ideal time to launch your product no matter what it is.”
Keep that in mind if you feel overwhelmed by the risks of running a business with the DOW is down.
What makes a product recession-proof according to business owners?
Of course, what we described above is a bit academic. It may also help to consider the anecdotes of founders who have been previously impacted by recessions as well.
“Essentially, recession-proof products can be any item that people need to survive in its most literal sense,” says Nate Banks, Founder of Crazy Compression, which sells compression socks. “No, this does not include streaming services or food delivery apps. Recession-proof products are consumer staples like food, hygiene, household, and personal care products. Pet necessities like pet food and cat litter are also considered recession-proof. These are things that people quite literally can’t live without. They are not luxury or entertainment items that people can easily forego during economic downturns.”
Brandon Hartman, Founder of Beyblades enthusiast website, BeyWarehouse, has a different take. “I classify recession-proof products into two broad categories. The first one is more obvious; it’s composed of non-negotiables that will always find a market no matter the state of the economy.” The examples he goes on to cite are strikingly similar to Banks’ prior statement.
Hartman goes on to state that “the second category is composed of highly-niched products whose success depends on dedicated fanbases and curated communities. These consumers tend to continue patronizing these products regardless of the state of the economy.”
As you read this article, you’ll also notice that many of the recommended items are the sort you buy more than once. This is because, according to Paul Ferrara, Senior Wealth Counselor at Avenue Investment, “the best way to increase lifetime value is to base acquisition expenditure on retention models.”
These professionals’ statements seem to also suggest again that recessions open up new opportunities. You just have to know where to look.
16 Recession-Proof Products You Can Sell Online
We’d now like to share some ideas for recession-proof products that you might consider investing in during, or before, a recession. Here are sixteen ideas to get your wheels turning.
1. Consumer staples
There are some items that you need no matter what the stock market is doing. Your customers will always need detergent, toothpaste, napkins, tissues, bottled water, and canned goods no matter what.
That’s why these items are called consumer staples and they come in six categories: beverages, food and staples retailing, food products, household products, personal products, and tobacco.
Because consumers’ need for these products doesn’t fluctuate, businesses that sell them will continue to see stable revenue, and perhaps even some steady growth.
2. Camping gear
Lavish vacations to distant lands are not as attractive during recessions. Yet the need to “get away from it all” doesn’t go away when the economy is bad. If anything, that escapist urge grows!
The data backs me up here too. In an article written by US News in 2009, Coleman posted higher sales of tents, coolers, stoves, sleeping bags, and fishing gear. The same article notes that fishing and camping permits went up by 10% between 2008 and 2009 and that canning jars and Rawlings sporting goods posted 12% higher revenue in 2009 than 2007.
In the 2020 recession, we saw something similar happening as well. People Googled “camping” more in 2020 than at any point in the last five years. Makes sense, too, with all the travel restrictions put in place for the COVID-19 pandemic!
3. Automotive parts
No matter what the S&P 500 says, people still need to go to work, the store, and the doctor. And for many people in the US, that requires a working vehicle. When times are good, people are more likely to buy new cars. But what about when times are bad?
People keep their used cars for longer. When your 401(k) gets clobbered and your pay gets cut, the idea of buying a brand new Lexus is off the table. But repairing your 2006 Honda Civic becomes much more attractive!
During recessions, people are a lot less likely to treat their beloved cars and trucks as disposable, which is good news for mechanics and part manufacturers. And if imported cars become more expensive with the new tariff policies implemented by the U.S., this will likely prove even more true.
And sure, it may not be realistic for you to sell alternators, batteries, and transmissions. But you can always sell the little air freshening trees that hang on rearview mirrors, or in-car trash bags to hold crushed soda cans and discarded snack bags.
4. Coffee and tea
I probably consumed a quart of coffee writing this post and another while editing the video up at the top. I am, after all, one of the 64% of American adults who currently consume coffee every day.
People love caffeine, and that’s why, much like tobacco and alcohol, caffeinated beverages do not suffer as much from the economic pressures of a recession!
Fortunately, with coffee and tea, there is a lot of room to differentiate your product from others. Just take a look at Amazon or Etsy and appreciate for a moment all the different coffee and tea flavors that creative people have been able to come up with over the years!

5. Tupperware
People don’t eat out as much during recessions. They prefer to make food at home instead. But you still need a way to store leftovers! That’s where tupperware comes in.
Tupperware was one of the big winners during the global financial crisis in 2008 and 2009. And of course, during the pandemic recession when eating out was considered to be dangerous for your health, tupperware sold like hotcakes.
6. Candy
When the economy tanks, it’s really stressful. Job prospects are grim and hours are long. Many workers in high-stress situations find themselves reaching for the candy bowl, filled to the brim with sugary sweets and cheap chocolates.
It’s for this reason that candy is a juggernaut of recession survival. Cadbury’s profits went up by 30% in 2008 and Nestle’s went up by 11% at the same time. This is not just some freak incident either. Chocolate sales grew by 12% in 2020 as well as people turned to comfort foods.
7. Cosmetics
The desire to look good doesn’t go away when the economy takes a dive. However, instead of extreme makeovers, expensive haircuts, and new wardrobes, women look to cheaper options. For that reason, cosmetics companies have a surprisingly easy time surviving recessions. Even nail salons did pretty well in 2009 (though not 2020 for obvious reasons).
It may seem paradoxical that people still buy luxury goods such as cosmetics in a crisis, but the tendency has been studied over the course of several recessions. There’s even a name for it: lipstick effect. “Instead of buying expensive fur coats, people will buy expensive lipstick.”
8. Pet care products
People love their pets! And when the S&P 500 decides to aim for the zero mark, people spend more time at home with them. So naturally, to relieve some of their stress, people want to pamper their pets!
The demand for pet products continued to grow through both the 2001 and 2008-2009 recessions according to MarketWatch. Then according to another article by Supermarket News, the pet industry broke $100 billion in 2020, posting a 6.7% increase over 2019.
So what can you sell? Shopify recommends you sell pet bowls, toys, and beds, pet treats, grooming supplies, and even adorable pet apparel! Even rising costs due to trade policy changes aren’t likely to dent this trend. Pet owners continue to prioritize spending on their companions.

9. Movies, TV, and video games
A night on the town is expensive. A night indoors is not! People still need entertainment when the economy is bad, perhaps even more so than when the economy is good. During recessions, cheap entertainment – movies, TV, video games, and other similar products – see a jump in demand.
This was the case during the 2001 and 2008-2009 recessions. It was especially the case during the 2020 recession since stay-at-home orders naturally pushed people to movies, TV, and video games.
10. Clothing
People still wear clothes during recessions. Shirts will be undone by stray fabrics and all shoes eventually have their soles ground down to dust if used enough. If you sell clothing during an economic downturn, you are likely to be insulated from the worst impacts.
On the cheap end, clothes function like a consumer staple. People need them, so they’ll buy them. On the more expensive end, nicer clothes are one of the more affordable luxuries. As such, nice clothes benefit from the lipstick effect, just like candy and cosmetics.
11. Baby products
When you’re a parent, you have to take care of your child no matter what. For that reason, baby products – clothing, diapers, formula, and so on – continue to outperform the market as a whole. This is also true for daycare/childcare services, whose work increases when the economy turns sour and parents return to the workplace. (With the exception of the pandemic-driven 2020 recession, of course!)
If I could sum up the economic outlook of kid products in one statistic, it would be this: spending on children’s nonfiction books grew 66% in 2020.
12. Food and drink
Food and drink continue to be essentials during economic downturns. You may think that consumers turn to rice, potatoes, and tap water when money is tight, but this isn’t always this case! Many times, luxury food and drink products perform well for a few reasons:
- People need comfort (like with candy).
- Luxury goods still have some demand (like cosmetics).
- Fancy food and drink products are still cheaper than dining out.
That’s surprisingly good news for business owners who specialize in trendy products like organic flaxseed, hemp, and chia kombucha.

13. Kitchenware
You know how people don’t eat out as much during recessions. Well, even cooking from home isn’t a free activity. You have to buy the food, of course, but you will need supplies too. That’s why kitchenware tends to perform pretty well during recessions.
In particular, mason jars, silicone molds and spatulas, spiralizers, skillets, flatware, and oven mitts all sell well online and do well in recessions.
14. Sports and fitness products
Gym memberships are expensive. That’s why it’s hard to justify maintaining one during a recession like 2001 or 2008-2009, let alone a pandemic-driven one like 2020.
But people still want to stay fit, so they end up keeping their routines going at home. When recessions strike, that opens up lots of market opportunities in the fitness sector. You can sell resistance bands, exercise balls, yoga mats, sports apparel, and more online. That way people can maintain their active lifestyle while still pinching pennies!
15. Home renovation and repair supplies
During the 2008 financial meltdown, a lot of people did not want to buy houses for obvious reasons. But people still wanted to improve their surroundings, which led many people to remodel their homes even during 2008 according to industry experts.
And, of course, during the 2020 recession, many people started renovating their homes since they were stuck there all the time!
Today, rising material costs from tariffs and supply chain issues also encourage smaller, DIY-friendly projects over major renovations. This is to say nothing of upper middle class homeowners who may prefer to invest in their own home rather than a volatile market.
Now bear in mind that not every renovation involves adding a new roof, breaking down walls, or adding granite countertops to the kitchen. A lot of home renovation is cheap and involves products that can be easily sold online.
To name a few: artwork, pillows, lamps, small furniture, bedding, curtains, and general home decor. This is a fairly easy sector to break into, and you can even dropship some of these items.
16. Highly niche products
It’s enormously difficult to get a hardcore fan of something to leave their money in their wallet, even if their wallet is a bit lighter than usual.
Brandon Hartman, Founder of BeyWarehouse, says that “our main offering [of Beyblade toys] is one such example. During the pandemic, we experienced slight but nonetheless unexpected growth in sales even as the economy ground to a halt and eCommerce reeled from the supply chain crisis.”
This is consistent with his overall belief that highly-niched products tend to do well even during recessions because of their large fanbases and communities.

Final Thoughts
Even if the economy is terrible, you can still launch products and succeed. If the economy tanks tomorrow and you’re selling a lot of different items, you might even find some doing better than you’d expect.
It’s important to understand the dynamic behind all this. Necessities are still necessities even if the unemployment rate is high. “Little luxuries” will still be in demand when “big luxuries” are not affordable. And hardcore fans will keep buying niche products, even when they have less cash to spare.
We hope this list inspires you to make your business a little more resilient against recessions!
How do you know when you need help with order fulfillment? It’s not an easy call. But deciding when to outsource order fulfillment is absolutely critical if you want to grow your business and keep it running efficiently.
As your business scales, shipping physical products becomes increasingly difficult. So does handling the logistics in-house. This can quickly become overwhelming and expensive.
Order fulfillment partners can help streamline operations, reduce costs, and improve customer satisfaction. Knowing the signs that indicate the need for outsourced order fulfillment will help you make an informed decision when the time comes.
6 Signs Your Business Needs to Outsource Fulfillment
Outsourcing fulfillment can significantly benefit your business. But knowing when it’s time to do this isn’t easy.
Below, you will find a list of signs that your business needs to outsource fulfillment. If you say “yes” to any of these, it’s probably time.
#1: Your customer base is growing faster than you can keep up.
As your order volume increases, it becomes harder and harder to keep up with demand. But once you are set up with an order fulfillment partner, a surge in the size of your customer base doesn’t have to mean hours spent packing boxes in your home office.
Order fulfillment companies can easily handle large volumes of orders. That way, they all go out in the mail on time and to the right address, keeping your customers happy and loyal.
#2: You are unable to quickly and accurately ship orders to customers.
If you can’t ship orders out on-time or to the right address, then you need help. If you even suspect that your order fulfillment process is becoming slow or inaccurate, it’s time to consider outsourcing.
Delays and mistakes can frustrate customers and damage your reputation. Fulfillment companies specialize in quick and precise order processing, helping you maintain high service standards and customer satisfaction.
#3: Your staff are overworked.
When your employees are overwhelmed with fulfillment tasks, their productivity in other areas can suffer. This overload can lead to burnout and decreased morale.
Outsourcing fulfillment can free up your team to focus on core business activities, improving overall efficiency and job satisfaction.
#4: Your business feels overly complicated.
As your business grows, it becomes more complex. This increased complexity can weigh heavily on your mind and you may feel like you can never reach the end of your to-do list!
There are a lot of aspects of in-house fulfillment that can be hard to manage. If you have a lot of SKUs, ship internationally, or have special packaging requirements, this can all add to the complexity.
A dedicated fulfillment partner can handle these complexities for you. That way, you can concentrate once again on strategic growth and business development.
#5: Shipping costs are adding up.
Postage and supplies are expensive. Shipping costs can eat into your profits, especially in eCommerce.
Fulfillment companies almost always get bulk shipping discounts because of the sheer order volume they handle. The same is true of supplies like boxes and other packing materials.
But fulfillment companies are also very competitive, and cannot simply pocket the savings for themselves. They often split the difference with their clients.
By outsourcing, you can take advantage of these cost savings, improving your bottom line and offering competitive shipping rates to your customers.
#6: You are running out of storage space.
If you run out of space to store your own items, you need help. Storing products in-house can clutter your workspace and limit your operational capacity. When you outsource to an order fulfillment center, they handle the inventory management for you and that can free up a lot of space.
How Order Fulfillment Services Are Priced
Order fulfillment pricing can seem complicated. That’s because order fulfillment services are priced based on several factors.
These factors include account or storage fees, the number of packages shipped, postage, supplies, and pick and pack fees. Understanding how fulfillment pricing works will help you estimate fulfillment costs and decide whether or not outsourcing fulfillment is financially sensible.
Order fulfillment pricing can generally be understood by using the following formula:
Fulfillment Cost = Account/Storage Fees + (Packages Shipped * (Postage + Supplies + Pick and Pack Fee))
In the following sections, we break this down further.
#1: Account/Storage Fees
Account and storage fees are the baseline costs for holding your inventory. These fees cover the space your products occupy in the fulfillment center. They vary based primarily on the amount of space required. However, for some special cases like hazardous or refrigerated materials, there may be additional upcharges.
#2: Packages Shipped
When it comes to calculating order fulfillment costs, the number of packages shipped is the most important factor. The more you ship, the more postage and supplies you need. Plus, fulfillment centers charge a fee for each package they handle. So as they handle more packages, you pay more of these fees as well.
In short, the more you ship, the more you pay.
#3: Postage
Postage costs are the fees associated with shipping your items to customers. Fulfillment centers often negotiate bulk postage rates, which can be significantly lower than standard retail rates.
Like with retail postage, the most important factors here are the size and weight of the package to be shipped, as well as the destination.
Heavy and large items shipped long distances cost more. Smaller, lighter items shipped short distances cost less.
#4: Supplies
Supplies costs cover the materials needed for packing and shipping, such as boxes, bubble wrap, and tape. Basic materials are typically included in the pick and pack fee (discussed below), but special packaging requirements may incur additional charges.
#5: Pick and Pack Fee
The pick and pack fee is the cost of retrieving items from storage, packing them, and preparing them for shipment. This fee covers labor and basic materials for each order processed. Think of this as the cost to have a human being put your items into a box and get them in the mail on your behalf.
How Outsourcing Fulfillment Can Save You Money
Saving time and running your business more efficiently are good enough reasons to outsource fulfillment on their own. However, outsourcing fulfillment can – in some scenarios – save your business a lot of money.
These cost savings come from bulk postage rates, reduced supply costs, and better labor allocation. Understanding where these cost savings come from is worth it, since they can help you see whether or not outsourcing fulfillment will be financially beneficial rather than merely an operational necessity.
#1: Fulfillment centers get bulk discounts on postage and supplies.
Fulfillment centers usually have lower postage rates because they ship so many packages. Carriers are more willing to cut them a price break. The same principle applies to supplies, which are purchased in massive bulk quantities.
Because the fulfillment industry is competitive, these savings are passed on to you, which can reduce your shipping and material expenses. Over time, these savings can really add up!
#2: Order fulfillment companies have staff that dedicate 100% of their time to shipping.
Outsourcing fulfillment allows you to reallocate labor to more valuable tasks. Employees can focus on revenue-generating activities instead of packing and shipping orders. This improved labor efficiency can lead to higher productivity and profitability.
#3: You can cut down on training and overtime costs related to shipping.
Fulfillment centers handle all aspects of order processing, reducing the need for overtime and extensive training. That means if you or your staff are doing overtime shipping packages, you can stop!
Cutting down on overtime, or even time spent training employees on how to ship, can save a lot of money. This isn’t just because it helps keep wages in check, but it also helps smooth out your workflows.
#4: You no longer have to purchase your own supplies.
Outsourcing eliminates the need for purchasing packing supplies like bubble wrap, boxes, and tape. These costs are largely covered by the fulfillment center and included in the pick and pack fee. This reduces your overall expenses and simplifies budgeting.
#5: You may be able to reduce storage costs.
Storing inventory in a fulfillment center can be more cost-effective than renting additional space. You avoid the expense of storage units and the hassle of managing inventory on-site. This can free up valuable workspace and reduce overall costs.
#6: Order fulfillment partners are generally more efficient.
Outsourcing streamlines your operations, making them more efficient. With professionals handling fulfillment, you reduce errors and improve workflow. This allows you to focus on core business activities instead of shipping.
#7: More consistent shipping experiences can reduce customer turnover.
According to eCommerce delivery platform, FarEye, 85% of customers will not shop again with retailers after negative shipping experiences. This is really bad, since acquiring new customers is far more expensive than retaining them.
Fulfillment centers ensure faster, more reliable shipping, improving customer satisfaction and retention. This reduces refund requests and increases repeat business.
#8: More consistent shipping experiences can improve customer retention.
Reliable fulfillment improves customer satisfaction, leading to higher retention rates. Happy customers are more likely to make repeat purchases and recommend your store to others, boosting your revenue and growing your customer base.
How to Choose an Order Fulfillment Company
Deciding to outsource fulfillment is one thing. Choosing the right company is another.
In order to pick the right one, you will need to consider a number of factors. Among them, include your average item weight and size, shipping volume, number of SKUs, and the location of your customer base. You will also need to make sure that any fulfillment company you choose to work with provides good quality service.
Note: if you import goods internationally, rising tariffs in 2025 could also impact your landed costs before goods even reach the warehouse. It’s smart to factor in total landed costs when budgeting for fulfillment.
Here is a quick guide to help you make the right choice.
#1: Consider the weight and size of your items.
The weight and size of your products significantly impact shipping costs and handling requirements. Select a fulfillment company with experience in your industry.
For example, if you sell small, lightweight items, choose a provider experienced in handling such products. Likewise, if your items are large and heavy, find a partner experienced in managing big and bulky shipments. That way, you can choose a fulfillment partner that provides cost-effective shipping tailored to your needs.
#2: Estimate shipping volume.
Understanding your shipping volume helps in selecting a fulfillment partner that can scale with your business. If you have a low order volume, choose a company with no minimum requirements, allowing you to pay only for the services you need.
For businesses with high order volumes, select a provider capable of managing huge quantities of orders. That way, you can rest easy knowing they can handle your peak times and have capacity for future growth.
#3: Count the number of SKUs you plan to ship.
The number of SKUs you have affects the complexity of inventory management. Choose a fulfillment company capable of handling your SKU count efficiently. If you have a high number of SKUs, find a provider with a flexible system that can manage diverse inventory without additional costs.
This ensures accurate order fulfillment and streamlined operations, preventing issues such as stockouts or mispicks.
#4: Consider where your customers are located.
Customer location is very important when choosing a fulfillment company. Make sure you choose a fulfillment company that has a location which can cost-efficiently ship to most of your customers within a short period of time. This will have a dramatic impact on postage costs, which is almost certainly going to make up the largest percentage of overall shipping costs.
#5: Carefully vet fulfillment centers for service quality and fit.
Vetting fulfillment centers ensures you choose the right partner. Start by researching online reviews on platforms like Google and Trustpilot to make sure their client base is happy.
Request quotes to understand their pricing structure. Make sure they are good communicators and that you feel like you can trust them. Check for hidden fees or long-term contracts that may not suit your business.
But be careful not to just default to the lowest priced option. William Forshaw, CEO of Maxwell Scott Bags says, “I chose a partner based on their warehouse tour and the cheap fees without testing the peak season capacity. Last Christmas, they fell apart and my leather goods clients were getting the damaged packages 3 weeks late because the partner was jamming 10,000 daily orders into a facility that was built for 3,000.”
That’s not a situation you want to find yourself in, so go into the quote process with a “value-for-money” mindset rather than a “bargain hunter” mindset. Cheaper upfront is not always cheaper in the long run!
Finally, test their software for ease of use and functionality. Software is going to be the primary way you interact with the company, so make sure you like what you see.
Final Thoughts
Deciding to work with an order fulfillment partner for the first time can be scary. But once you start shipping a lot of orders on a regular basis, it’s something you will want to think about.
The right order fulfillment company can really help you streamline operations and save money. That can put your company on the path to long-term growth for years to come.
Frequently Asked Questions
Why is order fulfillment important?
Well-managed order fulfillment means that customers will receive their products on time and in good condition. This directly impacts customer satisfaction and brand reputation, not to mention customer retention. Efficient order fulfillment can reduce operational costs, minimize errors, and improve inventory management, leading to better overall business performance and profitability.
Should I use a fulfillment company?
Using a fulfillment company can streamline operations, reduce shipping costs, and improve delivery times. Outsourcing fulfillment allows businesses to focus on core activities like marketing and product development.
Few things are as exciting as shipping your first eCommerce order. Turning your ideas into a physical product and sending it out to customers all over the world feels incredible!
But, shipping eCommerce orders can be tough. Many businesses hire fulfillment centers to help with this. Choosing the right fulfillment center can be overwhelming. Costs vary so much and it’s tough to understand why.
In this article, we’ll demystify the costs of using a fulfillment center for eCommerce. We’ll explain how fulfillment centers price their services and break down the various costs. Then we’ll show you how to estimate the total cost of order fulfillment using quotes and a simple spreadsheet.
How Fulfillment Centers Price Their Services
If you want to compare fulfillment center quotes, you have to understand the general fulfillment pricing model. No two fulfillment centers have identical pricing. In fact, it’s really hard to make an apples to apples comparison.
And even if you could do that, it would still take time to figure out the cost for your particular eCommerce business. There are lots of variables.
There is no one-size-fits-all estimate. Even online fulfillment center price calculators can only give ballpark figures. To understand how order fulfillment costs will look for your business, you have to request personalized quotes from each fulfillment center you are thinking about working with.
Each quote will be structured differently. So you’ll need to compare costs in a spreadsheet in order to understand who is actually offering the best deal.
But even with all the variables and differences between fulfillment centers, they all follow similar logic. Once you understand the logic, then you can understand the quotes.
How To Estimate The Cost of U.S. Tariffs for Ecommerce Fulfillment
Most of this blog post was written before the changes to U.S. trade policy, known as Reciprocal Tariffs. This guide is still up-to-date, but this section was added April 28, 2025.
To make a long story short, once your items are in the warehouse, you can use the information in this guide to figure out what it will cost to ship them out. But these days, getting your items into the warehouse is almost certainly going to be more expensive if you are manufacturing outside of the country.
If that is the case for you, we would like to suggest two tools.
First, use Freightos to figure out what it will cost to arrange the shipment of your items from your manufacturer to your fulfillment center of choice. Then, use SimplyDuty. It’s an excellent online calculator that can be used to calculate customs, duties, and tariffs.
With these tools combined, you’ll be able to back into how much it costs to import your items in bulk. Then, once your items are in the warehouse, you can use the rest of the information in this guide to forecast costs.
Basic Formula for Calculating Order Fulfillment Costs
Order fulfillment pricing can be understood with this formula:
Fulfillment Cost = Account & Storage Fees + ((Postage + Supplies + Pick and Pack Fee) * Packages Shipped) + Value-Added Services
Yes, that’s still pretty complex. Don’t worry, we’ll break this down in the next section!
Breaking Down the Costs
Understanding the individual parts of fulfillment costs will help you make better choices. So we’re going to break down the formula from the previous section part by part.
Account & Storage Fees
Account and storage fees are ongoing costs for keeping your inventory at a fulfillment center. Think of it like rent for your products’ storage space. These fees are usually billed monthly. They will change based on how much inventory you have, the amount of storage you need, and the fulfillment center’s policies.
Account fees depend on the fulfillment center. Some charge a minimum amount per month for account maintenance, which might be waived if your order volume is high enough.
Storage costs are often based on cubic footage or the number of pallets stored. Bigger, bulky items cost more than smaller ones. Some fulfillment centers also charge extra for climate-controlled or special handling storage.
Pick & Pack Fees
Pick and pack fees cover the cost of workers getting each item from your inventory, packing them for shipment, and printing and attaching postage labels. In short, these are labor costs. This fee is applied to each order that gets processed.
If you ship many orders, these costs can add up fast. Many fulfillment centers have a pick and pack fee structure like this:
- Pick and pack fee: $2.50
- Per additional item: +$0.15
High-volume businesses might be able to negotiate a lower pick and pack rate.
Postage
Postage costs vary widely based on the size and weight of your items, where they are being shipped, and the speed of shipping. Fulfillment centers often get lower rates with major carriers like USPS, UPS, and FedEx.
Each fulfillment center has different deals. To know what it will cost to ship items, request rate sheets from your fulfillment centers of choice.
The location of your fulfillment center affects postage rates. Shipping to Europe from the US costs more than shipping within the European Union. Following the same logic, shipping from the US west coast to the east coast will cost more than shipping from, say, New York to New Jersey.
Supplies
Basic packaging supplies are usually included in the pick and pack fee. However, specific packaging needs like branded boxes or environmentally-friendly materials might cost extra. Ask for detailed information if you need specialized packaging.
Value-Added Services
Fulfillment centers offer more than just storage and shipping. They can do custom packaging, kitting, product inspections, and return processing. Prices for these services vary a lot, depending on what you need. Still, it’s important to be proactive and gather this information.
Estimating The Total Cost of Order Fulfillment
To figure out the total cost of order fulfillment, gather quotes from fulfillment centers and use a spreadsheet to compare costs. This method helps you decide which fulfillment center fits your needs and budget best.
Creating a spreadsheet for comparison
Start by listing the rows as Account & Storage, Pick & Pack, Postage, Supplies, and Value-Added Services. The columns should list your fulfillment centers of choice.
Begin by writing down your estimated order volume. This helps in making accurate calculations. For Account & Storage fees, plug in your best estimate based on the quotes received. Do the same for Value-Added Services. These might include special packaging, custom labeling, or return processing.
Next, enter the average pick & pack costs and supply costs per order. These are usually straightforward to calculate based on the quotes. If the fulfillment center charges $2.50 for the first item and $0.15 for each additional item, you can estimate these costs based on your average order size.
Postage is more complex because it varies by destination. To estimate this, calculate the weighted average of postage rates for different destinations. For example, if 60% of your orders ship domestically and 40% internationally, use these proportions to weight the respective postage costs. You might need to create a separate tab to organize these postage rates and their corresponding percentages.
By entering these values into your spreadsheet, you can see the total estimated cost for each fulfillment center. This side-by-side comparison will highlight which provider offers the best value for your specific needs.
Comparing costs
Once your spreadsheet is set up, use it to compare costs side by side for each provider. Pay close attention to any significant differences in fees, especially for services that are crucial to your business.
Remember that actual costs may vary based on factors like shipping destination, package weight, or size. Therefore, it’s wise to build in a buffer for unexpected costs. For instance, you might notice that one provider has lower pick & pack fees but higher storage costs.
Additionally, consider the reliability and reputation of the fulfillment centers. Sometimes paying a bit more for better service can save you headaches in the long run. Look at reviews and possibly even reach out to other businesses that use these services for their feedback.
The goal is not to pick the cheapest option. The goal is to pick a company with competitive prices and good service.
Ultimately, you will want to choose a fulfillment center that offers a reasonable cost and reliable service. This balance will hep you keep your operational costs low. But at the same time, you’ll still keep customers happy.
Hidden Costs to Watch Out For
Even after you compare fulfillment center quotes, unexpected costs can creep up. Many eCommerce businesses don’t realize these fees exist until they show up on their invoice.
But you do have power here. If you know about common hidden costs, you can ask the right questions upfront. This can help you avoid unexpected expenses and make a more accurate fulfillment budget. Always request a detailed breakdown of fees before choosing a fulfillment partner.
With that in mind, here are common costs that tend to fly under the radar during the initial quoting process.
1. Long-Term Storage Fees
If your products sit in a fulfillment center for too long, you may get hit with extra storage charges. Many providers charge higher rates for inventory that remains unsold beyond a certain period—usually 30 to 90 days. Be sure to ask about long-term storage policies before signing up.
2. Peak Season Surcharges
During busy shopping seasons like Q4, fulfillment centers often increase their rates. These peak season surcharges apply to pick and pack fees, storage, and even shipping costs. If your business relies on holiday sales, make sure to factor in these extra costs.
3. Special Handling Fees
Does your product require fragile handling, climate-controlled storage, or unique packaging? Many fulfillment centers charge extra for these services. If you sell breakable or perishable goods, make sure you understand the full cost of storage and handling.
4. Return Processing Fees
Handling returns is rarely free. Some fulfillment centers charge per returned package, while others charge a flat monthly fee for reverse logistics. If your return rate is high, these fees can add up quickly.
5. Labeling and Barcoding Costs
Some fulfillment centers require barcodes on all inventory, and if your products don’t arrive pre-labeled, they may charge you a labeling fee. These costs vary, so check if your provider includes barcode labeling in their pick and pack fees.
6. Kitting and Assembly Fees
If your orders require bundling multiple items together or special packaging before shipping, fulfillment centers may charge a kitting or assembly fee. This is common for subscription boxes or multi-piece product sets.
When to Expand Internationally
Once you understand the basics of order fulfillment pricing, you may be curious to see if you expand to other countries as well. Assuming you’re in the U.S., it might be tempting to also have a warehouse in Europe, Canada, Australia, and other places around the world to provide faster shipping to customers in those countries or regions.
But you need to be careful, because expanding your network too far too fast can become really expensive. According to William Forshaw, CEO of Maxwell Scott Bags, “most companies should hit Australia and Canada before messing with Europe because you do not need to deal with complicated shipping rules.”
In short, it’s OK to concentrate your fulfillment operations in fewer countries and expand later. In fact, that’s often the smartest play.
Final Thoughts
Estimating order fulfillment costs for your eCommerce business can be tricky. But understanding how fulfillment centers set prices and using a simple spreadsheet model can help you make a smart decision.
Customers expect smooth, hassle-free delivery. Provide it, and you set yourself up for long-term success. It’s worth investing the time and effort to get it right!
Frequently Asked Questions
What are fulfillment costs in eCommerce?
Fulfillment costs in eCommerce include all expenses related to storing, packing, and shipping products to customers. This usually covers account and storage fees, pick and pack fees, postage, supplies, and any extra services the fulfillment center offers.
How do you calculate fulfillment costs?
To calculate fulfillment costs, use the formula: Fulfillment Cost = Account & Storage Fees + ((Postage + Supplies + Pick and Pack Fee) * Packages Shipped) + Value-Added Services. Get quotes from fulfillment centers and use a spreadsheet to compare costs side by side.
What is a fulfillment fee?
A fulfillment fee is the charge incurred for processing an order. This includes picking items from storage, packing them securely, and attaching shipping labels. Fulfillment fees vary depending on the number of items per order and the complexity of the packaging required.
Order fulfillment is incredibly important in eCommerce. It affects customer happiness directly. Problems here can cause bad reviews, lost sales, and less brand loyalty.
If you want to avoid these issues, you need to make your order fulfillment process smooth, clear, and reliable. Fixing common problems and giving great service will help you keep up your reputation. And that will help you keep your customers happy and loyal, and your store profitable.
1. Eliminate surprise costs.
The top reason people abandon their online shopping carts is high shipping costs. No one wants to buy a $25 item with a $15 shipping fee.
Many businesses still make this mistake. At the very least, clearly list your shipping prices on your store. This way, people won’t add items to their cart only to back out when they see the total price is too high.
This is the best way to reduce your cart abandonment rate. Use it wisely to increase your revenue with little effort.
2. Offer free shipping.
Free shipping isn’t actually free. When you buy something with free shipping, the seller pays for the postage. No free lunch, right?
But not offering free shipping isn’t free either. About 75% of customers expect free shipping even on orders under $50 according to the National Retail Federation, and this number is rising. This goes back to eliminating surprise costs. Free shipping is the best way to remove unexpected fees for customers.
This tip might not always make financial sense, but if it does, use it. It can reduce your cart abandonment rate, bringing in enough revenue to cover shipping costs. Plus, free shipping makes customers happier with their experience!
3. Use address verification.
Shipping can go wrong if the package goes to the wrong address. You might think this is out of your control, but it’s not.
Address verification helps make sure customers enter the right address. This reduces the chance of sending a package to the wrong place, a mistake that can make customers angry and be expensive to fix.
Shopify users can use the app Streetify, which costs $0.03 per address lookup. WooCommerce users can use Postcode/Address Validation by SkyVerge, costing $49 per year.
These are just a couple of examples, though. There are many apps for Shopify, WooCommerce, and other eCommerce software you might use!
4. Provide expedited shipping options.
Many consumers are willing to pay for fast delivery. About 41% will pay for same-day delivery, and 24% will pay more for delivery within 1-2 hours (source: Conveyco). Also, 70% of US consumers buy from one online store over another because of more delivery options.
So, one of the easiest ways to improve shipping is to offer more options. Next-day delivery through USPS, UPS, and FedEx at a premium is a simple way to let customers choose what suits them.
5. Ship as soon as possible.
One big reason for shipping delays isn’t the postal carriers. FedEx, UPS, USPS, and DHL are pros at delivery. Once you hand over the package, they handle the rest.
But what if you take too long to get a package ready? Miss the cutoff time by a few minutes, and you delay delivery by a whole day! Customers expect two-day delivery now, and anything slower feels like forever.
The solution? Ship orders as soon as they come in or use an order fulfillment service. If you don’t want to drop everything to ship an order, outsource it.
Order fulfillment companies ship packages all day, every day. Postal carriers visit their warehouses multiple times a day, getting your packages in the mail faster and shaving a day off delivery time.
6. Make two-day shipping your default.
Remember how I mentioned that two-day delivery is the expectation now? The data backs me up on this.
Two-day delivery is the new standard. A whopping 79.3% of online shoppers expect it. If you can, make free two-day shipping the default for your business.
7. Provide shipping notifications.
Online shopping is weird because you pay right away but wait days for your package. Customers like to track their orders to feel at ease.
Send tracking numbers and status updates by default. Let customers know when their orders ship and give an estimated delivery date. If something goes wrong, tell the customer immediately. An astounding 98.3% of customers want to be notified if a package is delayed per supply chain firm, Project44!
Keeping customers informed shows you care about their experience, increasing the chances they’ll shop with you again.
8. Don’t be stingy with returns and refunds.
Every year, three billion packages are lost or damaged. This problem comes with handling so many packages daily.
Customers don’t care if UPS damaged the package; it’s your job to fix it. Forty-eight percent of customers returned an item last year, and 80.2% did so because it arrived damaged.
Returns and refunds are tied directly to the shipping experience. Happy with the returns process? Ninety-five percent of shoppers will buy from you again. Unhappy? They’re three times more likely to never shop with you again.
Make returns easy. Allow free returns with refunds for up to 90 days. Let customers print return labels at your expense. Sure, you cover shipping and inventory costs, but you save the customer relationship, which is worth much more in the long run.
9. Pack items properly.
Shipping damage happens, but you can cut the risk with a few tricks:
- Fill empty spaces with bubble wrap, corrugated rolls, or air cushions.
- Use sturdy outer packaging like corrugated boxes.
- Keep liquids away from other items.
- Label fragile packages clearly.
- Separate fragile items within boxes.
These steps reduce the chance of items breaking and needing returns. That means more money stays in your pocket!
10. Provide great customer service.
Even with fast, free shipping, great packing, and a solid return policy, things can still go wrong. When they do, excellent customer service is key to keeping customers happy and coming back.
Offer friendly, accessible support. Have an email, phone number, and maybe even live chat. Make it easy for customers to reach you and solve their problems quickly. It pays off in the long run!
If you plan to hire an order fulfillment center to help with the logistics, this is even more important. William Forshaw, CEO of Maxwell Scott Bags, says that “picking [an order fulfillment company based] on cost per shipment instead of damage rates and peak capacity is pretty bad because one bad fulfillment experience can destroy years that you have spent building your brand. International expansion nearly cost Maxwell-Scott £25,000 in 2020 because Brexit changed everything and EU customers get slammed with customs fees that double product cost.”
The point is: if you hire help, make sure they don’t undermine your efforts to maintain good customer service (such as through poor packaging or shipping practices). Otherwise, your decision to hire cheaper help could end up being more expensive.
11. Brand your packaging.
People form opinions about products in just 3 seconds. Good packaging can make a great first impression. Over 50% of consumers say they’d buy more from a brand with branded packaging, and 68% say it makes a brand seem more high-end.
Represent your store brand right when customers open the box. Use custom packaging like boxes, bags, or bottles.
12. Ask for feedback.
Simple but often forgotten: ask your customers what they think! You can look at statistics all day long but never get a truly good feel for what your specific customers truly want.
The easiest way to find out is to simply ask them! Send out automated surveys so you can learn more about what you’re doing well and what you’re not. Then you can lean into your strengths and resolve your weaknesses.
If you follow tips like these, you’re likely to start converting more traffic and retaining more customers. But things will still go wrong from time to time, so here are some tips to help you handle occasional customer service issues as they arise.
7 Tips For Handling Customer Service Issues
Even if you prepare everything correctly, items will still break in the mail and get lost. Not often, but sometimes!
Because of that, you need a plan to handle issues when they come up. Here’s how you can do that.
1. Respond promptly to customer inquiries.
Quick responses can stop small issues from turning into big headaches. Imagine a customer with a simple question about their order. If they get an answer fast, they’re happy. If not, they might get frustrated.
Make sure your customer service team is always ready. They should be available and alert, ready to jump in and solve problems as soon as they arise.
2. Offer clear and proactive communication.
Keep your customers in the loop. Regular updates about their order status are crucial. Did something go wrong? Is there a delay? Tell them right away! Explain what happened and what you’re doing to fix it.
This kind of transparency builds trust. Customers feel reassured when they know you’re on top of things, and their frustration levels drop.
3. Provide multiple contact options.
Make it super easy for customers to reach you. Some people prefer email, others like to call, and many love live chat. Offer all these options and more if possible.
Accessibility is key. When customers can contact you easily, issues get resolved faster, and everyone’s happier.
4. Empower your customer service team.
Give your customer service reps the power to make decisions. They should be able to solve problems on the spot without always having to ask a manager.
Empowered employees are more confident and can provide quicker, more satisfying resolutions. When your team feels trusted, they work more effectively and customers benefit from faster service.
5. Offer compensation for significant issues.
Sometimes, things go really wrong. In these cases, consider offering compensation like refunds, discounts, or free products. This can turn a bad situation into a positive experience.
Imagine a customer receiving a damaged product. A quick refund or a discount on their next purchase can make them feel valued and understood, keeping them loyal to your brand.
6. Track and analyze customer complaints.
Keep a close eye on customer complaints. Record them, analyze them, and look for patterns. Is there a common issue popping up? Understanding these problems helps you fix them at the source.
Addressing recurring issues will prevent future complaints, making your overall service better and more reliable.
7. Follow up with customers.
After you’ve resolved an issue, don’t just leave it there. Follow up with the customer to ensure they’re happy with the resolution. This extra step shows that you care about their experience.
It’s a small gesture that can make a big difference. Customers appreciate knowing that their satisfaction matters to you.
Final Thoughts
Fast, competent order fulfillment and responsive customer service are both essential for keeping customers happy. Doing both of these things well can play a huge role in whether customers come back to shop more in the future.
Preventing shipping issues and addressing them quickly when they arise will allow you to build a strong reputation and increase customer loyalty. When in doubt – act like the kind of company that you want to shop from!
Words sell. But only if you use them well. Ecommerce copywriting is a tricky skill to master, but the basics are easy to understand.
Well-crafted copy can be the difference between a sale and a lost opportunity. A successful product line and a dud. A thriving business and a dead one.
In this article, we’ll teach you how to make your copy more persuasive so you can win customers and keep them loyal.
Understanding the Basics of Ecommerce Copywriting
Ecommerce copywriting is basically just writing, but used for the purpose of promoting and selling products online. It includes product descriptions, landing pages, and other written content aimed at convincing customers to make a purchase.
Effective copywriting attracts attention, builds trust, and encourages conversions. Ineffective copywriting makes people zone out, doubt your value, and makes them click the X button on the tab.
And it’s here that I’m reminded of when Michael Alexander, Managing Director of Tangible Digital, told me that “the extra procedure, the extra click, the extra distraction, is a silent slayer of the deals. The clear and simple companies are the ones that are found to be the most profitable.”
That axiom is as true in copywriting as it is in user experience design.
Bearing that in mind, here are some practical ways you can improve the copywriting on your eCommerce store.
Crafting Compelling Product Descriptions
People read product descriptions before they buy. As a result, these descriptions play a big role in convincing customers to make a purchase…or not. So product descriptions needs to be engaging, informative, and focused on the benefits of the product.
Below, we’ll share a few quick examples on how that works in practice.
#1: Focus on benefits, not just features.
Highlighting benefits that speak to customers’ real needs is key. Instead of simply listing features, explain how the product solves problems or improves the customer’s life.
For example, instead of saying “This jacket is waterproof,” say “Stay dry and comfortable even in the heaviest rain with our waterproof jacket.”
The goal here is to paint a vivid picture. You want the customer to imagine themselves staying dry and cozy in a downpour. When you do this, you help your customer think about how the product will function in their day-to-day life.
#2: Use persuasive and descriptive language.
“This sweater is soft.”
“Experience the luxurious softness of our cashmere sweater, perfect for cozy winter evenings”
That second quote felt more persuasive, didn’t it? And it’s not just because the second option is more benefits-focused, although that definitely helps.
When you look at the second version of the copy, it makes you feel something. It puts an image in your mind and stirs up emotions. That makes the product a lot more appealing.
“This sweater is soft” is something you think when you’re feeling shirts at the thrift store. But “perfect for cozy winter evenings” is what you think about when it’s December, it’s snowing, and you’re snuggling on the couch with your loved ones.
This is how you turn a description into an invitation.
#3: Be concise yet informative.
So far, you might be tempted to think that flowery language outsells plain descriptions. But that’s not the case.
You need to balance between providing enough information and keeping it succinct. The trick here is to avoid overwhelming the reader with too much detail, but still make sure they have all the necessary information to make an informed decision.
Consider using bullet points and short paragraphs to make the content easy to read and digest. For example, instead of a long-winded paragraph about a phone’s features, use a list:
- Battery Life: Lasts up to 48 hours on a single charge.
- Camera: Capture stunning photos with a 12MP dual-lens camera.
- Storage: Available with 64GB, 128GB, or 256GB of storage.
This format is easier to scan and helps customers quickly find the information they need.
Enhancing Usability and Readability
Good copy is easy to read. But it’s also easy to use, which means it is practical.
That means your copy needs to give your customers what they need to find and understand the information they want before they make a purchase.
The principle here is simple – if customers that can easily find and understand the information they need, then they will naturally be more likely to make a purchase.
#4: Use bullet points for clarity.
We mentioned this in the previous tip, but it bears repeating.
Structure information in a digestible format by using bullet points. This helps highlight key features and benefits, making it easier for customers to scan and absorb the content quickly.
For example, list product specifications or unique selling points as bullet points to enhance clarity and readability. Instead of a dense block of text, you could write:
- Material: 100% organic cotton.
- Fit: Slim fit, tailored for a modern look.
- Care: Machine washable, easy to maintain.
This way, the information is clear and immediately accessible.
#5: Maintain a consistent voice.
Having a consistent brand voice across all content reinforces your brand identity and builds trust with customers. Whether your brand voice is casual, professional, or playful, ensure it remains uniform in product descriptions, emails, and social media posts.
Consistency helps create a recognizable and reliable brand image. For example, if your brand voice is friendly and approachable, your product description might say, “Our jeans are perfect for every adventure, from casual Fridays to weekend getaways,” and your social media might follow with, “Ready for the weekend? Our jeans sure are!”
#6: Optimize for readability.
Make your text easy on the eyes by using short paragraphs, varying sentence lengths, and plenty of white space. Use subheadings to break up long blocks of text and improve the flow.
Choose a readable font size and style, and avoid cluttering the page with too much information at once. Instead of a long, unbroken paragraph, break it up:
Comfortable and Stylish Our sneakers are designed with both comfort and style in mind. Whether you’re hitting the gym or going for a casual walk, you’ll love how they feel.
Durable and Long-Lasting Made from high-quality materials, these sneakers are built to last. You can trust them to keep up with your active lifestyle.
This structure makes the content much more inviting and easier to read.
Using Psychological Triggers
Good copy is compelling. But to know what’s compelling, you need to use psychology. There are certain triggers you can use in your copy that will motivate customers to take action and make a purchase. Here are a few that come to mind.
#7: Use urgency and scarcity.
Procrastination kills sales. You need to create a sense of urgency and scarcity to encourage immediate purchases.
Phrases like “Limited time offer,” “Only a few left in stock,” or “Sale ends soon” can prompt customers to act quickly to avoid missing out. Highlight time-sensitive deals and limited availability to drive sales.
For example, if you’re selling a popular toy during the holiday season, you could say, “Only 5 left! Order now before it’s too late!”
This makes customers feel the pressure to buy right away, fearing they might miss out if they wait too long.
#8: Use social proof.
Use testimonials, reviews, and ratings to build trust and credibility. Sharing positive feedback from other customers can reassure potential buyers of the product’s quality and your brand’s reliability. Use quotes from satisfied customers and display ratings prominently on product pages.
For instance, include a customer review saying, “These shoes changed my life! Super comfortable and stylish,” along with a 5-star rating. Seeing others’ positive experiences makes new customers more confident in their purchase.
#9: Appeal to emotions.
Connect emotionally with readers by addressing their desires, fears, and aspirations. Use storytelling techniques to make your products more relatable and appealing.
Let’s say you’re marketing a new pair of noise-canceling headphones. You could describe them as, “Your personal escape into a world of clarity and peace. Perfect for drowning out the bustling noise of daily life, these headphones let you immerse yourself in your favorite melodies or podcasts.”
If you’ve made it this far, then you probably noticed that this combines the vividness and benefits-focused language of tips #1 and #2. But there’s more going on than that. This picks a specific feeling – a desire for peace – and completely focuses on it. That’s how you can make an effective appeal to emotion.
SEO Best Practices for Copywriting
You’re not just writing for people on the internet. You also need to write for robots.
Ecommerce copy needs to work well in search engines. Do this right and you can drive more organic traffic and boost sales.
Here’s how you can do that without making it feel overly-optimized or robotic.
#10: Include targeted keywords naturally.
Work keywords seamlessly into your copy without compromising readability. Use keywords in product titles, descriptions, and headers. Be sure they flow naturally within the context.
For example, instead of keyword stuffing, write: “Our organic cotton T-shirts are perfect for eco-conscious consumers looking for stylish comfort.” This not only includes the keyword “organic cotton T-shirts” but also adds context that appeals to the target audience.
When in doubt, read your copy out loud. If it feels like you’re repeating yourself too much, then you are probably overdoing it on keywords.
#11: Use SEO-friendly headings and titles.
Write headings that improve SEO and attract readers. Use relevant keywords and make headings clear and informative. For instance, “Top 10 Summer Shoes for Women” is better than “Summer Shoes” because it is specific and keyword-rich, making it more likely to rank well in search results.
Being specific helps search engines understand what your content is about and can improve your page’s ranking.
#12: Optimize meta descriptions and titles for search engines.
Create compelling meta descriptions and titles that include targeted keywords. These should accurately reflect the page content and entice users to click.
For example, a meta description like “Shop our wide range of eco-friendly T-shirts made from organic cotton. Perfect for a sustainable lifestyle!” can boost click-through rates. People can see what the page is about before they click.
This description tells potential customers exactly what they can expect while incorporating relevant keywords, making it attractive to both search engines and users.
Continuous Improvement and Testing
Even if you write the perfect copy today, it won’t be perfect tomorrow. You have to change things up regularly. That’s how you keep copy effective and relevant.;
Here is how you can tweak your copy while making sure you don’t break what’s working.
#13: A/B test different copy versions.
Use A/B testing to compare different versions of your copy. Change one element at a time, such as headlines or call-to-action phrases, and see which version performs better.
This method helps you understand what resonates with your audience and continually improve your copywriting efforts. For example, test two headlines: “Grab Your Discount Now!” versus “Limited Time Offer – Shop Today!”
When you see which one gets more clicks, you learn what drives your customers to act.
#14: Gather and act on customer feedback.
Collect feedback from customers to identify areas for improvement in your product descriptions and other copy. Use surveys, reviews, and direct feedback to understand customer preferences and pain points.
Make changes based on this feedback to enhance the effectiveness of your copy. For instance, if multiple customers mention that they love the softness of your T-shirts, highlight the softness in your product descriptions.
Naturally, not every change can be fixed with a copywriting update. But collecting the feedback will help all the same. After all, if your customers want more color options, collecting feedback will give you a sign that it’s time to expand your color palette.
Advanced Copywriting Techniques
The following tips require a greater understanding of the basics of copywriting. But if you can work these techniques in naturally, you can enhance your eCommerce copywriting even more, which will help drive sales.
#15: Tell a story with your copy.
Use storytelling to create a memorable brand experience. Share stories that highlight the benefits of your products or your brand’s mission. For example, describe how your product was developed to solve a common problem, connecting with customers on an emotional level and making your brand more relatable.
Imagine saying, “Our founder created this eco-friendly backpack after struggling to find a durable, stylish, and sustainable option. Now, you can carry your essentials guilt-free!”
#16: Integrate multimedia elements.
You can sell even more by pairing written content with images, videos, and audio. Visuals can make your copy pop and help explain product features better.
Use high-quality images and demo videos to provide a richer, more interactive experience for your customers. This can increase time spent on your site and improve conversion rates.
As an example, you could use a video showing how to use a multi-functional kitchen gadget can be far more persuasive than a written description alone.
Final Thoughts
When in doubt, keep your copy clear, concise, and compelling. You want to give people reasons to trust you enough to give you their hard earned money.
Ecommerce copywriting is not an easy skill to master. But it’s easy to start and mastering it is worth the time.
If you can master eCommerce copywriting, you’ll increase sales, engage your customers, and you may very well build a successful business as a result. Naturally, this is a skill you will need to practice again and again to truly master. But starting from scratch is intimidating, so hopefully the tips in this guide will help ease that learning curve for you!
Additional Resources
To further improve your copywriting skills, consider these resources:
- Copyblogger for in-depth articles and tips on copywriting.
- HubSpot’s Content Marketing Course for comprehensive training.
- Yoast SEO Blog for SEO best practices and tips.
- Grammarly for writing assistance and grammar checks.
- Ahrefs Blog for advanced SEO and marketing strategies.
Building an eCommerce empire requires a lot of steps. You need to sell amazing products, create a great website, and set up shop with all the right marketplaces like Amazon and Walmart Marketplace.
But even if you do all of these things well, you won’t get far without an eCommerce marketing plan. There are a million ways you can market an eCommerce store, so sometimes it helps to look at your options and pick ones that feel like the right fit.
To help you do that, we’ve compiled this list of eCommerce marketing tips. These tips will help you avoid common mistakes, build a brand, retain customers, and grow your customer base.
20 tips to avoid common eCommerce mistakes
Sometimes, the easiest way to make a great marketing plan is to consider all the ways that marketing typically goes wrong. Seemingly small mistakes can derail otherwise great marketing plans. That’s why we’ve started with these first 20 tips to help you avoid the kinds of problems that tank your sales from day 1.
#1: Sell products that meet an existing market need
You can’t sell products unless there’s a real market need. Make sure every single product you sell has real product-market fit. If you can’t tell who a given product is supposed to be targeting, don’t sell it!
#2: Develop a clear marketing funnel
Your eCommerce operation needs to be optimized from the start to turn visitors into buyers. According to the classic AIDA model, there are four steps in the marketing funnel: attention, interest, desire, and action. You need to know how your store will draw attention, create interest, build desire, and encourage action.
#3: Keep customer acquisition cost (CAC) in check
Your average customer will spend a certain amount of money on your store. That’s your average order volume (AOV). The amount of money you spend to win new customers needs to be much cheaper than that. Otherwise, high customer acquisition costs (CAC) will destroy your profits.
But important as this is, you should know that customer acquisition cost will ultimately bottom out. And at that point, you’ll need to shift your focus to retention.
“Acquisition is expensive, so real growth comes from retention. The goal isn’t just to get a customer: it’s to keep them,” says Danyon Togia, Founder of Expert SEO. “That means building a genuine connection through follow-up personal emails, loyalty programs, referral incentives, and expanding into products or services that serve them over time.”
He goes on to clarify that, “from a marketing perspective, the most powerful long-term play is content marketing. High-quality content (whether it’s blogs, videos, or social) creates trust at scale. When paired with SEO, those assets keep working for you 24/7, building relationships and generating sales long after they’re published.”
#4: Define your target market clearly
Who are you selling to? You need to be able to answer that question at length and in a great amount of detail. Everything you sell needs to be something that someone in your target market would plausibly want to buy.
If you’re not sure how to do this, consider creating a buyer persona. This can help you imagine your target audience as individuals and not abstractions.
#5: Use content and social media marketing
Content and social media help increase your visibility in search engines and on social media platforms. This can be a good way for people to discover your brand and start a relationship.
The trick: create valuable content on a regular basis. That way, everything you do is useful and that will help you attract and retain your audience.
If you’re looking for content ideas, SEO Consultant, Jase Rodley, suggests that “BuzzSumo is [an] underutilized tool that allows you to see what content performs well in your niche and create more engaging marketing materials.”
“Create a mix of evergreen and seasonal content to maintain steady traffic year-round while capitalizing on holiday trends,” says Paul Jozsef of Digital Practice. “This dual approach ensures you’re prepared for peak and quiet seasons.”
#6: Write effective and engaging product descriptions
Clear, specific product descriptions improve sales. Longer descriptions are generally better, since details can help handle customers’ potential objections and convince them to buy.
Highlight key features and benefits. That can help potential buyers make their decision. For apparel and similar products, provide clear sizing charts to help smooth out the buying process.
Over time, make a habit of testing different descriptions to find what works best with your audience.
This is a big topic, so check out our guide on eCommerce copywriting for even more specific tips.
#7: Organize product categories clearly
Your store needs to be easy to navigate. Clear product categories help tremendously with this. Use simple, intuitive labels to help shoppers find what they need quickly. This will increase their odds of making a purchase.
#8: Use high-quality product photos
Buying online is an act of trust. High-quality photos will boost buyer confidence, making it more likely that they click the buy button. Good photos can also help reduce returns since customers know what they’re buying.
In general, use photos that are clear, honest, and effectively show off the product. You want your customers making informed decisions.
#9: Simplify website navigation
This is a simple tip, but it’s important. Make your navigation menu simple. Every word needs to be crystal clear and you should avoid using too many submenus.
#10: Avoid a crowded website design
A clean, uncluttered website will help sales. Shoppers will be more easily able to find what they need. It will be more visually appealing. Plus, it will likely load faster as well.
When in doubt, simplify the layout to make it easy for customers to find and purchase products.
#11: Make sure your website works on phones
Responsive websites work well on all devices. This is key for setting a good user experience. More people shop on mobile devices than desktops and laptops, so you can’t skip this step.
#12: Optimize your website for search engines
SEO improves your site’s visibility in search engine results. Make sure you optimize your content, use relevant keywords, and improve site speed. This helps attract more organic traffic and increases your chances of converting visitors into customers. One free tool you can use to help with this is SEO Site Checkup.
“SEO is a constant task to be practiced 12 months a year,” says Michelle Symonds, Founder & CEO at Ditto Digital. This is the case “even if you are working on ranking keywords that will be used in holiday seasons. Outcomes are not quick or easy, so you can’t just ‘turn on’ Black Friday SEO in early October. That’s all. Your email, paid ads, and other channels should increase during peak seasons.”
#13: Simplify the shopping cart process
It needs to be easy to check out. Make sure your shopping cart allows checkout in the fewest amount of steps.
Above all, make sure users do not have to create an account in order to make a purchase. (No one wants to make an account.)
#14: Avoid surprising customers with hidden fees
Hidden fees can scare off customers and lead to cart abandonment. Be transparent about all costs upfront. If additional charges – particularly shipping charges – are necessary, clearly display them early in the checkout process to maintain trust and reduce drop-offs.
#15: Provide clear return policies and details
Clear return policies build customer trust. According to Ecommerce Fastlane, over 60% of individuals will examine the return policy before purchasing.
Make sure your return policy is clear, easy to find, and in line with customer expectations. This can help increase the amount of purchases completed.
#16: Invest in a professional logo
A professional logo enhances your brand’s credibility and memorability. Invest in a well-designed logo that reflects your brand’s identity.
A strong logo can make your site look more professional and help customers remember your store.
If nothing else, follow this tip because it’s weird when companies don’t have logos.
#17: Prioritize customer privacy and security
With data breaches becoming more common, customers are starting to worry more about their data. Preempt their concerns by keeping your store secure and personal information private.
Make sure your privacy policy is easy to find as well. This may not increase sales in the short run, but it can help reduce the risk of catastrophic problems in the long run.
#18: Offer excellent customer service
Good customer service is absolutely essential for customer retention. Be responsive to inquiries and resolve issues promptly. Remember: 89% of consumers are more likely to make another purchase after a positive customer service experience according to Salesforce Research.
This extends to the experience provided by your website as well. “User experience is at the core of eCommerce sites’ operations,” says Brandon Schroth at Reporter Outreach, “therefore, it should be a priority among eCommerce businesses, especially during peak seasons.”
#19: Showcase reviews and testimonials
When asked about SEO best practices, Paul DeMott at Helium SEO said that “I’d also recommend leveraging social proof, like reviews or user-generated content, to enhance trust [especially during the holidays].”
Reviews and testimonials provide social proof, helping potential customers trust your products. When you get a positive review, put it on your product pages to help increase the odds of customers making a purchase!
It’s also a good idea to encourage satisfied customers to leave reviews. That way, you can increase the material you have available to act as social proof.
If you want to put this into practice, set up an automated email to ask for reviews a few weeks after a purchase. It won’t be long before you have plenty of reviews to choose from.
#20: Ensure a smooth shipping and fulfillment experience
Fast and reliable shipping is key. Customers expect quick delivery times and intact products. According to Ipsos, “85% of online shoppers say that a poor delivery experience would prevent them from ordering from that online retailer again.”
Work with reliable fulfillment partners to ensure a seamless shipping process. If you can provide two-day shipping to most of your customers, even better!
6 tips to build your ecommerce brand
If you sell online, it’s easy for your brand to be overlooked. Customers might say “I bought this on Amazon” or “I bought this on eBay.”
However, if you’re proactive, you can increase the odds that people remember your brand name. A strong brand helps you stand out among your competitors. Once you do that, your commitment to consistency, quality, and real relationships will help carry customer retention.
Below are some tips on how you can build a memorable brand.
#21: Pick a consistent style and stick to it
Consistency in branding helps build recognition. Choose a style for your logo, colors, and typography, and use it across all marketing channels.
Yes, this is a simple tip. But consistency is the bedrock foundation that makes brands memorable and trustworthy. You can’t skip this part!
#22: Build real relationships with customers
Real relationships go a long way online. When possible, personalize your communication and provide great service. Show your customers that you value their business, and they will be more likely to shop with you again.
#23: Focus on product quality
It’s hard to build a brand if your products are not high quality. Make sure your regularly review and improve your products to meet or exceed customer expectations. That way, you can keep customers happy and count on their repeat business.
#24: Test and refine your brand messages
You need to regularly test your brand messages to make sure they still work with your audience. Use A/B testing, surveys, and focus groups to see what works best.
If you’re not sure how to do this, PickFu is a good tool to start with.
#25: Customize your packaging
Even if you sell on Amazon where your brand is not readily visible, you can always use packaging to your advantage. Customizing your packaging is an easy way to get customers to see your brand name and make a good impression.
Plus, if you customize your packaging, you have a chance to control the unboxing experience. That can help increase your visibility online as well.
#26: Use shipping as a branding opportunity
Fast and reliable shipping boosts your brand’s reputation. Make sure packages arrive quickly and in good condition.
If possible, you may even want to add personalized touches during the shipping process. For example, a handwritten note slipped into the box before mailing can go a long way!
13 tips to retain ecommerce customers
According to Harvard Business School, a 5% increase in customer retention can increase profits by anywhere from 25 to 95%. Customer loyalty is that important!
For this reason, much of your eCommerce marketing needs to be based on maximizing customer retention. Below are some tips on how you can do that.
#27: Develop a strong brand presence
A strong brand presence dramatically increases your odds of high customer loyalty. Reread the branding section if you haven’t already and make sure that you routinely carve out time to improve your brand messaging.
If nothing else, be consistent across all channels. You need your brand to be something people easily remember. If you do this correctly, people will remember to shop with you even without prompting.
#28: Understand the entire customer lifecycle
A customer who just found your store has different needs than a customer whose first purchase was four years ago. Think about what customers need at each stage: first contact, first purchase, one year after first purchase and so on.
This is very unique to your business and is worth thinking about so you can build a long-term strategy. To help explain this concept further, we’ve included a longer video below.
#29: Track and analyze customer behavior
Tracking customer behavior will tell you a lot about their preferences and buying habits. At a minimum, set up Google Analytics so you can gather data and understand your users’ shopping habits.
#30: Personalize the customer experience
The more personal you can make your eCommerce store, the better. You can use data to tailor recommendations and offers, as well as what kind of communication you send and when.
Personalizing eCommerce makes customers feel like you are reaching out for good reason and with their best interests in mind. And who wouldn’t want to shop with a store like that?
#31: Allow guest checkout
Guest checkout reduces friction in the purchasing process. According to Pymnts, three quarters of eCommerce shoppers pay via guest checkout. It’s better not to go against the grain on this.
#32: Roll out a loyalty program
Offer points, discounts, or exclusive deals to loyal customers. This can help reward repeat purchases and encourage customers to return. When done well, this is a neat way to increase customer retention and overall lifetime value.
#33: Offer freebies and coupons
Freebies and coupons often lead to purchases and repeat business. If you offer limited-time discounts or free gifts with purchases, you’ll find that you can motivate customers to buy more often. After all, it’s harder to procrastinate when you have a coupon that is about to expire!
#34: Cross-sell related products
Suggest related products during the shopping process. For example, recommend accessories or complementary items to enhance the customer’s main purchase. This is an easy way to increase sales.
Plus, you don’t need fancy technology to do this. You can manually set recommendations so that Product B always shows up when customers buy Product A.
#35: Use email marketing
Email marketing is an effective way to engage with customers. Send personalized emails with special offers, updates, and product recommendations. Regular communication keeps your brand top-of-mind and encourages repeat purchases.
Done properly, email marketing can have an ROI of 40 or greater. The reason is very simple. If you can send the right people the right offer at the right time, it’s very easy to make a sale. Email lets you do that and the underlying tech is not expensive to use.
If you have a large mailing list ready to go, the immediacy of email marketing, compared to longer-term efforts like SEO can be highly compelling. To that effect, Tom Jauncey of Nautilus Marketing recommends eCommerce sites balance “their long-term SEO efforts with more immediate marketing tactics like paid ads, email marketing, and social media campaigns.”
He clarifies that “SEO is crucial for organic traffic, but paid and social can give you the immediate results you need when time-sensitive promotions are running.”
#36: Implement a referral program
Referral programs encourage customers to recommend your store to others. You can offer incentives like discounts or rewards for successful referrals. This can expand your customer base and increase sales through trusted recommendations.
There’s nothing better than word of mouth. That’s because marketers can’t force word of mouth to happen. But that doesn’t mean you can’t ask politely!
#37: Consider a subscription-based model
It’s not right for every business, but it might be worth it depending on what you sell. Subscription models provide steady revenue and increase customer retention.
Consider offering products or services on a subscription basis. This will, by definition, keep customers on your books for longer.
#38: Implement a repurchase/replenish model
For consumable products, offer automatic repurchase or replenishment options. This convenience ensures customers always have what they need and encourages repeat orders, boosting sales and customer satisfaction.
#39: Exceed customer expectations consistently
It’s a simple rule, but it works – underpromise, over-deliver. If you exceed expectations on a regular basis, it will make customers more loyal.
Deliver outstanding products and exceptional service. Go the extra mile to surprise and delight your customers. That way, you can encourage positive reviews and repeat business.
9 tips to grow your eCommerce business
If you want to grow your eCommerce store, you need to be strategic. Customer retention is extremely important, so many of the following tips focus on how you can increase customer lifetime value. Other tips focus on making it easier to acquire new customers by getting rid of common obstacles.
#40: Implement a generous return policy
Most customers read return policies before they make a purchase. For that reason, you need to make sure that returns are easy and hassle-free. It’s also likely a good idea to have a long returns window. While 30 days is generally considered standard, one easy way to go above and beyond is to extend the window to 90 days.
#41: Ensure fast shipping
Fast shipping meets customer expectations and enhances satisfaction. According to Forbes, 90% expect 2- or 3-day shipping to be the standard.
Work with reliable carriers and streamline your fulfillment process to ensure quick delivery. Fast shipping can set your store apart and increase repeat purchases.
#42: Reduce the number of choices for customers
Decision fatigue is a real problem. Too many choices can lead to customers not making any choice at all!
Simplify their decision-making process by curating a selection of top products. This reduces decision fatigue and helps customers make quicker, more confident purchases.
#43: Identify and fix sources of cart abandonment
Cart abandonment is a major issue. One of the most important things you can do from a strategy standpoint is figure out why customers add items to their cart and don’t purchase.
You can use analytics to identify where customers drop off and address these pain points. When in doubt, simplify checkout, offer multiple payment options, and make sure you’re not adding surprise shipping fees late in the process.
#44: Increase payment options
Some customers want to pay by credit card, others by PayPal or Venmo. They more payment options you provide, the better. It’s a small detail but it’s so important because it improves the checkout process.
#45: Use lookalike audiences on Facebook
Lookalike audiences on Facebook help target potential customers who are similar to your existing ones. You use existing customer data to create these audiences. That will help you improve the effectiveness of your ad campaigns and increase conversions.
#46: Address customer questions and objections in your copy
The best copywriting answers questions before customers pose them. Make note of the kinds of things your customers often ask about, and see if you can proactively provide information in your copy.
Clear, informative copy helps customers feel good about their purchase. That helps ward off doubts and increase the odds of making a sale.
#47: Have real conversations on social media
This is a simple suggestion, but worth implementing. Have real conversations with your customers and your prospects on social media. Respond to comments and direct messages.
Be genuine in your interactions, and it will help build trust and true relationships.
#48: Separate your SEO and PPC focuses
“Don’t expect one approach to be able to do everything,” says John White of Complete White Label. “Make sure you’re planning in advance to see where one strategy ends and another begins. For example, plugging gaps in your SEO campaign and how that can assist your PPC landing pages, but also putting a line in the sand of where SEO is going to cover what PPC may not.”
He continues, saying “this could be your SEO strategy covering buyers’ guides and informational content, whereas PPC could be more focused on commercial keywords only (e.g. products and categories).”
7 tips to use AI in eCommerce marketing
There was a massive increase in available AI tools around late 2022 and early 2023. While much of the hype has receded, AI is still incredibly useful for cutting down on unnecessary work.
Below, you can find some tips on how to use the recent advances in AI to eliminate the grunt work associated with running an online store.
#49: Implement chatbots for customer service
Chatbots provide instant customer support, answering common queries and guiding users through the buying process. Setting up chatbots can be a simple way to improve response times and reduce workload on your team.
#50: Use AI for inventory optimization
AI can analyze past sales patterns and help predict demand and manage inventory levels effectively. Used correctly, AI-driven inventory management systems can cut down on stockouts and overstock situations, meaning you have the right products available when needed.
One example of this is Intellify’s AI-Powered Inventory Management AWS Solutions.
#51: Implement AI for fraud detection
AI can identify and prevent fraudulent activities. You can use AI tools to monitor transactions and detect suspicious behavior. Fraud detection existed prior to the explosion in available AI tools, but recent advances in AI have shown potential to further improve.
One example is NoFraud Fraud Protection for Shopify.
#52: Analyze customer feedback with AI
AI tools such as ChatGPT are good at analyzing large volumes of text and summarizing them. If you have a lot of customer feedback and want to get a feel for the general “vibe” quickly, you can copy and paste it into an AI tool of your choice and ask it for a sentiment analysis.
#53: Optimize SEO with AI tools
SEO tools such as SEMRush are starting to implement more AI. You can use these AI tools to help identify relevant keywords and analyze traffic patterns. This can help you boost your store’s search engine ranking and attract more organic traffic.
#54: Use AI for copywriting assistance
AI tools like ChatGPT are good at creating first draft copy for many types of writing. If you describe your product and provide photos, AI can create rough copy for your product descriptions. You can then take that, fact check it and change some words for tone and style. The end result will be better descriptions made in less time!
#55: Leverage AI for predictive sales and demand forecasting
Estimating your own sales can be tricky. But AI tools are getting better at this every day. AI forecasting can help you make smarter decisions about inventory, marketing strategy, cash flow, and overall profitability. For example, Salesforce has been piloting this type of AI within their CRM software.
Final Thoughts
Ecommerce success requires you to juggle a lot of different responsibilities. While that can be stressful, the positive side of this is that there are a ton of things you can do in order to improve your odds of success.
You don’t need to follow every tip in this guide. Pick a few that work for you and do your best to implement them. In doing so, you can build up your brand, improve your store’s performance, keep customers loyal, and ultimately, increase sales.
One of the most common bits of advice in eCommerce is to make landing pages.
But what do you put on those landing pages? And how do landing pages impact other marketing tasks you take on, such as running ads?
These are complex questions, but important ones to answer. That’s why we reached out Ro Patel from Starbound, a company that specializes in improving eCommerce conversion rates.
We sent him a bunch of questions by email, and he was kind enough to send responses back. We will now share those responses with you with only minimal editing for clarity and flow.
Why do store owners need landing pages?
This is a great question, and a pretty common one we hear from store owners.
As you likely know, most e-com businesses spend a ton of money on paid advertising, as it’s a critical part of most growing brands’ marketing strategy.
But most of that traffic is sent directly to templated, generic product pages or collections pages.
And that’s a real problem, because sending visitors to a simple product page is like handing them a catalog.
Sure, it lists the features, prices, and technical details to give you a general idea of what the product does.
But that’s not why visitors came to your site.
They came to your site because they want to know if your product is the solution to their problem.
And your job is to guide the visitor towards understanding that what you’re selling is for them.
And that’s where landing pages come in.
Landing pages are standalone web pages designed specifically to convert visitors towards some targeted and specific goal (like purchases or signups).
It’s like having a personal salesperson that deeply understands your visitors.
It doesn’t just show them the product, it tells them why they need it, addresses their concerns, and guides them to make a confident purchase without any distractions or confusion.
So that’s why landing pages are critical, especially for stores that are spending money on paid ads:
- Provide Clear Direction – Landing pages remove all distractions and make it extremely obvious what next step the visitor should take, making it much more likely they’ll continue down the customer journey.
- Address Objections – A landing page anticipates questions like, “Is this worth the price?” or “Will this really work for me?” and answers them right there, removing barriers that would otherwise keep the visitor from purchasing.
- They Tell the Story – Product pages list features, but landing pages frame those features as benefits that solve your customers’ problems, and give your offers context to drive more sales (i.e. landing page for a limited time holiday bundle)
- Seamless Customer Journey – A landing page aligns perfectly with the ad or email that brought them there, creating trust and consistency to leads to higher likelihood of conversion.
- They Boost Conversions – By guiding your visitors with hyper-targeted copy, engaging visuals, and a structured user experience, landing pages turn more visitors into customers.
When you’re running traffic to a product page, you’re relying on your visitors to sell themselves. A landing page gives you the ability to overcome all your visitors’ objections and get (way) more of them to actually buy.
How do conversion rates matter in the larger picture of marketing and sales?
Your conversion rates are one of the biggest levers you can influence that have an outsized impact to your:
- ROI
- Customer Acquisition Costs
- Scalability
- Long-term Growth
Here’s a quick example of a business that gets 50,000 visitors to their site every month, with a product they sell for $50:
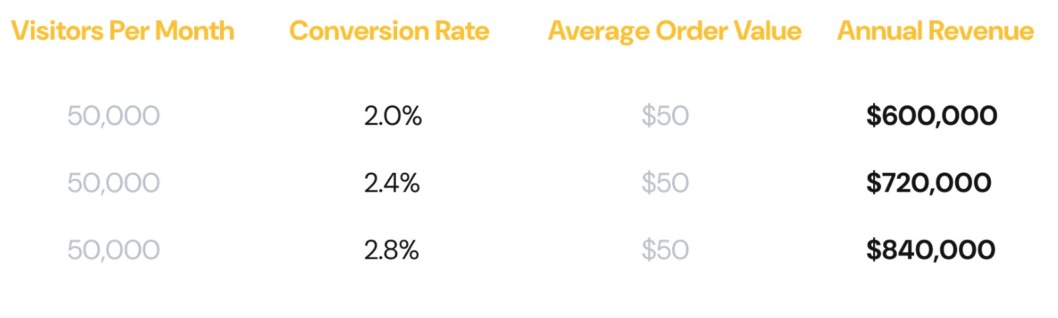
Notice that the only thing changing is the conversion rate, and only by a few tenths of a percentage. But it results in huge growth in revenue.
Having higher conversion rates mean you get more value out of every dollar spent on ads, emails, or any other traffic source.
And the best part? These are permanent gains, not one-time quick wins. When all this comes together, you end up with:
- lower customer acquisition costs
- higher profit margins
- revenue growth
Bottom line: improving your conversion rates is amongst the highest-ROI things you can do to dramatically grow your business in a relatively short time period.
How do the key elements of a landing page (e.g., design, copy, and CTAs) influence ad conversion rates?
Ads will drive traffic to your website all day long, all you need to do is throw money at it.
But whether or not that traffic actually turns into paying customers is the main job for your landing pages.
There are quite a few different components that make up a conversion-optimized landing page, and each one impacts visitor behavior directly.
Site Speed
There’s been multiple studies done that show a direct correlation between page load time and conversion rate impact.
And it should come as no surprise that the faster your page loads, the higher your conversion rate will be.
According to a recent Portent study, an e-commerce site that loads in 1 second will have conversion rates 2.5x higher than a site that loads in 5 seconds.
We’re not talking about small differences, we’re talking about double and triple revenue, just due to site speed.
Page Structure
All landing pages don’t follow the same formula, and how they’re structured depends on the purpose of the page.
Some take the form of advertorials that blend informative, editorial-style content with promotional elements to subtly promote products.
Others take the form of hero pages that are designed to immediately capture visitors’ attention and convey the core message or value proposition, without requiring the visitor to read too far down a page.
There are many other ways to structure a landing page, and sending visitors to the right ones based on where they are in their customer journey has a direct impact to conversion rates.
Headlines & Copywriting
Without a doubt, your headlines are one of the only things that you can be reasonably sure that most page visitors will read.
We’ve seen over and over again, through using heatmaps to identify on-page behavior, that almost everything else is likely to be skimmed, or even skipped entirely.
That’s why writing engaging headlines that immediately hook visitors to continue reading down the page is the most influential component of any landing page, when it comes to conversion rate impact.
Design
Design is not just about making things look pretty.
It’s about trust.
When your landing pages are organized and designed to engage the visitor, they’re way more likely to continue consuming the content on the page.
And the more they consume, the more “bought-in” they become to your story, your products, and their benefits. And that ultimately leads to more conversions.
Social Proof
Social proof is one of the most important elements of any landing page, and again, comes down to trust.
To quote Danyon Togia, Founder of Expert SEO, “one of the simplest ways to boost eCommerce conversions is by putting social proof front and center.”
He further clarifies that “as soon as someone lands on your site, they should see reviews, star ratings, trust badges, or even media mentions. Anything that instantly communicates ‘other people have bought this and loved it’ builds trust and lowers hesitation. The key is to have it above the fold; don’t make people scroll to be convinced.”
And he’s right: people seldom buy anything without first reading and watching reviews. According to Capital One Shopping, 84% of consumers trust online reviews as much as personal recommendations, with nearly 70% of online shoppers reading between 1-6 reviews before deciding to buy (Statista).
That means your landing pages must include real proof of what your customers are saying about your products.
Offer
Most businesses think their “offer” is simply the product(s) they sell.
But the reality is, it’s actually how they package what they sell. And this matters a ton for landing pages.
Let’s use planners as an example.
The product might be a quarterly habit tracking planner.
An offer, however, would be an discounted annual subscription for the planner (where the buyer gets 4 to cover them for the year).
Notice the difference?
How you position what you sell is your offer. And the more compelling your offer is on your landing page, the better your conversion rates will be.
What common mistakes do you see on landing pages that harm conversion rates, especially for eCommerce businesses?
While there are quite a few, I’ll limit it to the top 6 that I generally see:
- Templated product pages as landing pages – Particularly for e-commerce businesses, so many rely on their site’s default product to do all the selling for them, which leaves a lot of money on the table
- Slow load times – As we discussed earlier, even a 1-second delay can have huge negative impacts to conversion rates (one study shows every second results in a ~6% drop in conversion rates)
- No social proof – Nowadays, people don’t buy without getting the opinions of others first (even from strangers on the internet). If you don’t share what your customers love about your products, you’ll have a hard time converting new customers, since they won’t trust that you can actually provide what you say you will.
- Overwhelming information – So many landing pages try to cram as much text as possible into page section, thinking that getting as much information out as possible will help the visitor make a decision. It doesn’t, it only confuses people.
- Lack of mobile optimization – Even in 2024, you’d be surprised to see how many businesses still have barely useable mobile landing pages, where core elements end up being covered by popups and text becomes illegible. Nowadays, the majority of many business’ traffic is mobile, so this is critical.
- Generic copywriting – So much page copy simply describes features and technical specs, without targeting the reasons people actually buy: benefits.
And beyond just those common mistakes, the largest strategic error that eCommerce businesses tend to make on their landing pages can be summed up as “making things hard for no reason.”
Michael Alexander, Managing Director of Tangible Digital, said it best. “The extra procedure, the extra click, the extra distraction, is a silent slayer of the deals. The clear and simple companies are the ones that are found to be the most profitable.”
How can landing pages be optimized specifically for eCommerce clients to align better with ad campaigns?
Iteratively testing and improving any/all of the components can immediately improve conversion rates for most landing pages.
But if you want to get even more granular, you can do things like:
- Make sure your headline and visuals on your landing page mirror the ad’s promise, so visitors know they’re in the right place
- Promote ONLY the product(s) that you promote in your ads, and nothing else, to keep the landing page distraction-free
- Ensure your mobile pages are optimized, since the majority of e-commerce traffic is mobile now
- Incorporate urgency (”this offer ends in 12 hours!”) and scarcity (”Only 8 left in stock!”) into your landing pages, to drive people towards a purchase decision faster
- Build landing pages that target the specific demographics that your ad campaigns are targeting
- Write your landing page copy such that the headline references back to the copy used in the ad campaigns they are tied to
- Incorporate as many trust elements as you can, including social proof (reviews, testimonials, user generated content), certifications, security badges, and clear return policies
What metrics should eCommerce businesses track to evaluate the success of their landing pages in ad campaigns?
While the importance of each metric listed here may differ depending on the intent of the landing page, at a high level, these are the 7 core metrics that are most important to track:
- Conversion Rate – The percentage of visitors who complete the desired action, whether it’s a purchase, sign-up, or other goal. This is your north star.
- Bounce Rate – The percentage of visitors who leave without interacting with anything on your page. A high bounce rate usually means that the page isn’t meeting expectations, and there’s a disconnect between your ad traffic and your landing page content.
- Average Order Value (AOV) – Measures how much customers are spending on average per transaction, indicating whether upsells and bundles are working. While improving conversion rates alone has huge impacts, when you combine that with increasing AOV through better offers, you can truly explode your business.
- Revenue Per Visitor (RPV) – Tracks the average revenue generated by each visitor to your landing page. This metric helps us more easily determine profitability, as we can compare this number against how much it costs to bring a visitor to the page.
- Click-Through Rate (CTR) – CTR shows how many visitors move to the next step, which is mainly an important metric to track ad performance, but also important for landing pages if there’s multiple steps in your sales process.
- Return on Ad Spend (ROAS) – Calculates the revenue generated from your ads relative to their cost, tying ad performance to landing page effectiveness.
- Page Load Time – A slow page can drive visitors away, so keep an eye on this metric to avoid losing sales to technical issues.
How can A/B testing improve the performance of landing pages for eCommerce ads?
A/B testing is an amazing way to guarantee revenue (and profit) growth.
Buying habits change over time, and the interests and behaviors of your audience will also change.
What that means is, there’s always going to be ways to increase the number of site visitors that actually become your customers.
And the only way to find those ways is by running experiments (or A/B tests) on your landing pages.
After all, you can never really be 100% sure what changes to your pages are going to result in measurable improvements to conversions.
Sure, we can make educated guesses and rely on best practices based on experience. But that still doesn’t guarantee that the changes you make will perform better than what you already have.
With A/B testing, e-commerce brands can easily split their traffic between multiple versions of a landing page, allowing you to find “winners” quickly and with less risk.
E-commerce brands with experimentation programs essentially run multiple A/B tests constantly, across their entire user experience. This allows them to consistently increase conversions, without increasing ad spend.
How do landing pages differ in their impact on paid search versus paid social ad performance?
In general, the impact is the same to any type of traffic source. The better the conversion rates on the landing pages, the lower the cost of conversion, which ultimately means better performing ad campaigns.
There is a difference, however, in the audiences that come from search traffic vs paid social ads. And that influences how the landing page needs to be built.
You can get very specific with targeting your audience on landing pages that are tied to paid ad campaigns, because modern paid ad platforms tend to have very detailed targeting options. This makes it much easier to know exactly who will be coming to your landing pages, and tailor your copy and design to be super detailed and targeted.
For search ads, you have less knowledge about the exact characteristics of the people that are clicking through to your landing pages. They came to your page due to searching for topics that your ads show up for, so these landing pages would need to be designed to target a topic/search phrase.
Can you share any examples or case studies of how a landing page overhaul improved ad ROI for an eCommerce client?
I can give an example from my own e-commerce brand called Code&Quill, where we sold premium planners, notebooks, and writing tools for creative professionals.
We had launched a new productivity planner on a crowdfunding platform called Kickstarter, where we taking pre-orders of the product. It ended up doing well, so we knew we wanted to start selling it directly from our own store once we got inventory.
We put up a standard product page on our Shopify store, so we could take direct orders for the new product, and filled out the information that the template asked for. We figured that the a few paragraphs describing what the product did were good enough, and that the pictures would tell the rest of the story.
So, we started running Facebook and Instagram paid ads to the product page. After a couple weeks of testing tons of ads, we ended up with a ~1.8% conversion rate.
The planners were barely profitable at that rate, so we decided to test a dedicated landing page that included:
- a big hero section with a benefit-driven headline
- social proof throughout the page
- a visual representation of end benefits
- diagrams for how the planner worked, and how it should be used
- calls-to-action to buy either 1 at full price, or a discounted annual subscription (4 planners, 30% off)
- a couple videos of user generated content walking through their planners
The results from this were crazy. Not only did conversion rates increase, but we also increased our average order value:
Conversion rate went from 1.8% → 3.3%
83% increase
Average order value went from $35 → $46
31% increase
This allowed us to have significantly more profitable ads, which meant we could spend more to get more customers, fast.
We ended up selling 4500+ of those planners within the first 9 months of their launch.
Final Thoughts
Landing pages are a huge part of eCommerce. They don’t just convert visitors—they tell a story, answer doubts, and build trust.
Yet, their power is often overlooked. Too many brands rely on default product pages, missing out on what landing pages can do for their marketing campaigns.
Landing pages guide, persuade, and drive action with purpose. If you’re investing in ads, you can stretch your budget further by pairing them with pages designed to win.
Take the time to refine them, test them, and let data shape your approach. You’ll be glad you did!
Running a Shopify store isn’t as simple as it looks. Many store owners learn the hard way, spending countless hours and dollars on trial and error. But the right advice, straight from experienced store owners, can save you both time and money. That’s why we’ve compiled insights from experts who’ve been through it all.
In this guide, we talk about practical strategies that are proven to work. You will find tips for marketing, product design, customer retention, and more. Every tip you read in this guide comes from a real, vetted successful store owner.
No theory here—just real-world tactics that drive results. Learn from those who’ve made the mistakes and found the solutions. Take their experience, apply it, and watch your Shopify store grow.
3 Business Strategy Tips for Shopify Stores
Shopify store success isn’t about doing everything all at once. You need to focus on doing the right things the right way. Focus your efforts on key strategic activities, and results will follow.
1. Focus your time on key marketing channels
Overcomplicating your marketing can be a costly mistake. “Store owners often spread themselves too thin by trying to be on every platform, using every tool, and chasing every trend,” says John Butterworth of Mint SEO. Instead, he suggests focusing on a few key channels where your audience is most active and refining your efforts there. It’s about quality over quantity.
Mark Ainsworth of Maxweb Solutions agrees, adding, “start by mastering one or two marketing channels, and once those are optimized, expand your efforts.” Vukasin Ilic from Linkter emphasizes this point: “It’s better to focus on one or two platforms and excel there. Spreading yourself too thin can lead to mediocre results and burnout.”
2. Avoid unnecessary spending
Anthony Barone of StudioHawk UK sees a common problem among new store owners—overspending on tech and flashy tools. “Everyone gets sucked into so many tools, tech solutions and flashy things which suck money from the budget and your P/L,” he explains.
“When you are bootstrapped, you can’t flush money down the toilet on every little thing,” says Barone. “Find solutions that are free and will do the job for what you are doing now and what you want to do in the next 6-12 months, not what you’d like in 5 years when you think you’ll be the next ASOS”.
Keeping costs in check now lays the foundation for growth later. Just because this advice is simple doesn’t make it any less important.
3. Stock recession-proof products
In uncertain times, stocking essential products can allow your business to continue to succeed even when other product categories are underperforming. “Recession-proof products can be any item that people need to survive in its most literal sense,” says Nate Banks of Crazy Compression. He lists consumer staples like food, hygiene items, and pet necessities as examples. “These items are critical to the survival of consumers; they’re non-discretionary,” he adds.
Brandon Hartman of BeyWarehouse echoes this sentiment, classifying recession-proof products into two categories: necessities and niche items with dedicated fanbases. “[These products] will continue to get patronage, even as purchasers of upper-tier products slide down the price scale to save expenses,” he notes. In challenging economic periods, choosing the right products can make all the difference.
3 Customer Acquisition Tips for Shopify
If you want to acquire customers for your Shopify store, you need strategies that bring customers directly to you. But you don’t want to waste your time chasing every trend. Your time is better spent finding what works and doing it well. Here are some tips to help know where to focus your attention.
4. Use SEO to increase sales
Ignoring SEO is a costly mistake for any Shopify store owner. “Well-crafted online stores receive significantly more free organic traffic from search engines,” explains Justin Christopher of Klatch Coffee. Tools like Google Search Console and SEMRush can help track and monitor progress, showing which strategies yield the best results.
Ben Duffy from Quirky Digital adds, “SEO-friendly product descriptions not only improve search visibility but also enhance the user experience, increasing the likelihood of conversions.” It’s not enough to just have products; you need to ensure your site is optimized to rank for valuable search terms.
As Vukasin Ilic of Linkter puts it, “[Search] is fully intent-based—when I rank my Shopify store for linen dresses, for example, people coming on my website through search are shoppers who have their wallets ready.”
5. Get on Google Shopping
Google Shopping is an underused goldmine for small brands. “Shopify easily integrates with most social platforms, and for many small brands, there is a real opportunity to grow with Google Shopping,” says David Mason of Fortunata. Unlike major retailers, independent brands have an advantage on Google, as the platform builds its shopping results to feature unique brands over big-box names. “They don’t need another Walmart, Costco, or ASOS,” Mason emphasizes.
By using this tool, your store can show up when buyers are actively looking for products like yours. Thankfully, getting started is easy since you can add the Google & YouTube app on Shopify with minimal effort.
6. Run Facebook & Google ads
Paid advertising is a powerful way to drive targeted traffic. Ben Duffy from Quirky Digital highlights that channels like Google Ads, Facebook Ads, and Instagram are ideal for paid traffic because they “[allow for highly targeted advertising], which can be very useful when trying to reach niche markets.”
But it’s not just about ads. Email marketing remains a powerful and terribly underrated tool. Anthony Barone of StudioHawk UK explains that “emails are an oldie but a goodie—having direct contact into people’s inboxes can build another long list of customers [which helps] to warm people up, build loyalty, run offers, [and] engagement campaigns.”
For those willing to invest time and money, these strategies pay great dividends when it comes to customer acquisition and retention.
2 Tips to Increase Customer Lifetime Value for Your Shopify Store
Getting new customers is just one part of the puzzle. The real value lies in keeping them coming back. To do that, you need the right strategies—ones that build loyalty and drive repeat sales.
7. Start an email list
Too many store owners overlook one of their most powerful assets—owned media like an email list. Unlike social platforms such as Facebook or TikTok, where you have no control over changes, your email list is yours. Justin Christopher of Klatch Coffee explains, “[It’s a mistake] to not start capturing and building an email list on day one.” He recommends tools like Klaviyo for both email and SMS marketing, especially for its seamless integration with Shopify.
Email marketing isn’t just about sending messages. Vukasin Ilic of Linkter notes that “sending out newsletters, special offers, or personalized recommendations can boost repeat purchases and significantly increase lifetime customer value.” The sooner you start, the sooner you build a loyal customer base that’s ready to engage with your brand.
8. Connect TikTok Shop
TikTok isn’t just for dancing videos—it’s a serious sales tool for Shopify stores. Ben Duffy from Quirky Digital highlights that TikTok Shop is becoming increasingly effective, especially for brands using short, dynamic videos to engage audiences. “Creating engaging, authentic videos that showcase products can lead to instant sales,” he explains, especially when users can buy directly within the app.
Connecting your Shopify store to TikTok Shop streamlines the customer journey. “Linking your Shopify store directly creates an easy customer journey, turning engagement into conversions,” Duffy adds. By collaborating with TikTok influencers or running targeted ads, you can quickly build brand awareness and drive sales.
3 Product Design Tips for Your Shopify Store
The best products don’t happen by accident. They are built through careful planning, testing, and refinement. Approach your design process with precision, and your efforts will pay off.
9. Start small & iterate
Prototyping isn’t about progress over perfection. “Start small with your prototypes to keep costs down and iterate quickly based on feedback,” advises Jorge Argota. By engaging users early, you can gather insights that shape the design to better fit customer needs.
Valentin Radu of Omniconvert expands on this, saying they “leverage customer feedback and data to inform design choices,” creating preliminary models and using A/B testing and user interviews to refine products. He adds that tracking key performance indicators helps ensure each iteration aligns with market demands.
Jason Wingate of Emerald Ocean Ltd. shares his experience: “Know your customers.” Wingate further clarifies by sharing a story of what this looked like practice, saying “a few years ago we released the Rotary Thread tool, a thread filing tool that was revolutionary and nothing was like it on the market. It could file threads quicker and faster than anything. We sold (and still sell) to Lowe’s and Home Depot in the USA, and Canadian Tire in Canada. But sales were not as good as we expected. Why? Because the customers of most retail chains don’t need a thread filing tool most of the time. If a nut or bolt comes loose, they just buy a new one for a few cents.”
Ultimately, as a result of the learning process, his team found success when they identified the right market for their Rotary Thread tool, selling to industrial clients instead of retail. “If the customer doesn’t have a problem or need your product, you need to reflect on that and find out what they do need.”
10. Research suppliers carefully
Finding the right supplier is a crucial step that can save you time and money. “To get quotes I reached out to several manufacturers with detailed specifications of the product,” says Argota. He clarifies that his communication “[included] drawings or CAD files, material requirements and expected quantities. Comparing these quotes helped me understand the market rates and negotiate better terms. Having all the info ready upfront made the process smoother.”
Jason Wingate recommends using a broker in the manufacturing country to navigate customs, culture, and time zones efficiently. “They would also know manufacturers beforehand as well,” he explains, which speeds up the process. Jorge Argota reflects on his own experience, stating that “having all the info ready upfront made the process smoother.”
But mistakes happen. Argota admits he “underestimated costs early on, didn’t vet some manufacturers well enough,” leading to miscommunication and costly setbacks. Ryan McDonald of Resell Calendar stresses the importance of detailed quotes, advising brands to “request quotations breaking out labor, material, and any additional fees” for clarity. He also cautions that the lowest bid is not always the best choice—quality and communication matter.
11. Design attractive packaging
Don’t underestimate the power of good packaging. “Early consideration of these elements can significantly impact the perceived value of your product,” says Ryan McDonald from Resell Calendar.
Well-designed packaging can elevate a product, making it more appealing and boosting its resale value. McDonald’s team has found that investing time and effort in packaging during the prototyping phase pays off, transforming how customers perceive and interact with their products.
4 Web Design Tips for Shopify Stores
Good web design goes far beyond look and feel. You need to create a fast, seamless experience for every user. The right adjustments can transform how your store performs—and how customers spend their money.
12. Optimize your images
A slow website is a lost sale. Jose Gomez of Summit Metals points out that “websites generally load slowly because images are not optimized in size.” A common mistake is uploading large JPEG files, which can take up to 3MB each. Multiply that by 20 images, and you’ve got a site that drags on any mobile device.
The solution, according to Gomez, is to “convert images to WEBP format.” This technique reduces file size by up to 70% while maintaining high quality. For Shopify store owners, every second counts. Optimizing images speeds up load time, keeping customers engaged and ready to buy.
13. Remove unnecessary apps
Apps can be a double-edged sword. While they add functionality, too many can slow down your store. “Carefully choose the apps that you add to your store, and remove any that aren’t needed,” advises Justin Christopher from Klatch Coffee. But removing the app isn’t enough—make sure it deletes all the code it installed.
Old code left behind can still affect your site speed. Christopher recommends using tools like Google Lighthouse to run before-and-after tests, ensuring your store stays optimized. Regular maintenance keeps your site clean and efficient.
14. Familiarize yourself with Lighthouse scores
Understanding store performance metrics is complex, but you need to be able to do it. Shopify provides a Web Performance dashboard, where users can track loading speed, interactivity, and visual stability. But Shopify’s built-in dashboard is limited in scope, so many Shopify store owners prefer to use Lighthouse Scores (Google PageSpeed Insights) instead.
Windy Pierre highlights the importance of the Largest Contentful Paint (LCP) score—your site’s loading speed over time. For best results, he says “don’t make the main picture load lazily.” Use Shopify’s automatic lazy loading or section index for better control.
JavaScript is another area where store owners often slip up. “Too much JavaScript makes your site slow,” says Pierre. Simplify your code and eliminate unused scripts to boost your Interaction with Next Paint (INP) score. Lastly, set dimensions for images and videos with Shopify’s Liquid image_tag to prevent layout shifts. This will help keep your Cumulative Layout Shift (CLS) score low and reduce the risk of elements “jumping around” as the pages load.
If you want to research this further, check out Google PageSpeed Insights and GTMetrix. Both are free tools that you can use to measure your website’s performance.
15. Make checking out easy
You don’t want the checkout process to be any harder than it has to be. Even a little bit of cart abandonment can spike your customer acquisition costs and hurt profitability in a significant way.
“Having to get up and walk to another room to retrieve a credit/debit card in order to finalize an eCommerce purchase is a key obstacle to conversion,” says Justin Christopher from Klatch Coffee. “A simple change that’s easy to implement on the Shopify platform is rolling out accelerated checkout methods and/or wallets, like Apple Pay and PayPal.”
He goes on to say that “allowing consumers to save both payment method and delivery address preferences cuts down on time-wasting data entry, especially on mobile devices not conducive to typing. This is an easy conversion improvement almost any merchant can quickly make.”
4 Shipping Tips for Shopify Stores
Shipping is more than just getting a package from point A to point B. You need to make sure the process is smooth, efficient, and customer-friendly. Good shipping experiences keep customers coming back for more.
16. Validate addresses
Getting the address right is crucial. Shawn Zar from Superior Seating suggests using automated address verification to prevent costly mistakes. This makes perfect sense because their business is based on laborious custom furniture design. Shipping to wrong address would be terribly expensive.
Lou Haverty of Tank Retailer takes it a step further. “I process orders through Shopify, but I also double-check everything,” he explains. Haverty contacts customers to confirm shipment details, especially for larger orders requiring special handling like liftgates. “The biggest risk is if you ship an expensive product blindly,” he warns, highlighting the importance of verifying that customers can accept delivery before sending out high-value items.
17. Develop a clear returns process
A transparent and simple return policy can build trust and boost customer satisfaction. For many Shopify store owners, it makes sense to have a 30- or 60-day return window, no questions asked. But for some items like those described below (custom furniture and heavy tanks), it makes sense to take a different approach.
At Superior Seating, Shawn Zar states that they “handle returns on a case-by-case basis,” ensuring any issues are resolved quickly while staying within their policies for custom items. Lou Haverty of Tank Retailer shares his approach: “We offer a 30-day return window for all customer sales. If the customer decides to return the product during that window, [the customer also has to pay return shipping unless there is a defect].”
No matter what policy you ultimately implement, you want to make sure you set clear expectations upfront. This will allow you to maintain control of the returns process while showing customers that you value their business.
18. Practice good inventory management
Managing inventory is an art. You want to always have enough inventory to never stock out but not so much that it inflates storage fees. Much of this comes down to demand estimation and the willingness to run sales when inventory levels get too high.
Dan Jones of Terrarium Tribe has an interesting perspective here since many of his products are live. He explains that keeping “a relatively small product range” allows them to “monitor stock levels closely,” ensuring that sales don’t spread too thinly.
Overstock issues can still arise, especially with perishable or live products like those sold by Terrarium Tribe. In those cases, Jones suggests running flash sales or offering excess items as free gifts with purchases. This strategy helps maintain a balanced inventory while keeping customers engaged.
19. Find a trustworthy fulfillment partner
Shipping can be one of the most frustrating and time-consuming aspects of running a Shopify store. You have to manage inventory and find the time to pack orders. So it’s easy to feel overwhelmed. That’s where partnering with a fulfillment center can make all the difference.
Fulfillment centers like Fulfillrite help solve common shipping issues by streamlining the entire process. That includes everything from inventory management to real-time tracking. For Shopify store owners, the end result is fewer shipping errors and delays. Plus, most fulfillment centers integrate directly with Shopify, automating order processing, and ultimately saving time and reducing manual labor.
Choosing a fulfillment center becomes more useful as your business grows. The less time you spend packing boxes and licking stamps, the more time you can spend marketing and sales. Centers like Fulfillrite benefit from economies of scale, meaning their clients (store owners) benefit from lower shipping rates due to bulk discounts with major carriers.
When your business reaches a point where managing shipping in-house becomes too costly or time-consuming, working with a fulfillment partner can be the best step forward.
Final Thoughts
Running a Shopify store is all about balance—balancing costs, marketing efforts, and the customer experience. You’ve learned strategies here to make that balancing act easier. From fine-tuning your marketing channels to optimizing your shipping, the key is focusing on what truly drives results. Your goal shouldn’t be to do everything all at once. You want to focus on doing the right things well.
Remember, building a successful Shopify store takes planning. It’s not just about getting new customers but also keeping them engaged with strong customer retention tactics, like email marketing and fast, reliable shipping. Every system you put in place today, from inventory management to fulfillment processes, builds a foundation for the future.
As you implement these strategies, keep learning and adjusting. The eCommerce world is always changing, and staying flexible is how you stay ahead. Take these expert tips, tweak your approach, and you’ll find that success isn’t just achievable—it’s within your control.
Client retention in eCommerce isn’t just about keeping customers. You need to give buyers a reason to become lifetime customers—and that’s not easy!
The stakes are high. If you can retain customers, your eCommerce store is going to take off. But if you can’t, you’ll probably close up shop in a few years. Retention is just that important.
To uncover the strategies that actually make people want to buy again and again, we’ve reached out to a variety of experienced eCommerce experts. We want advice from those who’ve faced the challenges of retention firsthand.
In this article, we share the advice of these experts. These tips go beyond theory and will help you build deeper connections with your customers. That way, you will have the practical advice you need to not only retain your clients but also keep them engaged, loyal, and coming back for more.
What is customer retention in eCommerce?
Customer retention in eCommerce means getting customers to buy more than once. How you do that specifically comes down to building lasting relationships with your customers.
Acquisition starts with the first purchase. Retention starts with the second, and you only get that second purchase through consistent engagement, great service, and by providing ongoing value. So you need a way to turn your one-time buyers into loyal advocates who come back, spend more, and promote your brand to others.
Why focus on customer retention in eCommerce?
Retention matters because it’s cost-effective and sustainable. Acquiring a new customer costs significantly more than keeping an existing one. In eCommerce, where competition is fierce and customer expectations are high, retention is a critical metric for long-term growth.
And to be clear, it still makes sense to reduce customer acquisition cost as much as you can. You should absolutely take commonsense steps to boost conversion rates and lower acquisition costs where you can. To quote Justin Christopher, Manager of Ecommerce & Marketing at Klatch Coffee, “Having to get up and walk to another room to retrieve a credit/debit card in order to finalize an eCommerce purchase is a key obstacle to conversion, but fortunately, it’s easy to overcome.” He advises using “accelerated checkout methods and/or wallets, like Apple Pay and PayPal” to do this.
Lowering customer acquisition cost is good, but there’s a limit to how much you can do that. But there’s not a hard limit to how long you can retain a customer, making it a better path if you want to really boost revenue and profitability over time.
How do I personalize experiences in eCommerce?
Personalization in eCommerce is about creating meaningful connections with customers by tailoring their experiences. Or, put more simply, different customers should see different things on your store.
Personalization is more than just using their name in an email, though that’s certainly a good start. What you want to do is deliver relevant, timely, and valuable information that feels unique to them.
The goal is to show customers you understand their preferences, needs, and behaviors, without creeping them out with excessive data mining. Done right, personalization helps you build trust, drive engagement, and keep customers coming back.
With the right tools and strategies, personalization can scale effortlessly. Email platforms, CRM systems, and AI-based recommendation engines make it easier than ever to customize each customer’s journey. So the tech is there to support you—you just need to know how to use it.
Here are some tips from experts to help you get started with eCommerce personalization.
1. Use email platforms to tailor messaging.
Email is one of the most effective channels for personalization. Platforms like Klaviyo and Mailchimp allow you to segment audiences based on behavior, purchase history, or preferences. “Personalization doesn’t need to be creepy—just relevant,” says, Matthew Engelage of Chin Mounts. A customer who recently bought a product could receive follow-up emails recommending accessories or complementary items.
Tip: Automate email campaigns with targeted messaging based on purchase behavior, cart abandonment, or browsing history. Keep the tone friendly and the content valuable.
2. Use AI to make smarter product recommendations.
AI-powered tools like Klaviyo and Nosto can predict what customers might buy next. These systems analyze browsing and purchase data in order to provide product recommendations tailored to each individual. It’s personalization at scale, with no manual input required.
Tip: Integrate AI-based recommendation engines into your store to suggest relevant products on your homepage, product pages, or checkout process.
3. Use CRM systems to track and engage customers.
CRM platforms enable you to gather and organize customer data, helping you understand their preferences and behavior. “CRMs, AI-based product recommendations, and cutting-edge email platforms enable you to create personalized experiences,” says David Taylor, Founder of Academized.com.
A well-managed CRM will help you make sure every interaction with every customer at every touchpoint feels intentional and informed.
Tip: Use data in your CRM to segment customers by purchase frequency, preferences, or engagement levels, and create targeted campaigns that resonate.
4. Build loyalty with gamification and rewards.
Gamified loyalty programs add a fun and engaging layer to personalization. “Features like a gamified points system or achievement badges” encourage customers to interact with your brand, according to Brian Lim, Founder & CEO of iHeartRaves and INTO THE AM. Rewarding activities like leaving reviews or referring friends builds a sense of satisfaction and connection.
Tip: Offer points for purchases, reviews, or referrals. Include surprise perks, early access to products, or exclusive discounts to make loyal customers feel valued.
5. Provide tailored discounts and offers.
Segmenting customers allows you to create discounts and offers that align with their shopping habits. For example, frequent buyers might receive a VIP discount, while inactive customers could get an incentive to return.
Tip: Use tools like Shopify Flow or Yotpo to automate personalized discount codes for specific customer segments.
6. Monitor engagement for better segmentation.
Segmentation is key to effective personalization. By analyzing engagement metrics—like open rates, click-throughs, and purchase patterns—you can refine your audience groups and avoid overwhelming less engaged subscribers.
Tip: Use email platforms to tailor content based on engagement levels. High-engagement customers can receive frequent updates, while others get fewer, more curated offers.
What are the best customer loyalty programs?
A great customer loyalty program will help you build emotional connections with your customers and keep them coming back. It’s not just about discounts, although those are definitely helpful!
Loyalty programs work best when they’re simple, rewarding, and fun. The goal is to make customers feel appreciated and incentivize behaviors that drive repeat purchases.
Whether it’s points for purchases, exclusive perks, or gamified rewards, a well-designed loyalty program will help you create a sense of belonging and make customers think twice before shopping elsewhere.
The key to success is balancing value and simplicity. Customers need to understand how the program works and feel that the rewards are worth their effort.
Here are actionable strategies for building an effective loyalty program.
1. Offer points for purchases, reviews, and referrals.
Points-based loyalty programs are simple and effective. “Make it rain points,” suggests Kumar Vaibhav Tanwar, Founder of Clickworthy Digital Marketing. “Offer free shipping, and add perks they can’t resist.”
Customers earn points for purchases and actions like leaving reviews or referring friends. Points can be redeemed for discounts, free shipping, or other rewards.
Tip: Set up a points system where customers can easily track their rewards and understand how to redeem them. Make the process intuitive and appealing.
2. Create a tiered loyalty system.
Consumers love the feeling of exclusivity. “Designing a tiered loyalty program where your customers can earn rewards based on where they are by rank can play on this tendency and lead to repeat purchases,” explains Brandon Hartman, Founder of BeyWarehouse.
Higher tiers unlock bigger perks, encouraging customers to spend more to move up.
Tip: Structure your program with clear, achievable tiers, offering benefits like VIP discounts, early access to products, or free upgrades.
3. Provide exclusive rewards and experiences.
Making customers feel special fosters loyalty. “Early access to new products or exclusive perks can make customers feel like VIPs,” says Brian Lim. Customers appreciate rewards that go beyond standard discounts.
Tip: Include unique benefits like limited-time offers, first looks at new collections, or access to members-only sales.
4. Gamify your loyalty program.
Turning loyalty into a game creates engagement and excitement. “Offer tiers where customers unlock bigger rewards as they spend more,” advises Oun Art, Founder & Chief Link Strategist at LinkEmpire.io. When you do this, “shopping becomes an engaging experience.”
Tip: Incorporate challenges, badges, or point multipliers to add an element of fun and competition to your loyalty program.
5. Use loyalty tools for ease and impact.
Tools like Smile Rewards or apps integrated with platforms like Shopify simplify loyalty program management. “This easy and simple integration encourages repeat purchases,” says Andy Gartland, Company Director of Fitstraps UK. Paired with email tools like Klaviyo, they let you send personalized rewards and offers.
Tip: Use a loyalty platform to streamline tracking and rewards. Automate email reminders and updates to keep customers engaged with the program.
6. Encourage engagement with post-purchase strategies.
Loyalty doesn’t end at the sale. “Sending thank-you notes, targeted emails, or product suggestions post-purchase keeps customers connected to your brand,” says Muhammad Imran Khan, CEO at Brand Ignite. “Referral programs that reward bringing in new customers” amplify engagement.
Tip: Follow up with personalized messages, such as thank-you emails or product review requests, to strengthen post-purchase relationships.
7. Highlight the benefits of your loyalty program.
Loyalty programs are only effective if customers know about them. “[Inform] your customers about the benefits so they stay loyal,” David Taylor emphasizes. Clear communication ensures they understand the value of participating.
Tip: Use pop-ups, banners, and social media campaigns to promote your program. Make the benefits visible and easy to grasp.
8. Simplify the process for maximum impact.
Overcomplicated programs drive customers away. “Keep your loyalty program simple and rewarding,” advises David Taylor. “Offer clear benefits like discounts, free shipping, or exclusive access.”
Tip: Avoid complex rules or restrictions. Create a program that’s easy to join, easy to use, and consistently rewarding.
How does post-purchase experience impact retention?
Once a customer makes a purchase, the relationship is just beginning. The kind of post-purchase experience that your customer has will play a huge role in whether they come back to buy again.
A positive experience after the sale reassures buyers that they made the right decision. This goes a long way toward building trust and encouraging repeat business.
But this cuts both ways. A poor post-purchase experience can erode trust, drive customers away, and diminish your brand reputation.
Retention hinges on how well you maintain engagement after the purchase. You need to remind customers why they chose your brand. This increases the likelihood of repeat purchases and, with any luck, customer advocacy.
The post-purchase journey should be seamless, thoughtful, and engaging. Start with essential touchpoints like order confirmations and shipping updates—these reassure customers and set expectations.
Then, go beyond the basics with personalized follow-ups, helpful resources, and exclusive offers. The key is to maintain a balance: stay top of mind without overwhelming the customer.
Here is how you can do that with specific tips from the experts.
1. Send helpful post-purchase content.
Providing value immediately after a purchase shows customers you care about their experience. “Send something helpful after they buy—setup guides, videos, or care tips,” advises Matthew Engelage. For example, a how-to video for assembly or tips for using their product effectively can make a big impact.
Tip: Automate post-purchase emails with care guides, usage tips, or FAQs specific to the purchased product.
2. Personalize follow-ups.
Personalized follow-ups remind customers that they’re more than a transaction. Andy Gartland states that one winning strategy for them has been “a personalized follow-up email seven days after a purchase. The tone of this email is from me personally and is conversational and supportive as if each email were personally typed. This fast email invites feedback, addresses any concerns promptly, and reinforces that we care, boosting positive reviews and repeat business.”
Tip: Create a follow-up sequence that includes a thank-you note, an invitation for feedback, and personalized product recommendations.
3. Use customer service as a retention tool.
Effective customer service is a cornerstone of retention. “Provide accurate and prompt responses to build trust,” advises Brandon Hartman. Customers should never feel ignored when they reach out with questions or concerns.
Tip: Train your customer service team to respond promptly and empathetically. Equip them with the tools and knowledge needed to resolve issues effectively.
4. Offer exclusive discounts and loyalty rewards.
Post-purchase discounts not only encourage repeat purchases but also show appreciation. You can surprise customers with discounts or loyalty rewards to keep them engaged.
Tip: Include an exclusive discount for their next purchase in a follow-up email. Highlight loyalty rewards they’ve earned or introduce them to your program.
5. Request reviews and feedback.
Asking for reviews shows that you value your customers’ opinions while providing valuable insights for your business. “Send a follow-up email sequence that thanks customers, asks for reviews, and offers an exclusive discount for their next purchase. Keep the conversation going,” suggests Oun Art.
Tip: Send a friendly review request via email, making it easy for customers to share their feedback. Pair the request with a thank-you message or small incentive.
6. Keep the conversation going.
“Post-purchase emails, such as order confirmation, shipping updates, and thank-you notes, are a great starting point,” notes Muhammad Imran Khan. These touchpoints establish trust, but maintaining engagement with personalized product suggestions or curated content keeps your brand top of mind.
Tip: Use post-purchase emails to suggest complementary products, offer tips, or share stories that align with the customer’s interests.
How do I reduce churn rate in eCommerce?
Churn rate is the percentage of customers who stop engaging with your brand. Needless to say, this is a critical metric for eCommerce businesses. Losing too many customers is obviously bad for business!
The fact is that retaining customers is significantly more cost-effective than acquiring new ones. So that means a high churn rate can stagnate your growth and profitability. Businesses that actively manage churn build stronger relationships, drive repeat purchases, and improve customer loyalty.
Reducing churn requires identifying at-risk customers early, responding to signs of disengagement, and providing value at every stage of the customer journey. Below, you will find specific tips on how you can do that.
1. Provide value after the purchase.
Following up with helpful content shows you care about the customer’s experience. To reiterate what Matthew Engelage advised earlier in this article, “send something helpful after they buy—setup guides, videos, or care tips.” Personalized product suggestions or exclusive offers can encourage customers to stay engaged.
Tip: Automate post-purchase emails with content tailored to the product, such as care instructions, how-to guides, or related product suggestions.
2. Provide exceptional customer service.
Effective customer service is vital to keeping customers loyal. “Your customer care team should be up to par,” emphasizes Brandon Hartman. “Accurate and prompt responses build trust,” which helps maintain momentum in the customer relationship.
Tip: Make sure your support team is well-trained, responsive, and empathetic. Offer multiple channels like live chat, email, and phone for customer inquiries.
3. Monitor customer behavior for signs of churn.
Spotting at-risk customers early is crucial. “Look for patterns in your data—[are customers taking longer to reorder or not opening emails?],” advises Matthew Engelage. “Address these signals early. Send a check-in email or an exclusive offer to bring them back. Sometimes, asking for feedback shows customers you value them and makes all the difference.”
Tip: Use analytics tools to track behaviors like declining purchase frequency, abandoned carts, or reduced engagement. Respond proactively with personalized re-engagement emails.
4. Address cart abandonment promptly.
Abandoned carts signal hesitation that can lead to churn. “[Your cart abandonment rate will tell you a good story about why your customers churn],” notes Brandon Hartman.
Tip: Automate cart abandonment emails with incentives, such as free shipping or limited-time discounts, to encourage customers to complete their purchases.
5. Use predictive analytics to re-engage customers.
“Predictive analysis helps identify at-risk customers, enabling businesses to offer incentives like personalized discounts or win-back campaigns,” says Muhammad Imran Khan.
Tip: Use CRM systems or Google Analytics to detect early signs of churn and target disengaged customers with tailored promotions.
6. Track churn-related metrics consistently.
Metrics like Customer Lifetime Value (LTV), repeat purchase rates, and average order frequency provide actionable insights into customer retention. Monitoring these trends helps you identify at-risk customers early and refine your strategies to keep them engaged.
Tip: Use analytics tools, such as Shopify and Google Analytics, to track key metrics. Regularly review these numbers to spot patterns and inform your retention efforts.
Final Thoughts
Boosting customer retention in eCommerce requires you think about what your customer is experiencing at every stage of the customer journey. Personalized interactions, simple yet rewarding loyalty programs, and proactive post-purchase engagement are all ways that you can improve their experiences.
More simply put, the key is to show customers you care.
With open eyes and an open mind, not to mention solid data, you can cut down on customer churn and build customer loyalty. That will pave the way for sustainable relationships that drive repeat business. And that repeat business, in turn, will turn into stable long-term growth.
Selling on Amazon in 2025 isn’t just about listing a product and hoping for the best. The competition is intense, and success depends on making strategic choices from day one.
What products should you sell? How do you price them? What’s the best way to get reviews and keep inventory in check?
This guide breaks down key factors every new seller needs to know, from choosing a fulfillment method to optimizing listings for Amazon’s algorithm.
In this post, we’re going to share advice from experts and discuss proven strategies. That will help you see how you can set yourself up for long-term profitability—without making costly beginner mistakes.
We’ll go over this topic in the form of questions and answers, starting with strategy and research. Then we’ll move into sales optimization, logistics, advertising, and performance tracking.
How can sellers find the most profitable categories on Amazon?
If you want to succeed on Amazon, the #1 thing you can do is sell the right products. Getting this one part of the process right has an outsized impact on everything else you do.
Of course, market research is easier said than done and it helps to know where to begin. A great place to start is the Amazon Best Sellers list. On it, you will see top-performing products in real-time.
Spend enough time browsing the Best Sellers list and you’ll probably see trends emerge. For example, categories like Beauty & Personal Care, Home & Kitchen, and Clothing & Accessories tend to have consistent demand, but naturally, competition varies.
If you want to go deeper with your research (and we recommend you do), consider looking at Amazon’s Product Opportunity Explorer. Through it, you’ll see all kinds of data on search trends, niche saturation, and units sold. Sellers like you can analyze customer interest, competition levels, and historical performance and, in doing so, spot fresh opportunities.
Beyond Amazon’s built-in tools, monitoring Movers & Shakers and Hot New Releases can reveal fast-rising products. External sources like Google Trends and social media trends also help validate demand. A low-review, high-search-volume niche is often a strong entry point.
When you look at multiple different sources of Amazon data, you can often find areas where you can strategically enter high-demand, low-competition categories. These are the ones known for having strong profit potential.
What tools or resources are most effective for product research and competitor analysis?
Successful Amazon sellers rely on real data to make decisions. Certain widely available software tools can help you to identify profitable products and outmaneuver competitors.
Two of the most widely used platforms are Helium 10 and Jungle Scout. Both have a suite of features for product and keyword research.
- Helium 10’s Black Box tool filters products based on revenue, competition, and pricing trends. This helps sellers uncover overlooked niches. Its Cerebro tool reverse-engineers competitor listings to extract the most effective keywords for optimization.
- Jungle Scout provides in-depth sales estimates, keyword tracking, and competitor monitoring. The Opportunity Finder highlights markets with favorable demand-to-competition ratios, ensuring sellers avoid oversaturated spaces.
Beyond these, tools like AMZScout and Keepa help track price trends and historical sales data, giving sellers insights into seasonality and market shifts.
Using these resources allows sellers to make strategic decisions and stay ahead of market trends. But remember, you need to pair this with other research like described in the previous section. Number-heavy data like that provided by these tools can be misleading if you don’t seat it within a larger context.
What are common mistakes beginners make when choosing products to sell?
Many new sellers make emotion-driven decisions. After all, it’s tempting to pick products you like rather than those with proven demand. Without market validation, you risk launching items that don’t attract enough buyers.
Another common mistake is entering oversaturated markets. If a product has thousands of reviews and deep-pocketed competitors, a new seller will struggle to gain visibility. Instead of selling generic water bottles, niching down to “insulated stainless steel bottles for hikers” gives you a better chance to stand out.
Pricing issues also hurt beginners. Amazon FBA fees, referral fees, and shipping costs quickly eat into margins. A product that looks profitable at first glance may barely break even after fees. Using profit calculators and competitor analysis tools ensures better decision-making.
Successful sellers research trends, review costs, and validate demand before committing to inventory. They focus on low-competition, high-margin products with steady demand instead of chasing fads.
Which pricing strategies help new sellers attract buyers while still maintaining profit?
Pricing on Amazon is a balancing act. Go too high, and you lose customers. Go too low, and you lose profit. The most effective strategy is competitive pricing, where you price your product slightly below or in line with top competitors.
However, rather than simply undercutting, sellers can add value by bundling complementary products or offering limited-time discounts.
Dynamic pricing tools like RepricerExpress and Aura help sellers adjust prices based on market demand, competitor activity, and inventory levels. This ensures products remain competitively priced without unnecessary margin cuts.
Psychological pricing also plays a role—pricing at $19.99 instead of $20.00 increases conversions. Additionally, using Amazon’s coupon and deal features can attract budget-conscious shoppers while maintaining perceived value.
Ultimately, successful pricing requires constant monitoring of costs, fees, and competitors. Sellers who experiment and refine their approach find the sweet spot between affordability and profitability.
How do successful sellers optimize their product listings for Amazon SEO?
Amazon’s search algorithm favors relevance, engagement, and conversions. That means your listing must be optimized for both customers and search ranking.
Successful sellers start with thorough keyword research using tools like Helium 10 and Jungle Scout to identify high-traffic, low-competition terms. These keywords should be placed naturally in the product title, bullet points, and description to maximize visibility.
High-quality images and videos improve click-through and conversion rates. Amazon prioritizes listings that keep shoppers engaged, so having infographics, lifestyle images, and explainer videos can increase performance.
Encouraging customer reviews also helps rankings. Products with more positive reviews tend to rank higher, as they signal trust and reliability. Lastly, optimizing backend search terms helps Amazon understand your product even when shoppers use different phrasing.
When in doubt, remember the whole point of Amazon is to sell products. So your North Star should be to make a product listing that compels people to buy. If you can manage that, then you’ve accomplished the most important part of Amazon SEO.
How can sellers gather more (and better) product reviews in a compliant way?
Product reviews are one of the most powerful tools for boosting sales on Amazon.
“Positive online reviews can significantly impact sales, as consumers often place a high level of trust in them,” says Kristin Hutcherson, Partnership Manager at eComEngine. “Quality reviews help boost product search rankings, which allows more buyers to discover your product, increasing your sales potential.”
The best way to get more reviews? Ask your customers.
“Sending automated review requests is a smart way to streamline the process and ensure you’re regularly requesting reviews,” Hutcherson explains.
Amazon allows sellers to request reviews, but they must follow strict guidelines—you can’t pay for or influence a review, and requests must be sent within 30 days of order completion.
If you want to automate this process some, you might look into tools like FeedbackFive by eComEngine. This can help you automate review requests and stay within Amazon’s policies.
What factors should new sellers consider when choosing between FBA and FBM fulfillment?
When you start selling on Amazon, you will need to decide between Fulfillment by Amazon (FBA) and Fulfillment by Merchant (FBM). It’s a big choice and one that will directly affect your operations, costs, and customer satisfaction.
With FBA, you send products to Amazon’s fulfillment centers. Amazon then handles storage, packaging, shipping, customer service, and returns.
https://www.youtube.com/watch?v=qSnfGUKNDUQ
There’s a certain appeal to doing this. You can manage your sales and inventory under one roof and in one system. Plus, this method automatically makes your products eligible for Amazon Prime’s free two-day shipping, which increases your visibility among Prime members.
Of course, this is not a perfect option since FBA comes with storage and fulfillment fees. These can add up, especially for slow-moving or bulky items. Additionally, you have less control over inventory management and packaging.
Some people prefer FBM instead, which means you manage storage, packaging, shipping, customer service, and returns yourself or through third-party logistics providers.
Doing this gives you a greater degree of control over fulfillment, and you can do things like personalize packaging and interact more directly with customers. This can be more cost-effective for sellers with existing logistics infrastructure or for products that are heavy, oversized, or have lower sales volumes.
But there are downsides, as you might expect. For one, FBM products are not automatically Prime-eligible. You can get around this by qualifying for Seller Fulfilled Prime (SFP). But that means you will have to meet Amazon’s stringent performance requirements, which includes having a high on-time shipment rate and offering premium shipping options. That’s not easy to do.
When choosing between FBA and FBM, consider your product type and volume, desire for control over fulfillment, cost analysis, scalability, and the level of customer service you wish to provide. FBA is generally better when simplicity is a priority and FBM is generally better when flexibility is a priority.
How can inventory management tools help prevent stockouts or overstocking for beginners?
Many beginner sellers rely on spreadsheets to track inventory, but as sales grow, managing stock manually becomes overwhelming.
“As sales grow and SKUs increase, manual tracking gets more complex,” says Kristin Hutcherson, Partnership Manager at eComEngine. “This is where inventory management tools become important to consider.”
These tools provide real-time insights, helping sellers avoid stockouts and overstocking by streamlining supply chain decisions. “It may be beneficial to start with operational analytics or insights tools rather than a full inventory management tool,” Hutcherson explains.
“Tools like SellerPulse, for example, offer inventory planning reports, FBA fee alerts, and SKU-level profitability analysis.”
Effective inventory management reduces additional order fulfillment fees, aged inventory surcharges, and disposal costs. Smart use of software is an all-around good way to help maintain optimal stock levels.
How can a seller use Amazon ads to boost initial sales and visibility?
Amazon’s advertising platform is one of the most effective ways to drive traffic and increase sales. Sponsored Products, Sponsored Brands, and Sponsored Display Ads help new sellers reach their audience quickly.
To start, sellers should focus on keyword targeting. Using tools like Jungle Scout’s Keyword Scout can help identify high-performing search terms. Optimizing bids and monitoring ACoS (Advertising Cost of Sales) will help you make sure ad spend remains profitable.
Running low-bid automatic campaigns initially can help uncover valuable search terms. After identifying strong keywords, shifting to manual campaigns with refined targeting can improve efficiency. Additionally, testing Sponsored Brands and Display Ads can enhance brand recognition and keep products in front of customers.
What best practices should a newcomer follow to maintain high seller performance metrics?
Amazon tracks seller performance metrics closely. You’re going to need to maintain strong scores if you want to succeed in the long run.
The most important factors include order defect rate (ODR), late shipment rate, and customer feedback.
To keep metrics high, sellers should:
- Ship orders on time – FBA automates this, but FBM sellers need reliable fulfillment partners (Fulfillrite is one good option).
- Provide excellent customer service – Fast responses and accurate product descriptions reduce negative feedback.
- Monitor inventory closely – Stockouts hurt rankings, while excess inventory leads to storage fees.
- Handle returns quickly – A clear return policy minimizes chargebacks and disputes.
If you are able to consistently meet these standards, you will keep the buyers’ trust and your seller performance metrics will reflect this reality. And that is necessary if you want to stay in good standing with Amazon.
What else do I need to consider when selling on Amazon?
It’s also smart to keep in mind the long game. You’re ultimately going to want lifetime customers, and not just one-off purchases.
Marty Bauer, Ecommerce Expert at Omnisend says that “the strongest driver for increasing lifetime value is consistent communication post-purchase.” This is true whether people purchase from your own store or from a large centralized one like Amazon.
He goes on to further clarify that “something many businesses overlook when obsessing over loyalty programs or discounts. Customers return when they feel remembered and cared for, and coupon codes don’t necessarily convey that. Even if flows are automated, you can still set clear expectations, share tips, and follow up after delivery in a personal manner.”
If absolutely nothing else, you always have a chance to use custom packaging to direct people to your own store and your own ecosystem. That can help you stay in touch with customers, even if they find you via Amazon.
Final Thoughts
Winning on Amazon isn’t about guessing—it’s about understanding the platform, using the right tools, and making data-driven decisions.
The best sellers don’t just pick products at random. They research trends, optimize listings, manage inventory wisely, and use Amazon ads for visibility.
Whether you’re weighing FBA vs. FBM, fine-tuning pricing, or improving seller metrics, success comes down to consistency and adaptability.
Keep testing, keep optimizing, and most importantly—keep learning. The grand game of Amazon is always shifting, but sellers who stay informed and strategic will thrive.
Finding the right manufacturer is absolutely critical if you want to bring your dream product to life. A good manufacturer can make your vision a reality, ensuring high quality and timely delivery. But if you choose poorly, you could face delays, cost overruns, and subpar products.
This guide will help you navigate the process of finding the ideal manufacturing partner. In it, we will cover:
- Basic manufacturing information you need to know
- Common problems and how to avoid them
- Methods to find manufacturers
- More websites for further research
With this information, we hope to help you find the perfect manufacturer for your loftiest ambitions!
Manufacturing Basics: 7 Concepts You Must Understand
Manufacturing is about transforming raw materials into finished products. Conceptually, it’s simple. Practically, it’s complicated.
Here are seven things you need to understand before you go down the manufacturing rabbit hole online.
#1: Manufacturing in a Nutshell
Manufacturing is what transforms raw materials into finished products. It includes multiple stages: planning, designing, prototyping, production, and quality control.
- Planning sets the groundwork by defining what needs to be made and how.
- Designing turns ideas into detailed plans.
- Prototyping tests these designs to catch any issues early.
- Production is where the real making happens, turning designs into actual products.
- Quality control ensures everything meets the required standards.
Each stage must be managed well to produce a final product that meets all specifications and quality standards.
#2: Different Types of Manufacturing
Manufacturing isn’t one-size-fits-all. There are different methods depending on what you need.
Batch production is for smaller quantities, making it flexible and adaptable. It’s great if you need limited runs or want to test a new product without a huge commitment.
Mass production is for large volumes. It’s cost-effective but requires significant setup, making it ideal for products with high demand.
Bespoke manufacturing is for custom items. It allows for high customization, perfect for unique or specialized products.
Choosing the right method depends on your product’s needs, balancing flexibility, cost, and volume.
#3: The Importance of Design for Manufacturing (DFM)
Design for Manufacturing (DFM) is about making products easy and cost-effective to produce. It’s crucial to consider DFM from the start to avoid problems later.
If you ignore DFM, you might face higher costs and production challenges. DFM principles focus on simplifying designs, using standard materials, and minimizing parts.
A simpler design means fewer things can go wrong, making production smoother and cheaper. Standard materials are easier to source and often cheaper. Fewer parts mean less assembly time and fewer points of failure.
It’s really important to think about DFM early on. Of all the possible levers you have to keep costs low and production simple, DFM is probably the strongest one.
Don’t skip this!
#4: Why Minimum Order Quantities (MOQ) Matter
Minimum Order Quantities (MOQ) is the smallest quantity a manufacturer will produce in one order. Knowing your product’s MOQ is crucial for budgeting and planning.
High MOQs can mean higher upfront costs, which can be a challenge, especially for startups or small businesses. With Kickstarter campaigns in particular, the cost to produce an MOQ is extra important. That’s because a lot of crowdfunding campaigns are held in order to raise funds for production, whose cost is directly influenced by MOQ.
Sometimes, you can negotiate with manufacturers to lower the MOQ or get more flexible terms. Always consider MOQ when planning your production runs to ensure you can meet these requirements.
Proper understanding and planning around MOQ can make a big difference in managing costs and ensuring your production is viable.
#5: How To Request Quotes
Requesting a quote from a manufacturer is a key step in starting a business relationship. To get accurate quotes, you need to be clear and detailed about your product specifications.
In all likelihood, you will already be talking to manufacturers before requesting a quote. After all, you will need to have information about the MOQ, sampling, and turnaround time first. You’ll also need to finalize the specs, and manufacturers will likely have feedback for you to make sure your desired products can be made.
Ultimately, you will need detailed drawings, material specifications, and an understanding of any special requirements your product might have. When you have that, then it’s time to request a quote.
You will need to request quotes from multiple manufacturers so that you can compare prices. This will let you evaluate potential deals from different manufacturers.
This is not a process you want to rush. Thoroughness matters a lot!
#6: Quality Assurance & Packaging
Quality assurance makes sure your product meets all necessary standards before it goes into mass production. Always order samples from your manufacturer and inspect them critically.
This helps catch any issues early. Quality control involves regular inspections, testing, and making sure everything adheres to set standards throughout production.
Packaging is another big part of manufacturing and quality assurance. It often goes overlooked.
Your packaging needs to protect your product during shipping and handling. But you also can’t forget it’s also part of the overall customer experience in terms of branding and marketing.
A great packaging design can enhance the unboxing experience, making it memorable and shareable on social media. Think about durability, branding, and how the packaging reflects your product’s identity. Work closely with your manufacturer to ensure they understand and can meet your packaging requirements.
Proper packaging not only keeps your product safe but also boosts customer satisfaction and can influence their decision to buy from you again. So, prioritize quality assurance and packaging to make a lasting impression on your customers.
#7: Sustainability & Compliance
Modern manufacturing increasingly requires attention to environmental and regulatory compliance. Many manufacturers now offer sustainable material options, energy-efficient processes, and waste reduction programs that can differentiate your product while meeting consumer expectations.
Research regulatory requirements early in the process. Different markets have varying standards—FDA approvals for food contact, CE marking for European markets, or California’s Proposition 65 requirements. Some manufacturers specialize in compliance documentation and can guide you through these requirements.
Consider lifecycle impacts when selecting materials and processes. While sustainable options may cost more upfront, they often justify premium pricing and appeal to environmentally conscious consumers.
Common Problems in Manufacturing
Manufacturing can be tricky, with lots of potential pitfalls. In the sections that follow, we talk about some common problems. As we go over them, we’ll talk about how you can sidestep them to keep your production running smoothly.
#1: Poor communication and misaligned expectations
Clear communication with your manufacturer is absolutely crucial. Misunderstandings about design details and expectations can lead to big issues.
For example, imagine expecting a shiny silver finish on your product, only to receive a dull matte gray instead!
To avoid this, make sure every single specification is documented in detail and agreed upon by both parties. Use clear drawings, precise measurements, and unambiguous descriptions.
Regular updates and open lines of communication help ensure everyone is on the same page. Misaligned expectations can derail your project, so take the time to clarify and confirm every detail.
#2: Delays and unexpected costs
Delays and cost overruns are all too common in manufacturing. They can throw your entire plan off track. To tackle this, always add a cushion to your budget and timeline.
Expect the unexpected and be prepared for it. Create a contingency plan to handle surprises without panicking. Regular communication with your manufacturer is key here too.
This is especially true if you’re manufacturing overseas. Tariff hikes can drastically increase landed costs without much notice—another reason to build in extra margin and keep a close eye on trade policy updates.
Stay updated on the progress and any potential issues that could cause delays or extra costs. While you can never eliminate the possibility of unexpected costs, you can at least reduce the odds that they break your business by following tip #1.
#3: Late design changes
Changing your design mid-production is a recipe for disaster. It can lead to significant delays, increased costs, and even quality issues.
The best way to avoid this problem is to finalize your design before starting production. Once you’ve started, stick to the agreed design. Of course, some changes might be necessary, but try to limit them and understand the potential consequences.
Having a solid design from the start helps so much here. It will let you avoid last-minute changes, which will lead to a smoother production process and a higher quality end product.
#4: Poor quality control
Quality control is a critical aspect of manufacturing. A single bad batch of products can seriously damage your reputation and customer trust.
Conduct quality checks at every stage of production to maintain high standards. Regular inspections, thorough testing, and clear quality standards are essential. Don’t just assume everything will be fine—actively verify it.
#5: Poor logistics planning
Without good logistics planning, you can face major headaches. Imagine your products stuck in customs for weeks or customers getting their orders late.
To avoid these problems, plan your freight, customs, and fulfillment costs and times well in advance. Efficient logistics can reduce delays, lower costs, and improve customer satisfaction.
When choosing a manufacturer, consider all aspects of shipping and delivery. Think about the transportation method, packaging, storage, and handling. Also, be mindful of international shipping laws and customs regulations if you’re manufacturing overseas.
Any way you look at it, proper logistics planning can save you a lot of time, money, and stress.
And don’t forget tariffs. In 2025, many product categories face new or increased duties, especially for imports from China and Southeast Asia. Make sure you calculate landed costs early and consult with a customs broker before choosing a factory.
#6: Payment issues
Payment issues can cause significant disruptions. Manufacturers often require a deposit before they start production, and clear agreements on payments can prevent disputes later. Consider using escrow services for added security.
Define payment terms, conditions, and milestones clearly in your contract to avoid misunderstandings and ensure timely payments. For instance, you might agree to pay a certain percentage upfront, another portion upon completion of a milestone, and the final amount upon delivery.
Regularly review and reconcile payments to avoid any discrepancies. Keeping on top of payments helps maintain a good relationship with your manufacturer and ensures a smooth production process.
Evaluating manufacturer capabilities
When evaluating manufacturers, consider their capabilities, costs, location, and reputation. Make sure they can produce your product as you imagine it and meet your quality standards.
Visit facilities, if possible, to see their operations firsthand. Look for manufacturers with experience in your industry and good reviews from other clients.
Methods to Find Manufacturers
Finding the right manufacturer requires thorough research and patience. Start by searching online, visiting trade shows, and tapping into industry networks.
Websites like Alibaba, ThomasNet, and industry forums are great resources. Don’t rush this process—take your time to gather information and compare options.
Build a list of potential manufacturers and narrow it down based on your criteria. Look at factors like their production capacity, lead times, quality control measures, and pricing.
Reach out to them with detailed RFQs and evaluate their responses. The right manufacturing partner will align with your needs and help you bring your product to life successfully.
Bear in mind that as the world leans more toward tariff-driven policy, you need to consider that as part of your cost as well. As Jehann Biggs, President of In2Green says, “some product lines are more sensitive to tariffs than others, especially those made from more expensive materials or complicated supply chains.”
Again—we can’t emphasize this enough—don’t rush! Patience is your friend here.
Finding a Manufacturer – 14 Sites You Can Use
When it comes time to find a manufacturer, you will need to do a lot of industry-specific research to find the right one. We highly recommend that you read more information relevant to your industry before starting a business relationship with a manufacturer.
That said, we’ve compiled a list of manufacturing websites that you can use to start finding manufacturers. Our original sources are Shopify and Small Biz Trends.
- ThomasNet
- Maker’s Row
- MFG
- Kompass
- Shopify Dropshipping
- Alibaba
- AliExpress
- IndiaMart
- Sourcify
- Core77 Design Firm Directory
- Industrial Designers Society of America
- Upwork
- JobShop.com
- IndustryNet
Remember: before committing to any manufacturer, it’s a good idea to verify their credentials thoroughly.
Check business licenses, quality certifications (ISO 9001, etc.), and insurance coverage. Request references from recent clients and follow up with them about their experiences.
Consider third-party auditing services that can evaluate facilities for quality, safety, and ethical practices. Many buyers now require manufacturers to meet specific social responsibility standards.
Final Thoughts
Finding the right manufacturer can be the key to turning your dream product into a reality. Remember, thorough research and clear communication are your best tools.
Be patient and meticulous in your search, and don’t rush into decisions. A good manufacturing partner will align with your needs and contribute significantly to your product’s success.
Nothing beats making your ideas tangible. Creating a product prototype is how you do that. This is the process that turns concepts into realities.
When you have a prototype, you can test, refine, and perfect your design before mass production. But it’s not always a straight path to get there. You need to plan, research, and adapt as you learn new information.
Many aspiring inventors rush through the prototyping phase. They might overlook important details or skip critical tests, only to end up paying for it later. A well-thought-out prototype, on the other hand, can save time, money, and headaches later.
In this guide, we’re going to talk about how you can prototype your product in five simple steps. Along the way, we’re going to share thoughts from industry experts who’ve been through the process.
How Product Manufacturing Works
Before you start working on a prototype, it helps to know what goes into product manufacturing. It starts, of course, with an idea. You come up with a clear concept and then you make a prototype.
Prototyping means creating detailed specifications, including those around materials, dimensions, and functionality. Depending on what you’re making, you might end up using computer-aided design (CAD) software.
Once the design is finalized, you’ll need to choose a manufacturer, assuming this isn’t something you can make in-house. Manufacturers vary in terms of capabilities, quality standards, and costs. So if you want great results, you’ll be doing a lot of research.
Your design might require special processes, like injection molding, CNC machining, or 3D printing. But that will all depend on what you’re making.
Once you find a few manufacturers you like, then you request quotes. Once you review those, you settle one you like best and then start production. This might involve doing a small test run to make sure everything goes OK. If the sample run turns out well, you can move on to full-scale production.
Bearing all that in mind, we’ll now share advice from experts on common mistakes to avoid during the prototyping and manufacturing processes.
5 Tips Before You Start Manufacturing
When you start having product manufactured for you, it can be stressful, even if you know what you’re doing. But with some forethought, you can avoid common issues.
1. Know your customers.
Jason Wingate, CEO of Emerald Ocean Ltd., illustrates this especially well in a story he shared with us. He says, “a few years ago we released the Rotary Thread tool, a thread filing tool that was revolutionary and nothing was like it on the market. It could file threads quicker and faster than anything. We sold (and still sell) to Lowe’s and Home Depot in the USA, and Canadian Tire in Canada.”
“But sales were not as good as we expected. Why? Because the customers of most retail chains don’t need a thread filing tool most of the time. If a nut or bolt comes loose, they just buy a new one for a few cents.”
Wingate’s team was ultimately able to pivot into a much more profitable niche with time. But he stresses the importance of knowing your customer before total commitment to a certain course of action. “If the customer doesn’t have a problem or need your product – you need to reflect on that and find out what they do need and how your product fits.”
2. Start small and iterate quickly.
You’re not going to get everything right the first time. Multiple sources stated this to us, perhaps best said by Jorge Argota, a marketing consultant with a background in product development.
Argota says it’s best to “start small with your prototypes to keep costs down and iterate quickly based on feedback. Engage potential users early in the process to make sure the product meets their needs. Keep detailed records of all changes and decisions during the prototyping phase, it will help you in future development.”
He also emphasizes that it’s important to be flexible with your design, and to adapt to challenges or new opportunities as they come.
On a related note, Ryan McDonald, COO of Resell Calendar, states that it’s important to not “forget packaging and branding during the prototyping process. Early consideration of these elements can significantly impact the perceived value of your product. At Resell Calendar, we’ve found that your product’s resale value is much improved by appealing, well-designed packaging.”
3. Don’t underestimate the costs.
One unfortunately common issue that product creators run into is underestimating costs. It’s easy to overlook certain expenses, especially when they’re not obvious. But hidden or not, costs associated with material testing, design revisions, and multiple iterations add up. So does gaining access to specialized tools or machinery, like plastic molds.
When asked about mistakes best avoided, Argota said that “I underestimated costs early on, didn’t vet some manufacturers well enough and sometimes rushed through the prototyping phase without enough testing.”
The learning curve is formidable and making mistakes is common. But nevertheless, Argota emphasizes that “miscommunication about product specs led to some costly mistakes. Looking back better planning and clearer communication would have saved a lot of trouble.”
When in doubt, assume manufacturing – including prototyping – will cost more than you think.
4. Don’t hurry the process.
Another tempting mistake is to rush through the prototyping process. But ironically, this can end up wasting more time, in addition to leading to costly mistakes. When you’re in a hurry, it’s easy to skip steps like testing, refinement of the design, and gathering feedback.
“Anyone beginning their own product prototype should never hurry the process,” says McDonald. “Spend time evaluating your prototypes in real-world conditions. Don’t be afraid to iterate, as every version should improve upon the last. Keep your target market in mind throughout the process. In the end, the product must fulfill the needs and wants of your customers.”
5. Consider hiring a broker.
You don’t necessarily have to manufacture your own products. In fact, you have the option to hire a broker to assist.
When asked what he would do differently, Wingate stated that “if I could change anything – first I would get a good broker. Without one we were just going back and forth ourselves looking up and trying to evaluate manufacturers, but a good broker will have that knowledge and possibly existing relationships already.”
5 Steps To Create A Product Prototype
It’s premature to start prototyping before you understand the underlying logic of manufacturing and prototyping. Having covered that in the previous sections, we can now provide a list five steps that you can follow to get started with prototyping.
1. Create the best prototype you can alone.
Everyone we talked to, independently of one another, agreed that it was vitally important to have a clear vision of what you want to make. One great way to do that is to make the best prototype you can on your own. This isn’t a substitute for a sample run, but rather a way to clarify your thinking.
McDonald says, “we’ve found that having a clear vision is crucial when prototyping products. First, we create detailed sketches and 3D renderings of our product ideas. This visualizes the end result, allowing us to identify potential issues early on. After that, we create physical prototypes. For smaller items, we use 3D printing, and for larger ones, we work with local craftsmen.”
Argota has a similar process, saying that he and his team would create “a basic version of the product using basic materials to test the idea. Depending on the product complexity and requirements, I used 3D printing, CNC machining, or even handcrafting. This stage [involved] a lot of iterative testing and gathering feedback to refine both design and functionality.”
Even Wingate, who advocates for working with a broker says that “while I don’t usually prototype the products myself – the general way is that we try to see if we can ‘throw it together’ as a prototype in-house using CAD drawings and, if possible, a 3D printer (of course – this depends on what you’re trying to create).”
2. Find a similar product.
Once you have a sense of what your product will look like, try to find similar ones. Buy them, if need be. You want to analyze similar products and try to understand how they are made.
If you’re not sure how a product is being made, you can try looking for “making of” or “X being manufactured” videos on YouTube. You might also have some luck looking for how to blogs or even searching for patents.
Even if you are unable to tell how specific products are made, finding similar ones will allow you to describe what you want to a manufacturer. They may be able to reverse engineer a product that already exists.
Sometimes, you can even find the manufacturer of products you like. That gives you chance to reach out to a company whose work you’re already familiar with.
3. Shop for materials.
Once you have similar products in hand, start researching material options through manufacturers’ catalogs, sourcing platforms like Alibaba and ThomasNet, and by consulting with industry experts if needed.
As you research, keep in mind that tariffs on imports — especially from China — have risen sharply in 2025. It’s wise to check tariff classifications (HS codes) for your intended materials and consider alternate sources, like Mexico, India, or Vietnam, if costs are too high. Bear in mind that some materials are subject to higher tariffs than others, so you may be able to save on tariffs if you choose materials carefully.
The specifics of your material research process will differ greatly depending on the nature of the product you are manufacturing, but the basic information provided above is useful in most cases.
For example, if you know you need transparent plastic, you can figure out a more specific name using this method. The screenshot below shows you what happens when you look for “transparent plastic” on Alibaba. You have options ranging from food-grade R-PET plastic to cast acrylic to polycarbonate…the list goes on.
![]()
When asked about best practices on material selection, McDonald says that “we consider cost, durability, and user experience. To evaluate performance and quality, we often order samples from several suppliers. For electronics, we prioritize components that satisfy industry standards and have a track record of reliability. Regarding clothing and accessories, we pay close attention to materials that provide longevity as well as comfort.”
Argota has a similar method, saying that in his prior career, “material selection was driven by durability, cost, availability and how well the material suited the product’s purpose. I did some initial research by consulting with material experts and engineers and factored in sustainability if that was a priority. Prototyping with different materials helped me make a more informed decision.”
Wingate emphasized the importance of “research, research, research.” And indeed, his emphasis is well placed, since material requirements vary widely based on product, price, market, your target audience, and a variety of other factors.
4. Look for a manufacturer.
When the situation calls for it, it’s a great idea to make your own prototype. But your own in-house prototype is no replacement for a true sample of a manufacturer’s work. So it is very important to note that prototyping will also involve finding a manufacturing partner.
This can be an in-depth process. According to Argota, “finding the right manufacturer required researching companies that specialized in my type of product. I used online directories, attended industry trade shows and reached out to my contacts for referrals. I made sure to evaluate each manufacturer’s capabilities, quality standards, communication style and reliability before making a decision.”
McDonald says that his team has “had success with platforms like Alibaba and GlobalSources. These platforms let us connect with many different manufacturers and evaluate their capacity and cost performance. Whenever possible, we also go to trade events since they offer great chances to meet manufacturers personally and see their work firsthand.”
To add to the above, we believe it is best practice to contact multiple manufacturers so that you can compare quotes. Alternatively, you can consider Wingate’s advice to hire a broker.
Most important of all: never commit to a manufacturer based solely on their claims or portfolio. Request samples of similar products they’ve made, ideally using materials comparable to your requirements. Pay attention to finish quality, dimensional accuracy, and consistency between multiple samples.
Consider visiting facilities if feasible, or hiring third-party inspection services. Many manufacturers excel at producing samples but struggle with consistent quality at scale. Ask about their quality control processes, testing equipment, and how they handle defective units.
Document everything during this evaluation phase. These records become valuable if quality issues arise during production.
And again, it bears repeating: rising tariffs on Chinese goods in 2025 have also made it increasingly important to explore manufacturers in regions with lower import duties. Some creators are shifting to Mexico, Southeast Asia, or even U.S.-based options for smaller production runs.
5. Request quotes.
Once you have a clear idea of what you need to manufacture and what materials you need to use to make it, then you can request quotes. You want multiple quotes from multiple manufacturers so you can compare them and make a smart decision.
“To get quotes I reached out to several manufacturers with detailed specifications of the product, including drawings or CAD files, material requirements and expected quantities,” says Argota. “Comparing these quotes helped me understand the market rates and negotiate better terms. Having all the info ready upfront made the process smoother.”
This isn’t a process you can shortcut. As McDonald states, “though it can take time, the quote request procedure is necessary to get the best value. Usually, we reach out to various manufacturers with detailed product specifications. We request quotations breaking out labor, material, and any additional fees.”
This thorough approach has a lot of benefits. “This lets us compare offerings more easily. We also consider production capacity, quality control measures, and communication responsiveness as the lowest bid as not necessarily the best choice.”
If this process intimidates you, take heart. According to Wingate, “quoting isn’t too hard.” He further states that “you’ll get feedback and pricing from a variety of suppliers, and if you did your research (or had your broker do it for you), you can select from there.”
Final Thoughts
Making a great product prototype requires patience, planning, and willingness to adapt. The goal here isn’t just to bring an idea to life, but to refine an idea until it’s the perfect fit for your customers. If you follow the steps in this article, you’ll be well on your way to doing exactly that.
Don’t rush the process and don’t underestimate its complexities. Doing that can lead to delays and extra expenses. Take your time and do things right. Test, gather feedback, and improve at every stage. If you go through this process and you’re careful and attentive to detail, you won’t just make your idea tangible – you’ll make a really good product that people desperately want to buy.