How Ecommerce Order Fulfillment Works: A Flow Chart
Have you ever ordered something online and wondered how exactly it got to your house? You’re certainly not alone – people may shop online a ton, but the order fulfillment process is still a little opaque.
Supply chain management, done well, is a bit like magic. Online shoppers can go their whole lives without really understanding how items get from Point A to Point B. And that’s the way we like it!
But still, you might be curious about how the whole thing works. So to satisfy your curiosity, here are the 11 order fulfillment steps that take place within the walls of our warehouse – and other warehouses like it – that make online shopping possible.
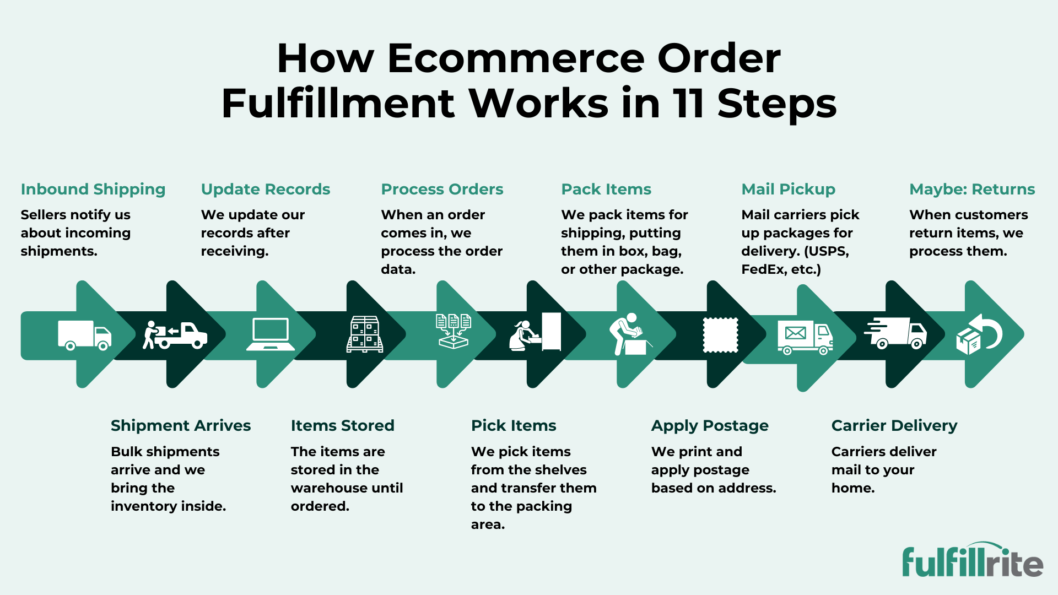
11 Steps in Ecommerce Order Fulfillment
1. Sellers notify us about incoming shipments.
Before we can talk about what happens when you click “buy”, we need to talk about how goods wind up in our warehouse in the first place! Sellers have to ship them to us in bulk, which they do by booking freight.
Freight is how you get large quantities of goods from one place to another, such as a manufacturer to a warehouse. Booking freight is a complex enough subject in its own right, which we write about in detail here. Suffice it to say, when something happens in the world of freight – like a boat getting stuck in a canal – it can really slow down the flow of goods from one place to another!
In any case, in order for us to prep our warehouse for a big shipment, we have sellers send us an ASN, or advance shipping notice. That basically tells us when they’re shipping items in and what we can expect to find in the truck. This allows us to make sure we have enough people working a given shift to unload the truck in a timely manner.
The process is the same even in other countries. For example, Adayra Lopez, Vice President of Sales at InterFulfillment, a Canadian fulfillment center, describes a similar process for knowing when new orders come in.
“Orders are seamlessly transmitted to your [fulfillment center] software through integration with your shopping cart, ERP system, or other platforms,” says Lopez. “This eliminates the need for manual order uploads, though that option remains available if you prefer to start manually before integrating. Once an order is processed, the tracking number is automatically sent back to your shopping cart, ERP system, or other platforms through the integration.”
2. Bulk shipments arrive and we bring the inventory inside.
When the truck arrives, goods are typically packed in boxes. If there are enough goods, the boxes will be packed on pallets and possibly shrink-wrapped to the pallets.
Depending on the size and number of the boxes, we may use conveyors to slide boxes quickly from the truck into the warehouse. Alternatively, we may use pallet jacks to move entire pallets of goods within the warehouse. With either method, the goal is to ultimately move inventory to a designated place in the warehouse where they will be stored for the long term.
3. We update our records after receiving.
Once we receive goods, we make to update our system to reflect where we are going to store them. This makes it easy to know where to go when we need to retrieve items for order fulfillment. We also double-check to make sure we received the correct number of boxes or pallets based on the information included on the ASN.
4. The items are stored.
This part is straightforward. Either by hand or by using machinery like a pallet jack, we physically store the items where they need to go.
5. When an order comes in, we process the order data.
Now we can get to the part where you’re involved! We had to set the stage before your part could be played, because an order going to an empty warehouse simply cannot be fulfilled.
When you place an order online with a company that is using a fulfillment warehouse, a lot of things happen when you click that Buy button. The store will collect payment from you, and your shipping information as well as information about the order itself is sent to the fulfillment company. The specifics of how this happens differ based on what software the company is using and which fulfillment company they’re working with.
Let’s use a simple and common example for the sake of conversation. Say you order 10 blue baseball caps from a local Shopify store. Your mailing address is sent to us via a Shopify-Fulfillrite integration. Along with your mailing address, we also see which SKUs – unique items – you ordered along with quantities for each.
At this point, we now know exactly what we need to look for in the warehouse, where we can find it, and to whom we need to send it.
6. We pick items from the shelves.
At this point, we look for the blue baseball caps. We check our system to see where we stored them. Then a warehouse worker goes to pick them up and bring them to the shipping table.
During this process, we scan the items so we know how many we are taking out of inventory. This allows us to keep a pretty accurate tally of how many items we have on hand.
It’s worth noting that fulfillment centers also tend to be more cost-efficient than DIY shipping. According to Adayra Lopez at InterFulfillment, “their ability to leverage economies of scale plays a significant role. By managing large volumes of inventory for multiple clients, fulfillment centers can spread fixed costs—such as warehousing and equipment—over a larger base, effectively reducing the cost per unit.”
This “economies of scale” effect is why so many businesses – from small Shopify stores to mega-stores like Costco – rely on fulfillment centers instead of handling shipping in-house.
7. We pack items for shipping.
Once the items are delivered to the packing table, we determine how best to prep them for the mail. Breakable items need to be placed in rigid boxes and wrapped in cushioning material like bubble wrap. Other items, like T-shirts, can simply be put in polybags.
Choosing the right packaging can be a surprisingly complex topic in its own right. Suffice it to say, our goals are to pack items in the smallest packages possible while providing adequate padding so they items don’t break in the mail.
8. We print and apply postage.
Choosing the smallest package possible is important. Postage prices are determined by the weight and size of the package, so we naturally want to save our clients – the companies you order from – as much money as possible.
We weigh packages before we print postage and measure them as well. This allows us to buy and print the amount of postage. Depending on where we’re sending to, we may use a carriers such as UPS, USPS, or FedEx. For international shipping, we may use DHL or Asendia. Still in other cases, we may use regional carriers such as PCF (which serves just the northeastern US).
Once we print the postage, we apply it to the package and then prep it for pick-up.
9. Mail carriers pick up packages for delivery.
Because of the amount of packages we ship, carriers stop by our warehouse multiple times a day. Before they arrive, we sort packages based on carrier. That is to say, UPS packages go in one bin, USPS packages in another, and so on.
That way, when the carrier arrives, they take the bin full of goods and it’s a very short stop for them. This is where our work ends and mail carriers’ work begins.
10. Carriers deliver mail to your home.
Mail delivery is a complex subject in its own right. Suffice it to say that mail carriers each have their own hubs and sorting facilities. The trucks that collect packages from warehouses like ours all go to hubs/sorting facilities. At that point, packages are prepped to go from hub to hub. This is what’s happening when you see a package go from Los Angeles to Las Vegas to Houston and so on as it gets closer to your house.
Eventually, when your package arrives at the closest hub to your home, it is prepped for last-mile delivery. That’s when your local postal carrier picks up the package and drops it off at your place!
It’s at this point that order fulfillment is complete!
11. When customers return items, we process them.
Or is it? As many as 15-40% of online purchases are returned, which is a very wide range, yes, but even 15% is a lot!
That means the company that you shopped from needs to have a good, simple process in place for when items are returned.
Here is what the process usually looks like, though it may vary from store to store. The customer will request to return the item. They print a return label and a local carrier picks up the package.
The carrier delivers the item back to our warehouse. From there, we follow instructions given to us by the seller on what to do with returns. Sometimes we put them back into stock and sometimes we throw them away. It depends entirely on the nature of the item itself and the seller’s instructions.
Either way, returns are an important part of the order fulfillment process too, even if it’s easy to forget about them!
Final Thoughts
Ecommerce order fulfillment is a complex, multi-step process. But all these steps serve a clear purpose – moving products smoothly from seller to customers. This is what makes it possible to order items from the comfort of your own home and receive them just two days later!
You want to make a board game.
But how do you…make a board game?
I’m not talking about play-testing or art or any of that. I’m talking about manufacturing.
How do you work with a manufacturer to turn that beautiful idea in your head or on some index cards covered in Sharpie into a real, marketable board game product?
That’s where Panda Game Manufacturing comes in. They’re one of the most famous board game manufacturers out there. Asmodee’s used them, as has Stonemaier, Z-Man, GMT, Leder Games, and a bunch of other huge publishers.
So that’s why I’ve brought on Tyler Lipchen, Senior Project Manager and Prepress Specialist at Panda.
Transcript
About this Interview
This transcript was generated with AI and may contain occasional minor errors.
Brandon Rollins: You want to make a board game, but how do you make a board game? I’m not talking about playtesting or art or any of that. I’m talking about manufacturing. How do you work with a manufacturer to turn that beautiful idea in your head or on some index cards covered in sharpie into a real marketable board game product?
That’s where Panda Game Manufacturing comes in. They’re one of the most famous board game manufacturers out there. Asmodee’s used them, as has Stonemaier, Z Man, GMT, Leader Games, and a whole bunch of other huge publishers. So that’s why I’ve brought on Tyler Lipchin, Senior Project Manager and Pre Press Specialist at Panda.
Brandon Rollins: Now it’s funny, I had pitched the idea of an interview with the topic of a crash course in manufacturing board games when I was working with Panda on this. Turns out they had a slideshow already made, ready to go, that was almost a word for word match on what I was looking for. I couldn’t ask for any better, so they’re going to do that slideshow today.
Now we’re going to cut to that in just a minute, but real quick. My name is Brandon. This video is brought to you by Fulfillrite. We ship orders for e commerce and crowdfunding. Link below for more details, and quotes are always free. Now, one last quick note, I edited this one with a light touch because we just want to keep it simple and lo fi and honest, just like two professionals on a Zoom call, but this time with screen sharing.
So, alright, let’s cut to the interview. So, yeah, thank you again for coming on. I really appreciate it. Yeah, no worries. Yeah, I, I love, um, that you just happened to have exactly the kind of thing that we wanted to cover anyway, just sitting around in your Google Drive ready to go. I couldn’t have asked for better.
Tyler Lipchen: Yeah, we get, we get asked the question a lot. So yeah, we’ve definitely come prepared.
Brandon Rollins: Yeah, you’re ready for it. I like that. Um, we can jump into this thing whenever you’re ready.
Intro to Panda Game Manufacturing
Tyler Lipchen: Yeah, sounds good. Sounds good. So this is our crash course in, in, in tabletop game manufacturing. Um, this is an introduction to, um, to, uh, Panda’s process in particular, but this process will be very, very similar for any mass production, um, uh, uh, supplier.
The 1st part of it will kind of go through the whole process, but some parts of it will be more geared towards like a print on demand. But the majority of this presentation will be for a full mass production facility. My name is Tyler. I’m from Panda. As you know, I am a senior project manager and pre press specialist.
Um, so I kind of handle projects from the consultation, quoting phase all the way through to, I do run pre press checks and design verification. Um, and then I actually manage a project all the way through to completion, even help with some shipping as well. So, um, that’s who I am. Uh, but let’s get into the production process.
Cause that’s why you’re all here. So. There we go.
The Manufacturing Process
Tyler Lipchen: So this is a typical manufacturing process. So, um, you will reach out, uh, at the beginning of your journey, whether you’re in the middle of a game design, or you’re planning a crowdfunding campaign, or you’re a publisher who has a product that you’ve kind of gotten past alpha testing.
So like you’ve been playtesting it, you have a good idea of the specifications of how many cards you need, how big your board has to be. Um, you have a A working prototype, um, that that could be a mass production game eventually, right? That’s kind of when you want to reach out for quotes with manufacturers because otherwise it too much is in flux and you make it an estimate that’s not really accurate.
So, um, uh, the 1st part of the process is reaching out for a quote, and I believe you should reach out for a quote once you have a working prototype. And then you just match specs to reach out for a quote. You can do it through. There are some online estimator tools. Panda has an estimator tool on our website, so you can use that to start.
If you want just a rough estimate or you can reach out to us directly for a quote, at that point you’ll be put in touch with the project manager like myself, um, who will review your specifications. Um, there are ways you can input specifications into our website. Um, or if you have like an Excel document or something, you can also work with your project manager to fill out your specs that way.
Um, someone like me and myself, again, a project manager, will review your specifications. Uh, we’ll look out for, for, um, things that don’t quite match, like maybe your, you know, the components don’t fit inside your box, or maybe you’ve kind of asked for something that’s a little bit kind of, um, uh, whether we can do it or not.
Uh, we’ll kind of look for any kind of hedge cases, anything, any tweaks we can make. Um, and also during that initial stage, we might make some, uh, suggestions. Uh, certain materials, uh, more obvious, some like cost saving suggestions. Um, if you want, um, there’s also a bit of consultation for crowdfunding, which we’ll talk about kind of at the end of the presentation where there, there’s a little bit of extra, uh, consultation that goes along with that.
Um, but generally speaking. You’ll speak to one of us or you’ll send in your specs and we’ll provide a quote. Now once you’re happy with the quote and you want to sign the quote and you’ve solidified your quantities, um, then we go into the next stage which is called design verification, um, which will be checking your files.
After that we go into pre production. Uh, which will be, uh, kind of digital printed a sample of your game and any samples of any source components, which are non printed components, then mass production, then assembly, and then shipping. And that is kind of the whole process from start to finish. I want to go through each of those, uh, points, uh, in detail, and then we’ll give you some, some tips and tricks, uh, and some more information on crowdfunding in particular at the end of the
Brandon Rollins: presentation as well.
Now, I do have a brief question about the manufacturing, the, um, Manufacturing process more broadly. And that is, I I’m seeing more and more people are doing this kind of, um, design for manufacturing kind of process where they get really smart about it. And they figure out what is actually feasible in terms of costs before they get too hung up on any idea.
Now, it sounds like your online pricing calculator can already help people with that to some extent, but do you have additional resources that can help people in that scenario?
Tyler Lipchen: Yeah, yeah, for sure. No, it’s a really good idea to, um, you know, as you’re as you’re building a tabletop game is to consider manufacturing.
We actually have a presentation called game design with manufacturing in mind that goes through it in detail. Um, but because you’re building a product and because it has to, you know, um. Take up a physical space is actual physical thing, uh, knowing a lot more about, um, kind of your, your, your, your limitations and your opportunities with certain components, uh, is only going to help your design, uh, and earlier, earlier you think about that, the better is going to be in your final product.
Um, so if you go to the Panda website, panda. gm. com and go to tools. Uh, there are a lot of tools there that can help you out. We have a graphic design guidebook, um, and a component guidebook and a crowd funding guidebook, plus templates, a template generator, and, and all sorts of, of, um, of tools that can help you out throughout that process as well.
Um, also just flipping through the website in general, like we go through each component on the website itself. Just reading through those, uh, and get familiar with them, uh, will make a big difference in your game design.
Brandon Rollins: Yeah, that, that sounds good. And I can’t recommend enough that people just get involved early in trying to cut off costs before they, uh, Commit really hard to something because if you get the costs under control early, it makes everything else easier.
And as a note for you and me, um, any of those resources you just mentioned, if you just send me the links after the, after we do this recording, I’ll drop those down in the comments. Anybody who’s watching this can, can go to the landing pages or any other resources you may want to link
Tyler Lipchen: them to. Yeah. Yeah.
It sounds perfect. Sounds good. There’s a slide at the very end that talks about tools as well. So we’re kind of jumping ahead of ourselves here, but I figured it’s a good question. It’s all good. I’m kind of jumping all over the place already, but that’s okay. Uh, like I said, you got lots of questions. Um, you know, a lot of your, your clients, people you work with have questions that you’re kind of, um, you’re, you’re kind of their avatar right now.
Aren’t you kind of speaking for them? So, um, so that’s fine. Yeah. We can jump around a little bit if we have to. Okay. Awesome.
Quoting
Tyler Lipchen: So let’s go through the first bit, which was quoting, which I kind of already talked mostly about. Um, but again, we have an estimator tool online. Some of the manufacturing may also have estimator tools.
Um, you can request a formal quote, I think you’ll have a consultation with, with your project manager. Um, go to the components, um, again, offer suggestions. And then of course there’s crowdfunding. Uh, we do have a crowdfunding package. We will talk about, uh, later on in the presentation as well. Um, but for that, we will have offered crowdfunding advice, how to particularly look at manufacturing.
Um, For crowdfunding project, uh, planning, stretch goals and add ons, and also talk about prototypes and review copies as well, which is very important for crowdfunding. So I’ll talk about that a bit at the end, but during this quoting process, that is something you will be talking about as you’re quoting your project for sure.
Design Verification
Tyler Lipchen: Um, next up, after you sign the quote, as I said, we go into design verification, and this is pre press. At this point, you will be assigned a dedicated pre press specialist. Again, I’m a dual role. I do project management and pre press, but if your project manager isn’t a dual role, you’ll be assigned a specific pre press specialist.
You’ll upload your files to our website. We have a custom built FTP, uh, for all of your files. Uh, we’ll check your files, provide a pre press report, which will say, um, kind of where there are issues. Um, any suggestions we have, uh, if there’s an issue that we, that you need to correct, we’ll provide information on how to correct it with screenshots and the whole lot.
So, um, we’ll send that report back to you. You’ll amend the files and re upload the files to us. We’ll check them again. And we’ll kind of go back and forth until I’m happy with your files. Once I’m happy with them, I will send them to our factory. Uh, they will do another final check and then create digital proofs for you.
Once you approve the digital proofs, that kind of finishes the design verification phase, and then we go into pre production.
Brandon Rollins: Do you guys tend to have a lot of back and forth on the, um, on the prepress
Tyler Lipchen: part? Yep, absolutely. Okay. For sure.
Brandon Rollins: And that’s… Complicated to account for in Kickstarter,
Tyler Lipchen: right? Yes, absolutely.
That’s one of the, probably one of the longest, um, it can be one of the longest phases in the whole production process, uh, cause it really depends on your files, um, how, how long it takes. It could take two weeks. It could take two years. Who knows? Depends on your files. But the advantage, um, you know, of working, working with Panda, working with someone like myself, is that you have a pre press specialist on call, um, who will talk you through everything, right?
They’ll talk you through how to set up your files if you need to. They’ll provide, again, they’ll provide feedback on your files to help you out. Um, And that, and that’s really important because again, it can be challenging, especially if you’re doing it all yourself. Like if you have a graphic designer who is used to tabletop games, um, it’s a little bit easier because they, you know, they kind know what they’re doing, you know, and they, they speak the lingo, right?
Um, but if you doing it yourself, which a lot of time creators are, uh, it helps to have a dedicated pre-press specialist to help talk you through these things and help check your files as you go. So. Um, don’t be too daunt. Like, don’t be too, you know, uh, you know, scared of it. It’s not like it’s going to, like, delay your project for years and years, so to speak.
Um, but it is something that you will likely need some extra support for, particularly on your first project. Uh, you will find it’s, it’s a steep learning curve, but once you do that first project. Um, the, the, you know, the reprints are very, very simple compared to a first time project. And even like a new project with an existing client, um, I find is just so much easier because like you’ve been through the process, you’ve read the design guidebook, you’ve had a pre print support, you know, what, what can be fixed.
You don’t make the same issues, you know, don’t make the same mistakes twice usually. Um, so it gets the first time. Budget extra time for sure, but after that, like it gets a lot easier to become second nature and you start to set up your files properly when you start a new game design, like, you know what card sizes you want, you have templates for the bleed and the margins, you know what to look out for, you can start to like, you know, as as an art director, help brief your artists on what you want and work within the restrictions of the components of the media.
And that makes a big difference to you’ll definitely find it. Artists and graphic designers who are, uh, industry veterans, um, their work is, is phenomenal. Um, you know, their files are, are perfect when they come in for design verification. Like it just goes right through prepress. It’s very smooth, but they work within the constraints that are inherent in the actual product and the actual processes.
Um, but they still make it look good. Right. Like, you know, they have, they have to adhere to bleed on tokens and cards, but they, they, they know those margins and bleed so well to actually use them third vantage, which is part of design. Like that’s part of game design, right? Like restrictions breed creativity, don’t they?
Like that’s, that’s inherent. Um, so same thing goes with the, with the pre press files. And again, using a graph designer who’s, who’s experienced, um, is definitely worth looking into.
Brandon Rollins: I think something just to point out for somebody who’s like, and it’s like, it’s YouTube, we get quite a general audience, but like, if you’ve never done a board game file before, or like any kind of printed marketing or media or whatever, um, that bleed is basically, you have to, um, Assume that whatever you make printed is going to have the edges cut off, so you just have to make sure that all of the critical stuff fits within a certain safe zone, and the rest is you bleed in your trim, and that’s what that’s called.
There’s neat diagrams for this, I might pop that up on
Tyler Lipchen: screen too. Yeah. And then the templates that you get through the template generator, uh, on our website does have the margin lines and the bleed lines, and it has a legend to explain what they are and things like that as well. So it’s pretty, pretty, you know, once you get the hang of it, it’s, it’s, uh, it gets a lot easier.
Like I said, just a bit of a learning curve. Awesome.
Pre-Production
Tyler Lipchen: So, uh, going through, uh, after design verification, after the digital proofs are approved, we go into pre production. So, um, at this point, uh, it says here, this is the final quality control checkpoint before mass production. Uh, we will produce a full pre production copy of your game.
That’s called the PPC for short. And that is, uh, it’s a digitally printed version of your game, so it’s used, uh, printed using a digital printer, not the offset printers that we use for mass production. Um, but it will be using the same materials and finishes as your final game. Um, the, uh, anything that’s going to be cut is going to be, uh, trimmed with a plotter as opposed to die cuts.
Um, this is very complicated. We may opt for DICUS, depending on your project manager will determine what’s best. Um, but it’s going to be a physical version of your game. Okay, kind of like, you know, kind of like a prototype you’d get at a print on demand service. Um, and this is going to be shipped to you, and then your project manager and you are going to have a, have a call.
You’re going to hop in a video call, you’re going to review the game, review the PPC, you’re going to play the game a few times with it. You have a video call with your project manager to go through any issues that you have. Now, at this point, If you have any issues, it’s fine. It can be fixed. If you find a typo in your rule book, we just go back to design verification, upload a new rule book, we check it, digital proofs are fine, approved, off we go.
Um, so at this point you can make changes if you need to. Um, after this point is when we go into mass production where it can be a lot more costly, but this is kind of like your last checkpoint before we go, we go on to mass production. Uh, during this stage, you’ll also be getting samples of any non printed components, which I call source components in this case, but, um, That would be things like dice, uh, wood, you know, wood, meeples, wood, cubes, plastic cubes, um, custom plastic minis, um, metal.
Uh, those all have kind of their own, their own process. Uh, but it’s very similar to, you know, basic print that we’ve talked about so far, like you’ll upload your files for like, it’s a three, five, we will check it, we will provide feedback, you know, re re sculpting feedback, but it’s a 3d mini or, or metal or something like that.
Um, you know, we will be some of the modifications we can do ourselves when it comes to plastic minis or metal. Um, We might revert back to you. We’ll show you what has to be done because it’s too big of a change or something like that, but we’ll, we’ll optimize your design files for, for the manufacturing process, right?
It’s like, we’ll check wood. If, um, if some parts are too thin and we’re very breakable, we’ll offer feedback, say, Oh, you know, we should pick them up the legs on this, this wooden meeple, um, or, you know, the details on this plastic mini aren’t going to show us, we should deepen these here or we should move, you know, the arm is right here and we move it to like this angle here.
Then the molds will open easier. You know, things like that is the kind of advice that we’ll offer. I said, some things we can fix ourselves for you. Um, some things we might be too much of a change that we want to, um, we want you to, to be the one to change it, uh, to make sure that it’s exactly how you want it.
Uh, well, any of these changes that we do make, we’ll always show you in advance, whether it be through a digital files or email or through a video call to make sure you approve any change that we do make as well. For any source components. Um, but once you approve those samples and the PPC, then we move on to mass production.
Yeah. And do you have any questions or comments about pre production? No, you’re good. Okay. Yeah.
Mass Production
Tyler Lipchen: So then mass production. Um, at this point, all the paper, the printed components will be printed and die cut. Um, any of the non printed components will be produced. Uh, and we will make one mass production copy, that’s MPC for short.
Uh, and that’ll be assembled and sent to you. That, the MPC is, for all intents and purposes, a retail version of your game. Uh, everything will be die cut, everything will be assembled into the box. Um, you’ll have a plastic tray, for example, and it’ll be assembled into the tray. And then we’ll be shrink wrapped and sent to you.
The only difference between the mass production copy and the final, final, final retail copies are that while we send the MPC to you for you to check, we will be acclimatizing all of your components in our factory to avoid like warping and any kind of damage from moisture. So while we send the NPC to you, um, we’ll have another video call.
Uh, you’ll unbox it. I always recommend you videotape your unboxing for your NPCs because the way that it was assembled in that box will be how it’s assembled for final. Um, at this point, again, you can’t really, well, you can change something, but it’d be costly. If you need to have you find a type or at this point or something like that, you’d have to reprint all your rule books if that was the case.
Uh, but we have so many checkpoints beforehand that, that rarely ever happens. There’s an issue at that point. Um, but one thing we can change is the way things are assembled in the box, because nothing’s been assembled yet. We’ve just produced everything. So that’s why I say, always videotape your, your MPC unboxing, just so you remember how it was packaged and it’s how you want it to be packaged.
Um, so yeah, we have a call. We go through the MPC, everything is approved. We go into final assembly.
Brandon Rollins: Yeah. Are you able to do like runs of say 15, 20, 30, if you wanted to send out copies to
Tyler Lipchen: reviewers? I will talk about that when we get to the crowdfunding section. Yeah, don’t worry. We’ll talk about that in a minute.
Assembly & Shipping
So after mass production, this is the mass production, like, you know, 1500 2000 units. We’re talking, um, after that, we go into assembly as where we actually assemble everything into the boxes. For your instructions and then your shrink draft, um, the packing, the cartons, cartons go on the pallets. Uh, and then when they wait your shipping plan, this point, they can go into a shipping container, um, that they’re being transported by ocean.
Uh, they could be packing the cartons to go on airplanes. It all depends on what your shipping plan is, uh, during the mass production process, um, that’s usually. You know, quite a lengthy time where there’s not a lot for, for me and you to do. Um, so during that time, we tend to talk about shipping, make sure your shipping plan is in place, talk to FulfillRight, make sure everything’s in, uh, all your ducks are lined up so that when the games do ship, um, everything is in order from there.
So, um, that Kind of concludes the entire production process from start to finish.
Timelines & Invoicing
Tyler Lipchen: For timelines is a quick summary, uh, design verification. The time that takes against variable files, uh, you know, for a first time client, first project planned about four weeks, um, could be a lot less, could be a lot more. It really depends on your files.
Um, Uh, pre production, uh, but before we start pre production, that’s when your first deposit invoices due, again, this could change depending on which manufacturer is, uh, who your manufacturer is or your relationship with the manufacturer, but typically speaking, the deposit invoices due before any, any kind of samples are made, um, pre production two to four weeks depends on the, on the game, depends on the components, um, some components might take longer for pre production, like again, custom metal, custom plastics will normally take longer than that.
Yeah. But dice and wood are quite quick, and so is print for pre production. Mass production, 8 12 weeks, again, totally depends on the type of components, how many different types of components you have, and your overall order quantity, right? As you can imagine, you know, making 2, 000 games is different from making 20, 000 games.
So mass production can vary. Also depends on the time of year. Um, you know, if it, if it, your mass production goes over a Chinese New Year, for example, our factories close, all Chinese factories are closed over Chinese New Year. That might add three or four weeks to your production process because of the time of year when you went into production.
After that final assembly, again, two to four weeks, um, could be a little bit longer cause it depends on the complexity of the assembly. And of course, the order. Once again, assembling 2000 games, uh, it doesn’t take as long as assembling 20, 000 games, assembling a legacy game that has, you know, certain components and certain compartments that are sealed that are in certain parts of the box.
That takes a lot longer to assemble than just some shrink wrapped cards in a tuck box, right? So, um, again, these are all kind of just overall general. You know, kind of like a pandemic style game where you’ve got a bit of print, a bit of, you know, a bit of plastic, that kind of thing all put together. But it can definitely vary.
And then, of course, shipping in the pre COVID world, ocean shipping, four to six weeks to the Western US, six to eight weeks to Eastern USA or Europe, air shipping, one to two, one to three weeks, land shipping, one to three weeks. That’s usually local to China will be anything that’s going to be a land ship for us.
Again, if you’re working with a European manufacturer, like in Poland or Germany, You know, land shipping can be anywhere in Europe, so it’s a bit different there. But, um, that’s kind of the general guidelines. Um, you know, shipping times as of the, this recording are actually, you know, pretty good. Um, so if that’s, that’s actually pretty accurate at this, at this point in time, but it can, tomorrow it can change.
So don’t just check out the date stamp when this is posted. Uh, don’t quote me on that. Um, so that’s the whole production process. Do you have any questions before I move on from there? I’m with you so
Brandon Rollins: far. I, I mean, this is like, this is, this is thorough. You guys have clearly refined this over time to, you know, kind of, um, anticipate the questions.
Tyler Lipchen: Anyways, one thing I should mention, I didn’t mention it before, is that the final invoice, we said the deposit invoice is due typically before pre production, uh, the final invoice is due before the game ship. So um, again, that’s something that you would talk with your project manager throughout the mass production, you’ll be preparing the final invoice, perhaps if Panda’s handling some of your shipping for you, that would put on your final invoice as well as we discuss your shipping plans and things like that.
General Tips
Tyler Lipchen: Awesome. Moving on. Uh, so general tips, like I said before, every first project is a learning curve. Um, so build in buffer time to begin with, right? You have to learn how to do a lot of these things as well. Um, keep usability and user experience in mind at all times. Uh, things like choosing the right colors to, you know, to avoid any challenges for people who are colorblind.
Um, choosing the right components for the job. Uh, we also do a presentation on, um, you know, UX and UI and, and, you know, game design with manufacturing in mind. Um, there’s a lot of information, um, that you can find online about this as well, but always keep the overall experience in mind, you know, like your, the way your, your tray is laid out, like, you know, think about how it’s going to be stored, how it’s going to be used, uh, throughout the entire process, because once again, game design is product design, as I said before.
Um, any game specific requirements, um, you should mention during quoting and consultation. So, um. Some games are straightforward like it’s it’s a card game. It’s me in a box. There’s a board in the scoring track, whatever. If it’s like a legacy game and you want things assembled a certain way or cards in a certain order, that’s something that’s a bit more unique.
So just be sure to mention that during our consultations. We’ll normally ask for like the elevator pitch of the game and ask how it plays that helps a lot with. What advice we can give, um, all of us are gamers at Panda. We’re all project managers are gamers. So we, we understand, we understand the lingo.
Um, if you have like a, uh, if you’re at a convention, like let us play your game, right? Like let us play tests with you. Um, if you have a mod on, uh, on online, uh, like tabletopia or TTS or something, let us play it. It helps a ton when we’re consulting you on the game and gives us a lot more context as to what you’re going for.
So. I think that’s kind of very unique for your game. Please mention it to us early. Um, think about stretch goals and fulfillment early, uh, which we talked about before and I’ll talk about again later, um, and consider table presence. Um, do more with less, right? I mean, your table presence is going to sell your game board.
Games are viral by nature. Yeah, there are solo games. Yes. But most games are multiplayer. In order to play them with somebody, you have to actually bring them to your table and show them to them. And if your game is very photogenic, uh, you know, games go viral very easily on Instagram and Facebook and social media.
Right? So consider your table presence at all times, right? That’s going to help your game overall, especially if you’re crowdfunding or trying to build up an audience at conventions.
Your Project
Tyler Lipchen: So, some tips and tricks. Cost savings. Materials and options. Um, that’s obvious cost savings, what kind of cardstocks you choose and what kind of grayboard you’re going to choose.
As you mentioned before, design with cost in mind. It’s always going to help. Um, use components, uh, in multiple ways if you can. Right. There are certain ways you can, um, you know, you can use cards to, to keep score like bonanza, right? The back of the card is how you keep your points, your scores, right? Um, think about multiple functions for, for certain components, maximize your printing sheets, right?
Um, cards print on a big giant sheet. Uh, your standard poker size car, 63 by 88 millimeter cards, uh, print 54 cards per sheet. Well, there’s 54 cards in a card deck. So, if you print 55 cards, you’re going to have to do two full sheets of, um, use two sheets. So, use 54 cards, right? Um, or, you know, max yourself out if you can.
Um, if you have, you know, 50 cards in your game, well, you kind of have four extra cards to be maybe rules reference cards or something, right? Or, or maybe they’re an advertisement for your next game or something like that, right? Um, so just use that to your advantage. Optimize your punchboard dialines as well.
Um, with Panda, we make everything bespoke. Uh, so we make your dialines bespoke, um, for your punchboards. So, utilize them. Maximize them. Maximize the space. Get the most out of it. Um, use custom shapes, right? Like double, triple encode your information. So instead of having just… Uh, you know, a coin that has a one and a coin that has a five, you can make the five bigger.
You can make it, uh, you know, a Pentagon instead of, um, instead of a circle, right? Like you can change the shape, change the sizes to help that accessibility as well for no extra cost for manufacturing, at least with us. Um, and then of course, minimize the box size. Um, that’s, that hint is particularly for crowdfunding.
Um, if you want a big shot, like a, a good shelf presence for retail, you might want a bigger box than what’s needed. Uh, but generally speaking, most people want the smallest box size possible. Cause it’s going to save you a lot on shipping. Yeah. Ocean shipping is dependent on volume. So the smaller your box, the better it’s going to be for you overall.
That’s
Brandon Rollins: a good tip for order fulfillment as well. The smaller the box, the more likely it is to get a price break on literally any kind of shipping, especially if you can get into the like the smallest possible flat rate box
Tyler Lipchen: by USPS. I was going to say flat rates make a big difference, don’t they?
Brandon Rollins: Oh yeah, for sure.
Enormous difference.
Tyler Lipchen: Yeah, absolutely. Um, awesome. Time save, uh, time save, sorry, those are cost savings. Talk about some things that can save you on production time. First of all, follow our design guidebook, which I’ll talk about later. That’s in our tools section on our, on our webpage. Um, plan your shipping strategy in advance.
Again, this, this helps a lot with any kind of delays. Um, start sampling as early as possible. You know, um, come talk to us early as possible. Start consulting. You know, you can find. A lot of times during, just during a consultation on video, we can, uh, you know, uh, find a lot of challenges, uh, that you’re going to, that you’re going to run into a lot of kind of roadblocks along the way, um, you know, kind of pinpoint where, where, where in the production process, your delays might happen, um, just by having a chat with one of us, we’ve seen it before, usually.
Use early design verification. I’m going to talk about this when we get to crowdfunding, but early design verification is basically, um, that design verification, that pre press process, doing that way in advance of, um, actual production, which we’ll talk about in a second. And of course, utilize prototype services, which will also help a lot.
So, um, I’ll get to those when we talk about crowdfunding.
Sustainable Components
Tyler Lipchen: One thing to consider as well, uh, with manufacturing is using sustainable components. Um, we can make your games FSC certified. Um, so if that’s important to you, please chat to us. Um, sometimes there’s an extra cost involved behind the material, sometimes not.
Um, we can replace shrink wrap with alternatives. We have like paper bands for cards. We have paper wrap or wafer stickers for boxes, things like that. Um, you can use a varnish instead of a laminate on your game boards and boxes. Um, you use a plastic, laminate is like a plastic sheet that goes over top of the print to protect it.
Very, um, very standard for boxes and game boards, but a varnish will, uh, will make your games a lot more recyclable. Um, you can replace plastic inserts with either molded paper trays, like pulp trays, um, or cardboard inserts. Um, and there’s going to be plenty more tips to come as we go along. Uh, we’re constantly trying to find ways to reduce, um, you know, disposable plastics, one use plastics, things like that.
So, um, okay. Keep following our website and our social media. We’ll, we’ll be constantly announcing any advances we have.
Brandon Rollins: It’s getting more cost efficient all the time too.
Tyler Lipchen: It is. Yes. It’s going more standard, right? The more standard becomes the more cost efficient it becomes. It becomes, um, cool. I mean, just one second.
Crowdfunding Tips
Tyler Lipchen: Okay. So the moment we’ve been talking about. For the half the presentation is crowdfunding tips. Um, so on our website, again, PandaGM. com slash tools, there is a crowdfunding guidebook. Um, they just, if you’re new to crowdfunding and new to the tabletop space in regards to crowdfunding, read this through.
It’s a quick read. Um, it’s just a great introduction to like how crowdfunding works with a tabletop space. It’s a little bit different. Um, the expectations with tabletop games as opposed to other projects. Um, also ask your project manager about the crowdfunding package that we offer. So, um, let’s talk about that briefly.
So we’re talking about prototypes. We talked a bit about early design verification So panda has a crowdfunding package, which is a suite of services Um that is geared specifically towards crowdfunding projects So this includes a crowdfunding consultation where we’ll have a call with you talk about your project.
We will talk about Finding your MVP, your minimum viable product, which is going to be. The version of your game that is like the bare minimum that you’ll be happy with that will be your funding will be based around. It doesn’t mean like replace all the plastic means with cardboard standees, right? It’s whatever version of your game is the version that you as a creator are going to be happy with on the market.
That could involve a whole lot of plastic means it could not, right? It depends on your project. And then also going through all of the stretch goals for that offering suggestions for stretch goals and kind of component upgrades, um, talking through the best. Um, materials and finishes, uh, for your game in particular.
Talking about add ons, uh, if you have like a deluxe game, a retail game that’s being produced at the same time, we’ll talk about how we can kind of separate the components and how we work assembly for that kind of thing. We’ll also offer suggestions on, um, you know, marketing, um, and fulfillment, uh, and shipping and things like that as well.
Um, along with that crowdfunding, uh, the consultations, we will also, um, talk about prototypes. So what will happen is we will do, uh, we can do prototypes for your, uh, for your campaign, which you’d use for, um, demos, review copies, uh, convention, you know, convention presence, taking photographs and videos, how to play videos and things like that.
Um, it will be digitally printed like your PPC. Um, the cutting, uh, will be, could be, um, die cut or plotted, depends on, on your game. And then any non printed components, um, we can also do prototypes for, uh, with the exception of. Plastic minis talk to your project manager, we may or may not be able to do plastic mini, it depends on your project.
But things like dice, things like wood, you know, simple plastics like cubes and things like that we can do for prototypes. And the advantage with working with us for prototypes is that everything will be bespoke. So if you have custom meats, we can do those for you, for prototypes. If you have custom dice, we can do those for you, for prototypes, which will make a, a massive splash on for when you go to reviewers and, uh, and, and try to show off your products.
I mean, there’ll still be a prototype, right? You know, the reviewers will still say this is a prototype. Things are substitute change, but is going to be a very good, very good prototype, um, to show off. Um, the quality, the quality is, I mean, sometimes I’m amazed by how good it is at the moment. It’s only getting better as well.
Um, so part of the, part of the package will be prototypes and with that will come early design verification because of course, in order to print your files, I’m going to have to check your files anyways, right? So I will go through the design verification process. Um, we’ll upload the files, we pre press checks with digital proofs, all of that, and then do the, the prototype.
And what that will help you out as well, not only do you get review copies and things like that, um, but, uh, when it comes to actually produce the game for mass production, we will have gone through the design verification process already. Okay. So some things may change, right? Like you may, the rule book might change.
Maybe you added some cards because there’s a stretch goal. So you have to upload a few extra files, but like 80 to 90 percent of the design verification process has been done already at this point, because you did it for prototypes. Um, you’ll still get a PPC because that’s for quality control, but because you’ve already seen the prototypes, which are very, very similar process, again, that pre production phase goes by a lot faster, right?
So if you haven’t changed like the dice at all, for example, like we can go, we can go to mass production if you approve those samples because we, because we make them all bespoke anyways. Um, it just saves you a lot on your production process, a lot of time. Your production process. So, um, that is, that’s the massive advantage of going through, um, you’re going through manufacturer, your, your final manufacturer, um, with, uh, with all your crowdfunding needs as well in advance.
So save you a lot of time, um, can save you a lot of costs in some cases in the beginning as well, because you have to pay for prototypes anyways, these days, right? Uh, it’s for your crowdfunding project. So, um, that is kind of our crowdfunding package and services that we can also offer things that we can help you with punch board layouts with packaging design, um, you know, plastic trade design to some degree, um, uh, you know, things like that.
We can, we can help you, you know, arrange your dial lines on your punch boards. And if you have anything. Dual layer boards. We can, we can help you with as well as part of that package. So, um, you know, really help hold your hand, especially if you’re new to, to tabletop games and crowdfunding. Um, it’s really nice to have a project manager and prepress specialist as part of your team, uh, to go through that process with you and help you out.
So. So that’s what we can help with crowdfunding. Um, and then a couple of tips for crowdfunding is talk to your project manager about your delivery timeline, because, uh, again, first time projects are going to take a lot of extra time when you go into production. It might cross over a Chinese new year.
For example, if you want your games out for Essin or Christmas, you got to really work back from those timelines. And you seem to have a lot less time than you think. If you think like, Oh yeah, I’m going to launch the campaign now. Then six months again, we’ll be arriving in stores. Well, I mean, ocean shipping might take eight weeks.
Well, design verification takes this many weeks and pre production, you know, this, you know, let us know your timelines in advance when you work backwards with a, with a realistic, you know, conservative timeline for you, for your project, because it was your first time creator. You don’t want, you want to be very upfront and transparent and honest with your backers.
Um, so. You know, knowing it, getting all the information in advance is going to help you a lot, um, to become, uh, a reliable creator who will go on to, you know, if you want to build a company out of this, where you want to build a publishing company, you want to gain that trust from your backers right away.
Um, so, you know, you use, use, use us, use your team. And as we’re here, we’re part of your team. So I’ll, you know, use us. Yeah, no questions here,
Brandon Rollins: but I, but I will say that yes, it is tremendously hard to make a board game and absolutely like reach out to a manufacturer early, like to get this help, not only with the manufacturing, but also with just figuring out the timeline in a fulfillment center relatively early too, because like.
In terms of two vendors to reach out to early, those are probably the two that if you get everything right and listen to the advice you get early, it will save you probably the most time and money and set you on track for that second, third, fourth product launch much, much easier.
Tyler Lipchen: For sure. For sure. Yeah.
You’ve got the relationship with the partners as well, right? Which helps. I would say there are kind of four pillars to your crowdfunding project. The like, uh, um, you know, four partners you want to, you want to have, um, the last one will be fulfillment, obviously shipping fulfillment. Second, last one will be your manufacturer.
So I’m going to make the game. Uh, then before that, you’re going to have to partner with a crowdfunding platform and a pledge manager, right? Would it be Kickstarter, backer kit, game found? Um, That’s a very important part of the process. Obviously, it’s going to determine how you structure everything. And then before that, before you even launch a campaign is marketing, you know, that’s becoming more and more necessary for successful project.
So working with, um, you know, some, some of the crowdfunding platforms offer marketing services like backer kit does working with a, with a, a program like launch boom, for example, um, you know, to get that marketing in advance. If you get those four, if you understand those four pillars, right, the marketing.
The crowdfunding platform, uh, the manufacturing and the fulfillment, um, then that’s, that’s success right there, right? You, you hit those four things and you’re good. Um, so, uh, yeah, do, do, do your homework plan in advance and don’t be afraid to ask questions. Don’t be afraid to reach out. That’s what we’re here for, right?
That’s, that’s literally what we do. So, um, don’t be afraid. Um, Yeah, and there we go. My last point is a great design will go unnoticed without great marketing. So use marketing, uh, not just like professional marketing, you know, paid marketing, but just in general, like go to conventions, uh, you know, go to protospiels, go playtest your game out in public, um, you know, uh, post on board game geek, uh, go on social media, join design groups, um, participate in rules, uh, exchanges, join the online playtesting community as well.
Um, you know, yeah. Give, give and receive, right? Like playtest someone’s game, have them playtest yours, just be as involved as you can in the board game community. It’s still, it’s a growing industry. It’s become bigger and bigger every year, but it’s still a very intimate industry. People know each other, you know, by name and by face, right?
So get involved in the community as early as possible. Um, and, uh, and just give as much as you can, because whatever you give, you’ll, you’ll get back as well, right? Like, I mean, don’t just do it for the sake of getting back, but, The more you contribute to the community, the more we all build a community together, um, which is, that’s why we’re literally having this, this, this
Brandon Rollins: conversation, this video right now is literally
Tyler Lipchen: that, right?
Like, um, yeah, just give whatever you can to the community because it only helps it grow. Right. Um, and there’s, we’ve seen so much so far in the last, you know, 15, 20 years, especially of this hobby. Uh, and there’s still so much more to see. You know, there’s, whoever’s watching this right now, like, I can’t wait to see your creation when it hits Kickstarter, right, or hits back for kids.
So, um, so yeah, uh, don’t, don’t be afraid, you know, uh, to get out there, show your game, talk to people, talk to partners, uh, get involved.
Tools
So last time we talked about tools, this is the page I promised. Uh, there’s a link right there, panagem. com slash tools. There’s template generators for custom dice and for any print components.
Uh, our guidebooks, the design guidebook that talks about, um, how to set your files for print. Um, so definitely read this and if you’re not doing your own files, send this to your graphic designer. Um, and any, any graphic designer who is like well versed in this. Book will be like your best friend when it comes to the production process for, for board games.
Um, the component guidebook talks about any non printed components. And of course, there’s also the crowdfunding guidebook as well. Um, so you’ll find all that on the tools page. Uh, and then the, uh, we got other resources as well. We have some badges and box markings. And then for the CE logo or the choking hazard logo as well, which by the way, if you need to save to test your game, please talk to your project manager well in advance.
That’s a conversation to have very early on. Um, there’s also some tools for the Adobe suite. There’s a pre flight profile. You can check your own files for certain for some of the big, um, the big mistakes we normally see for pre press. Uh, and there’s an export profile as well that will help export your files into a printable PDF that is, um.
Uh, that is in the, the, the color profile that we use for print. So, uh, visit the tools page, explore it. There’s a lot of good stuff on there. Read through all the guidebooks, um, and do yourself a big favor. And
Brandon Rollins: link is down there in the description for anybody who wants to access those resources.
Tyler Lipchen: Perfect.
Um, and yeah, any questions or information, uh, more information on our website, follow us on social media. You can always reach out on social media as well. Um, our helloappendagm. com inbox is, uh, manned by people. Not by robots. So if you have any general inquiries, just email there. If you want to get put in touch with the project manager again, just email us there.
If you want to, we’ll set you up with somebody in your time zone, preferably in your time zone or close to it. Um, and hopefully in your native language. We, um, we have. Project managers all over the world. Um, I sound like I’m from America, but I’m actually Canadian and I live in the UK. Go figure. We have project managers in Germany and Portugal and France, the UK.
Uh, and then of course, all across America as well. So you guys will find somebody in your time zone or close to it. That can help you out.
Brandon Rollins: Yeah, and, and anybody who’s got a question down below, I’ve asked all mine for, um, for the day and honestly, like you, you have already like front loaded a lot of the questions and answered those in the slides, but anybody who’s got questions, leave them down below in the comments, um, we’ll try and answer as many of them as we can as the fulfillment center has folks who’ve worked in board games.
So honestly, if we get stuck, we’ll just reach out to Panda and like, get a response to your comment as well. Thank you for watching this interview. I appreciate it, and I know that Tyler at Panda does, too. Details on both our companies are in the description. And just in case you missed the name earlier, my name is Brandon, here on behalf of FulfillRite.
If you need help shipping your orders, go to Fulfillrite.com and request a quote. We’ve shipped for thousands of crowdfunding campaigns before, and we’re happy to help you ship yours, too. The quote doesn’t cost a thing, so if nothing else, you get some good information about pricing. Link in the description.
If you enjoyed this video, please take a moment to like and subscribe. Don’t forget to slap some postage on that bell so we can express ship new videos to you as soon as they drop. And last but not least, if you have any questions, leave a comment below. I will personally answer as many as I can. Thanks for watching.
Manufacturing products – that’s just the beginning. You also need to fulfill orders, and that’s a whole other challenge. And in between, you probably need to book freight.
But how do you do that?
Many business owners find freight shipping particularly scary because it’s so unfamiliar. But once you get past the headlines and complicated terms, booking freight is more straightforward than you would think.
Ultimately, booking freight for your eCommerce store or Kickstarter campaign comes down to four key decisions.
Here’s what you need to know.
1. Choose a freight broker or freight marketplace
There are two main ways to book freight: through a broker or a marketplace.
A freight brokerage firm will ask you a few questions and handle the rest, similar to how travel agents used to book vacations before online booking became common.
Similarly, freight marketplaces help you book shipments just like Expedia helps you book hotels. We recommend checking out Freightos.
No matter which marketplace you choose, the process is similar. You will need to provide details about your shipment, pickup and delivery locations, and customs information. Then, you’ll select a shipping option based on the quotes provided.
2. Determine the right shipping terms
When dealing with freight shipments, you’ll encounter incoterms. These are rules that define the responsibilities of the buyer and seller in freight shipping.
The four most common incoterms are EXW, FOB, DDU, and DDP. Here’s what they mean for you:
- EXW (Ex Works): The seller (your manufacturer) hands over responsibility for the goods once they’re manufactured. You need to arrange for someone to pick them up.
- FOB (Free On Board): The seller is responsible for getting goods onto a shipping vessel. You take over responsibility from there, including handling the import process and arranging local transportation once the goods leave the vessel.
- DDU (Delivery Duty Unpaid): The seller handles the entire freight process, except for customs, which you will pay.
- DDP (Delivery Duty Paid): The seller handles the entire process, so you have nothing to worry about.
If your manufacturer insists on EXW or FOB terms, it will affect when you need to book freight. Both brokers and marketplaces can handle any incoterms – just confirm with your manufacturer which ones apply to you.
3. Calculate customs costs
When importing goods from another country, you’ll likely need to pay customs fees, which fall into two main categories:
- Duties and tariffs.
- Safety exams.
For duties and tariffs, you’ll be charged a percentage based on the HS Code of the goods, the country of origin, and the destination country.
To estimate your costs, look up your HS Code using the GlobalPost HS Classification Tool. Then, use that code along with other relevant information to calculate your import duties and taxes.
Additionally, your goods might be randomly selected for customs inspection. This can involve X-rays, container openings, or direct inspections of the goods. If this happens, you’ll need to cover the exam costs, which vary based on the inspection method. (For example, I had a shipment of board games X-rayed in 2020, which cost around $600 USD.)
4. Choose transportation mode
Freight shipping can be done via four transportation modes: air, sea, rail, and road. Your shipment will likely use a combination of these, but the main leg will typically be by air or sea.
Sea shipping is much cheaper but significantly slower, often taking weeks or even months, especially from China to the US. Recent supply chain disruptions – such as those seen during the COVID-19 pandemic – have occasionally further extended these times.
Air shipping is much faster, with deliveries often made within a few days or weeks, but it is considerably more expensive.
If your items are perishable, air shipping is the only viable option. On the flip side, if environmental sustainability is your priority, sea shipping is likely the best choice.
Consult with your freight broker or compare multiple quotes on a freight marketplace to determine if the faster delivery is worth the extra cost.
Bearing all this in mind, freight booking is still very complex. Below, we’ve included some tips from a freight shipping expert to help you all the latest best practices.
5 Tips for Better International Freight Shipping
Please Note: The information in this section comes directly from Corinne Berzon at Freightos. Freightos is a freight marketplace, meaning it helps businesses book their own freight shipping.
What you read in this section was previously part of a guest post, which we’ve bundled into this post for your convenience.
Unpredictable freight rates, port congestion, and fluctuating demand have made freight rates less reliable.
This means that for any shipper, the flexibility to compare quotes and choose the right rate for each shipment can be a huge advantage. Here are 5 tips for getting better freight rates for your international shipments – even when the market is unpredictable:
1. Get multiple quotes
Getting rates from multiple freight forwarders lets you compare price, routing, and estimated transit time so that you can find the best quote for every shipment.
But make sure when you compare quotes that you are getting a detailed breakdown of what’s included in the price. Look out for these details when checking freight quotes from various freight forwarders to avoid surprises:
- Correct origin and destination details
- Main freight charges
- Custom clearance charges
- Warehouse and ground transportation charges
- Port charges and equipment fees
- Additional service fees
2. Try different shipping modes and lanes
Closures and congestion on the shipping lane you usually use can be costly and frustrating. One way to overcome volatility is to look at alternate routes and modes. Here are some examples of how flexibility can help you ship smoother:
- If you typically ship air, consider whether shipping a higher volume of goods by ocean might be more cost efficient.
- If you are shipping FCL but are struggling with long transit times, consider splitting shipments up. Switching to LCL or air cargo could help keep your inventory moving.
- If your regular shipping lane is bogged down by delays, consider shipping to alternate ports and use inland transport for delivery.
3. Double check your shipping details
International freight involves a lot of documentation and forms. Making sure these are accurate can prevent shipment delays and extra charges.
- Accurate measurements and labeling can make or break your profitability – about 20% of charges added after booking result from incorrect measurements.
- Proper licensing can prevent your shipments from being held up at customs, which costs both time and money in avoidable penalties.
- Communicate about requirements like special product handling, extra packaging, additional equipment support, or any non-standard service before shipping to avoid service disruptions, expensive accessorials, or extra charges.
4. Keep seasonality in mind
When you are getting freight quotes for your international shipments, keep in mind that freight costs fluctuate by season.
- Peak season for ocean shipping is usually August-October when businesses stock up on back-to-school and holiday inventory. During this time, prices can climb as capacity decreases.
- Lunar New Year in late January or early February shuts down most east Asian factories and manufacturers which can lead to a short period of congestion and elevated prices.
5. Use a freight marketplace
Getting multiple quotes from different forwarders can be time-consuming – and until fairly recently could only be done by reaching out to providers one by one. But freight is going digital, and now shippers can get quotes instantly from dozens of freight forwarders.
The power to compare multiple quotes can help save you time and money, plus by using an online freight marketplace, you also gain the flexibility to switch modes, lanes, or providers depending on specific shipping needs.
Marketplaces provide a number of additional benefits:
Market visibility
Marketplaces collect pricing and transit time data from lots of service providers so you can compare delivery times, prices, and service standards – and choose the best option for every shipment.
Transparency
By using a freight marketplace, you’ll get full transparency into what each quote includes. Since quotes are standardized, you won’t have to guess what services are included.
User reviews
Picking the right freight forwarder can be confusing, but hearing from other importers and exporters can make the decision easier. Marketplaces let you assess the performance of different logistics providers before committing.
Final Thoughts
Booking freight for your eCommerce store or Kickstarter campaign might seem overwhelming at first. But once you understand it, it’s a lot more manageable.
Remember, the goal is to ensure your products reach your customers efficiently and cost-effectively. Smart freight management is one more lever of power you have to make that happen.
Order fulfillment is incredibly important in eCommerce. It affects customer happiness directly. Problems here can cause bad reviews, lost sales, and less brand loyalty.
If you want to avoid these issues, you need to make your order fulfillment process smooth, clear, and reliable. Fixing common problems and giving great service will help you keep up your reputation. And that will help you keep your customers happy and loyal, and your store profitable.
1. Eliminate surprise costs.
The top reason people abandon their online shopping carts is high shipping costs. No one wants to buy a $25 item with a $15 shipping fee.
Many businesses still make this mistake. At the very least, clearly list your shipping prices on your store. This way, people won’t add items to their cart only to back out when they see the total price is too high.
This is the best way to reduce your cart abandonment rate. Use it wisely to increase your revenue with little effort.
2. Offer free shipping.
Free shipping isn’t actually free. When you buy something with free shipping, the seller pays for the postage. No free lunch, right?
But not offering free shipping isn’t free either. About 75% of customers expect free shipping even on orders under $50 according to the National Retail Federation, and this number is rising. This goes back to eliminating surprise costs. Free shipping is the best way to remove unexpected fees for customers.
This tip might not always make financial sense, but if it does, use it. It can reduce your cart abandonment rate, bringing in enough revenue to cover shipping costs. Plus, free shipping makes customers happier with their experience!
3. Use address verification.
Shipping can go wrong if the package goes to the wrong address. You might think this is out of your control, but it’s not.
Address verification helps make sure customers enter the right address. This reduces the chance of sending a package to the wrong place, a mistake that can make customers angry and be expensive to fix.
Shopify users can use the app Streetify, which costs $0.03 per address lookup. WooCommerce users can use Postcode/Address Validation by SkyVerge, costing $49 per year.
These are just a couple of examples, though. There are many apps for Shopify, WooCommerce, and other eCommerce software you might use!
4. Provide expedited shipping options.
Many consumers are willing to pay for fast delivery. About 41% will pay for same-day delivery, and 24% will pay more for delivery within 1-2 hours (source: Conveyco). Also, 70% of US consumers buy from one online store over another because of more delivery options.
So, one of the easiest ways to improve shipping is to offer more options. Next-day delivery through USPS, UPS, and FedEx at a premium is a simple way to let customers choose what suits them.
5. Ship as soon as possible.
One big reason for shipping delays isn’t the postal carriers. FedEx, UPS, USPS, and DHL are pros at delivery. Once you hand over the package, they handle the rest.
But what if you take too long to get a package ready? Miss the cutoff time by a few minutes, and you delay delivery by a whole day! Customers expect two-day delivery now, and anything slower feels like forever.
The solution? Ship orders as soon as they come in or use an order fulfillment service. If you don’t want to drop everything to ship an order, outsource it.
Order fulfillment companies ship packages all day, every day. Postal carriers visit their warehouses multiple times a day, getting your packages in the mail faster and shaving a day off delivery time.
6. Make two-day shipping your default.
Remember how I mentioned that two-day delivery is the expectation now? The data backs me up on this.
Two-day delivery is the new standard. A whopping 79.3% of online shoppers expect it. If you can, make free two-day shipping the default for your business.
7. Provide shipping notifications.
Online shopping is weird because you pay right away but wait days for your package. Customers like to track their orders to feel at ease.
Send tracking numbers and status updates by default. Let customers know when their orders ship and give an estimated delivery date. If something goes wrong, tell the customer immediately. An astounding 98.3% of customers want to be notified if a package is delayed per supply chain firm, Project44!
Keeping customers informed shows you care about their experience, increasing the chances they’ll shop with you again.
8. Don’t be stingy with returns and refunds.
Every year, three billion packages are lost or damaged. This problem comes with handling so many packages daily.
Customers don’t care if UPS damaged the package; it’s your job to fix it. Forty-eight percent of customers returned an item last year, and 80.2% did so because it arrived damaged.
Returns and refunds are tied directly to the shipping experience. Happy with the returns process? Ninety-five percent of shoppers will buy from you again. Unhappy? They’re three times more likely to never shop with you again.
Make returns easy. Allow free returns with refunds for up to 90 days. Let customers print return labels at your expense. Sure, you cover shipping and inventory costs, but you save the customer relationship, which is worth much more in the long run.
9. Pack items properly.
Shipping damage happens, but you can cut the risk with a few tricks:
- Fill empty spaces with bubble wrap, corrugated rolls, or air cushions.
- Use sturdy outer packaging like corrugated boxes.
- Keep liquids away from other items.
- Label fragile packages clearly.
- Separate fragile items within boxes.
These steps reduce the chance of items breaking and needing returns. That means more money stays in your pocket!
10. Provide great customer service.
Even with fast, free shipping, great packing, and a solid return policy, things can still go wrong. When they do, excellent customer service is key to keeping customers happy and coming back.
Offer friendly, accessible support. Have an email, phone number, and maybe even live chat. Make it easy for customers to reach you and solve their problems quickly. It pays off in the long run!
11. Brand your packaging.
People form opinions about products in just 3 seconds. Good packaging can make a great first impression. Over 50% of consumers say they’d buy more from a brand with branded packaging, and 68% say it makes a brand seem more high-end.
Represent your store brand right when customers open the box. Use custom packaging like boxes, bags, or bottles.
12. Ask for feedback.
Simple but often forgotten: ask your customers what they think! You can look at statistics all day long but never get a truly good feel for what your specific customers truly want.
The easiest way to find out is to simply ask them! Send out automated surveys so you can learn more about what you’re doing well and what you’re not. Then you can lean into your strengths and resolve your weaknesses.
If you follow tips like these, you’re likely to start converting more traffic and retaining more customers. But things will still go wrong from time to time, so here are some tips to help you handle occasional customer service issues as they arise.
7 Tips For Handling Customer Service Issues
Even if you prepare everything correctly, items will still break in the mail and get lost. Not often, but sometimes!
Because of that, you need a plan to handle issues when they come up. Here’s how you can do that.
1. Respond promptly to customer inquiries.
Quick responses can stop small issues from turning into big headaches. Imagine a customer with a simple question about their order. If they get an answer fast, they’re happy. If not, they might get frustrated.
Make sure your customer service team is always ready. They should be available and alert, ready to jump in and solve problems as soon as they arise.
2. Offer clear and proactive communication.
Keep your customers in the loop. Regular updates about their order status are crucial. Did something go wrong? Is there a delay? Tell them right away! Explain what happened and what you’re doing to fix it.
This kind of transparency builds trust. Customers feel reassured when they know you’re on top of things, and their frustration levels drop.
3. Provide multiple contact options.
Make it super easy for customers to reach you. Some people prefer email, others like to call, and many love live chat. Offer all these options and more if possible.
Accessibility is key. When customers can contact you easily, issues get resolved faster, and everyone’s happier.
4. Empower your customer service team.
Give your customer service reps the power to make decisions. They should be able to solve problems on the spot without always having to ask a manager.
Empowered employees are more confident and can provide quicker, more satisfying resolutions. When your team feels trusted, they work more effectively and customers benefit from faster service.
5. Offer compensation for significant issues.
Sometimes, things go really wrong. In these cases, consider offering compensation like refunds, discounts, or free products. This can turn a bad situation into a positive experience.
Imagine a customer receiving a damaged product. A quick refund or a discount on their next purchase can make them feel valued and understood, keeping them loyal to your brand.
6. Track and analyze customer complaints.
Keep a close eye on customer complaints. Record them, analyze them, and look for patterns. Is there a common issue popping up? Understanding these problems helps you fix them at the source.
Addressing recurring issues will prevent future complaints, making your overall service better and more reliable.
7. Follow up with customers.
After you’ve resolved an issue, don’t just leave it there. Follow up with the customer to ensure they’re happy with the resolution. This extra step shows that you care about their experience.
It’s a small gesture that can make a big difference. Customers appreciate knowing that their satisfaction matters to you.
Final Thoughts
Fast, competent order fulfillment and responsive customer service are both essential for keeping customers happy. Doing both of these things well can play a huge role in whether customers come back to shop more in the future.
Preventing shipping issues and addressing them quickly when they arise will allow you to build a strong reputation and increase customer loyalty. When in doubt – act like the kind of company that you want to shop from!
Launching a Kickstarter campaign takes a lot of planning, especially with shipping. Many creators get excited about their product and forget about the tricky and pricey shipping process. This can cause big problems.
Estimating and managing shipping costs is mission critical for your project’s success. This guide breaks down the four main factors affecting your Kickstarter shipping costs. We also share strategies to keep these costs low. That way, you can keep your campaign successful from start to finish.
The 4 Main Factors In Kickstarter Shipping Costs
You can’t ship a Kickstarter if you don’t understand the costs that go into fulfilling one. There are four primary costs every creator needs to consider: freight, customs, postage, and fulfillment.
- Freight Costs: These are the costs of moving your product from the manufacturing facility to your location or a fulfillment center. Factors like size, weight, and location affect these costs.
- Customs Costs: These costs come from importing goods from overseas. They depend on your product’s HS code, its value, and the import regulations of the destination country.
- Postage Costs: This is the cost of mailing rewards to your backers. These costs vary based on the size, weight, and destination of the product.
- Fulfillment Costs: These include expenses for packaging, handling, and managing logistics. The complexity of your rewards, the number of backers, and your fulfillment process all impact these costs.
Once you understand these four factors, you can better estimate your total shipping costs and plan accordingly to avoid surprises.
Calculating Kickstarter Shipping Costs in 4 Steps
#1: Calculating freight costs.
Calculating freight costs means figuring out how much it will cost to ship your items. This depends on how much your shipment weighs, its size, how far it has to go, and the type of transport you choose.
Bigger and heavier shipments cost more. So does shipping longer distances or using air freight. To get an accurate estimate, contact different freight companies with details about your shipment’s weight, size, and destination.
Collecting multiple quotes helps you find the best deal. Online tools like Freightos let you enter shipment details to compare costs quickly.
Accurate info and careful planning are key to getting reliable freight cost estimates. This helps you manage your budget and avoid surprise expenses.
#2: Calculating customs costs.
Calculating customs costs involves a few steps. First, find your product’s harmonized system (HS) code, which is an international standard that categorizes goods for customs. This code helps you find the duty rates for the countries you’re shipping to.
Next, research the duty rates based on your HS code and the destination country. To estimate customs costs, multiply the shipment’s value (including manufacturing and freight costs) by the duty rate.
Customs costs can also include extra fees like taxes and handling charges. Decide if your backers will pay these fees directly or if you’ll cover them, which might be more customer-friendly but more expensive for you.
Accurate calculations help you avoid unexpected costs and ensure smoother shipping.
#3: Calculating postage costs.
Postage costs depend on your product’s weight, dimensions, packaging, and destination. Start by weighing and measuring your product, including its packaging.
Shipping zones are important since postal services use them to set postage rates. Use online postage calculators like EasyShip by entering your product’s weight, dimensions, and destinations to get cost estimates.
Since backers may be from different regions, create a weighted average based on estimated locations for a more accurate overall postage cost.
Regularly update these estimates as you get more backer info. This helps you manage your campaign’s budget better.
#4: Calculating fulfillment costs.
Calculating fulfillment costs depends on whether you handle it yourself or use a fulfillment center. If you self-ship, make sure you order enough packaging materials like boxes, labels, and supplies. It’s also smart to buy in bulk from suppliers like ULINE to save money.
If you use a fulfillment center, ask for detailed quotes that include setup fees, storage fees, pick-and-pack fees, and postage rates. Provide detailed info to get accurate quotes and compare multiple centers to find the best rates and services.
When you understand how these costs work, it’s a lot easier to set a budget and avoid surprises. Then once you can make sensible calculations around fulfillment costs, your odds of smoothly shipping your Kickstarter campaign go way up.
Keeping Kickstarter Shipping Costs Low
#1: Lowering freight costs.
Keeping freight costs low requires smart decisions and strategic planning. Start with product design—make your product as lightweight and compact as possible.
Every gram and inch matters! Reducing the size and weight of your product can drastically lower freight costs. For instance, using lightweight materials or rethinking the packaging design can save on shipping expenses.
Next, consider bulk shipping. Sending larger quantities at once often lowers the per-unit cost because of economies of scale. Ordering and shipping in bulk can reduce the cost per item, as shipping companies often offer discounts for larger shipments.
Also, explore different shipping options. Sea, road, and rail are generally cheaper than air freight, though slower. If speed isn’t crucial, go for these options to save money. Sea freight, in particular, can be significantly less expensive than air, though it takes longer.
For bigger shipments, think about hiring a freight broker. They can negotiate the best rates for you. Brokers have the expertise and industry connections to get better deals than you might find on your own.
For smaller campaigns, use a freight marketplace like Freightos to book shipments directly and avoid broker fees. Freightos allows you to compare quotes from different carriers and choose the best option for your needs.
Quick Tips:
- Design Smart: Make products lightweight and compact. For example, use materials like aluminum instead of steel, or design your packaging to be collapsible.
- Ship in Bulk: Send larger quantities at once to reduce costs. Consider ordering larger quantities from your manufacturer to save on per-unit costs.
- Use Cheaper Transport: Ship by sea, road, or rail instead of air. If time is not a critical factor, these options can save you a lot of money.
- Hire a Freight Broker: They can get you the best rates. Brokers can often find discounts and special rates that aren’t available to the general public.
#2: Lowering customs costs.
Reducing customs costs starts with understanding the customs regulations for each destination country.
Proper documentation is key. Make sure all customs forms are correctly filled out and comply with the regulations. Incorrect or incomplete paperwork can lead to delays and extra charges.
Hiring a customs broker can be very helpful, especially for larger shipments. Brokers are experts at navigating customs regulations and can help minimize costs by ensuring compliance and avoiding unnecessary fees.
Researching and choosing the correct HS code for your product can sometimes result in lower duty rates. The HS code classifies your goods and determines the duty rate.
Compliance with safety and other regulatory standards in the destination country is also essential to avoid fines and legal issues. Make sure your product meets all necessary standards to prevent costly delays and fines.
Quick Tips:
- Know the Rules: Understand customs regulations for each destination. Research the specific requirements for each country you’re shipping to, as they can vary widely.
- Fill Out Forms Correctly: Proper documentation prevents delays and extra charges. Double-check all forms for accuracy before submitting them.
- Hire a Customs Broker: They can help minimize costs. Brokers can provide valuable guidance on navigating complex customs requirements.
- Choose the Right HS Code: This can lower duty rates. Use online tools or consult with a broker to ensure you’re using the correct code.
- Meet Standards: Comply with all safety and regulatory standards to avoid fines. Research the standards for your product in each destination country. Don’t assume your product is good to go – you need to absolutely sure it’s safe and legal where you plan to ship.
#3: Lowering postage costs.
To keep postage costs low, start by thinking about your packaging. You will want to reduce the weight and size of your packages as much as you can without compromising product safety. As with freight, every gram and inch matters for postage costs. Consider using lightweight materials for your packaging and designing it to be as compact as possible.
Compare rates from different carriers like USPS, UPS, and FedEx. Rates can vary for different package sizes and weights, so shop around for the best deal. Many carriers offer online tools to help you compare rates and choose the most cost-effective option.
Hiring a fulfillment center can also reduce costs since they often have access to deeply discounted postage rates. Fulfillment centers handle large volumes of shipments, allowing them to negotiate better rates with carriers.
For international campaigns, consider using overseas fulfillment centers closer to your backers. This can lower postage costs but be sure to balance these savings against higher freight rates for bulk shipping to multiple centers.
Quick Tips:
- Optimize Packaging: Make packages lighter and smaller. Use bubble wrap or air pillows instead of heavier packing materials.
- Compare Carrier Rates: Shop around for the best deal. Use online rate calculators to compare costs from different carriers.
- Use Fulfillment Centers: They can access discounted postage rates. Fulfillment centers can also streamline your shipping process and handle logistics for you.
- Consider Overseas Fulfillment: This can lower postage costs for international backers. Research fulfillment centers in regions where you have many backers to see if this option makes sense for your campaign.
#4: Lowering fulfillment costs.
To lower fulfillment costs, follow a few key strategies. If you’re self-fulfilling, buy packing materials in bulk to take advantage of discounts. This includes boxes, labels, and packing supplies.
Efficient packaging processes can also reduce labor costs and improve efficiency. Try packing a few boxes and make sure you get your process right before you pack all of them. Once you get into a rhythm, then you can train your team, if you have one. This is a great way to save time and money!
If you’re using a fulfillment center, compare quotes from several providers. Each has its pricing structure and services. You need to read every line item of each quote. Make sure you look for fulfillment centers that specialize in crowdfunding – it’s a less common service than you might think!
Quick Tips:
- Buy in Bulk: Get packing materials in large quantities to save money. This includes everything from boxes to tape to packing peanuts.
- Streamline Packing: Make your packing process efficient. Practice first, then train your team on the best practices to save time and reduce labor costs.
- Compare Fulfillment Centers: Get quotes from multiple providers. Look for centers with corwdfunding experience.
Final Thoughts
Keeping your shipping costs low is incredibly important for the success of your Kickstarter campaign. From freight and customs to postage and fulfillment, each part of the process needs to be accounted for in your overall budget.
Good planning can help you avoid unexpected expenses and provide a smooth delivery process. Follow the tips outlined in this article, you and keep your Kickstarter shipping costs in check and keep your backers happy!
Finding the right manufacturer is absolutely critical if you want to bring your dream product to life. A good manufacturer can make your vision a reality, ensuring high quality and timely delivery. But if you choose poorly, you could face delays, cost overruns, and subpar products.
This guide will help you navigate the process of finding the ideal manufacturing partner. In it, we will cover:
- Basic manufacturing information you need to know
- Common problems and how to avoid them
- Methods to find manufacturers
- More websites for further research
With this information, we hope to help you find the perfect manufacturer for your loftiest ambitions!
Manufacturing Basics: 6 Concepts You Must Understand
Manufacturing is about transforming raw materials into finished products. Conceptually, it’s simple. Practically, it’s complicated.
Here are six things you need to understand before you go down the manufacturing rabbit hole online.
#1: Manufacturing in a Nutshell
Manufacturing is what transforms raw materials into finished products. It includes multiple stages: planning, designing, prototyping, production, and quality control.
- Planning sets the groundwork by defining what needs to be made and how.
- Designing turns ideas into detailed plans.
- Prototyping tests these designs to catch any issues early.
- Production is where the real making happens, turning designs into actual products.
- Quality control ensures everything meets the required standards.
Each stage must be managed well to produce a final product that meets all specifications and quality standards.
#2: Different Types of Manufacturing
Manufacturing isn’t one-size-fits-all. There are different methods depending on what you need.
Batch production is for smaller quantities, making it flexible and adaptable. It’s great if you need limited runs or want to test a new product without a huge commitment.
Mass production is for large volumes. It’s cost-effective but requires significant setup, making it ideal for products with high demand.
Bespoke manufacturing is for custom items. It allows for high customization, perfect for unique or specialized products.
Choosing the right method depends on your product’s needs, balancing flexibility, cost, and volume.
#3: The Importance of Design for Manufacturing (DFM)
Design for Manufacturing (DFM) is about making products easy and cost-effective to produce. It’s crucial to consider DFM from the start to avoid problems later.
If you ignore DFM, you might face higher costs and production challenges. DFM principles focus on simplifying designs, using standard materials, and minimizing parts.
A simpler design means fewer things can go wrong, making production smoother and cheaper. Standard materials are easier to source and often cheaper. Fewer parts mean less assembly time and fewer points of failure.
It’s really important to think about DFM early on. Of all the possible levers you have to keep costs low and production simple, DFM is probably the strongest one.
Don’t skip this!
#4: Why Minimum Order Quantities (MOQ) Matter
Minimum Order Quantities (MOQ) is the smallest quantity a manufacturer will produce in one order. Knowing your product’s MOQ is crucial for budgeting and planning.
High MOQs can mean higher upfront costs, which can be a challenge, especially for startups or small businesses. With Kickstarter campaigns in particular, the cost to produce an MOQ is extra important. That’s because a lot of crowdfunding campaigns are held in order to raise funds for production, whose cost is directly influenced by MOQ.
Sometimes, you can negotiate with manufacturers to lower the MOQ or get more flexible terms. Always consider MOQ when planning your production runs to ensure you can meet these requirements.
Proper understanding and planning around MOQ can make a big difference in managing costs and ensuring your production is viable.
#5: How To Request Quotes
Requesting a quote from a manufacturer is a key step in starting a business relationship. To get accurate quotes, you need to be clear and detailed about your product specifications.
In all likelihood, you will already be talking to manufacturers before requesting a quote. After all, you will need to have information about the MOQ, sampling, and turnaround time first. You’ll also need to finalize the specs, and manufacturers will likely have feedback for you to make sure your desired products can be made.
Ultimately, you will need detailed drawings, material specifications, and an understanding of any special requirements your product might have. When you have that, then it’s time to request a quote.
You will need to request quotes from multiple manufacturers so that you can compare prices. This will let you evaluate potential deals from different manufacturers.
This is not a process you want to rush. Thoroughness matters a lot!
#6: Quality Assurance & Packaging
Quality assurance makes sure your product meets all necessary standards before it goes into mass production. Always order samples from your manufacturer and inspect them critically.
This helps catch any issues early. Quality control involves regular inspections, testing, and making sure everything adheres to set standards throughout production.
Packaging is another big part of manufacturing and quality assurance. It often goes overlooked.
Your packaging needs to protect your product during shipping and handling. But you also can’t forget it’s also part of the overall customer experience in terms of branding and marketing.
A great packaging design can enhance the unboxing experience, making it memorable and shareable on social media. Think about durability, branding, and how the packaging reflects your product’s identity. Work closely with your manufacturer to ensure they understand and can meet your packaging requirements.
Proper packaging not only keeps your product safe but also boosts customer satisfaction and can influence their decision to buy from you again. So, prioritize quality assurance and packaging to make a lasting impression on your customers.
Common Problems in Manufacturing
Manufacturing can be tricky, with lots of potential pitfalls. In the sections that follow, we talk about some common problems. As we go over them, we’ll talk about how you can sidestep them to keep your production running smoothly.
#1: Poor communication and misaligned expectations
Clear communication with your manufacturer is absolutely crucial. Misunderstandings about design details and expectations can lead to big issues.
For example, imagine expecting a shiny silver finish on your product, only to receive a dull matte gray instead!
To avoid this, make sure every single specification is documented in detail and agreed upon by both parties. Use clear drawings, precise measurements, and unambiguous descriptions.
Regular updates and open lines of communication help ensure everyone is on the same page. Misaligned expectations can derail your project, so take the time to clarify and confirm every detail.
#2: Delays and unexpected costs
Delays and cost overruns are all too common in manufacturing. They can throw your entire plan off track. To tackle this, always add a cushion to your budget and timeline.
Expect the unexpected and be prepared for it. Create a contingency plan to handle surprises without panicking. Regular communication with your manufacturer is key here too.
Stay updated on the progress and any potential issues that could cause delays or extra costs. While you can never eliminate the possibility of unexpected costs, you can at least reduce the odds that they break your business by following tip #1.
#3: Late design changes
Changing your design mid-production is a recipe for disaster. It can lead to significant delays, increased costs, and even quality issues.
The best way to avoid this problem is to finalize your design before starting production. Once you’ve started, stick to the agreed design. Of course, some changes might be necessary, but try to limit them and understand the potential consequences.
Having a solid design from the start helps so much here. It will let you avoid last-minute changes, which will lead to a smoother production process and a higher quality end product.
#4: Poor quality control
Quality control is a critical aspect of manufacturing. A single bad batch of products can seriously damage your reputation and customer trust.
Conduct quality checks at every stage of production to maintain high standards. Regular inspections, thorough testing, and clear quality standards are essential. Don’t just assume everything will be fine—actively verify it.
#5: Poor logistics planning
Without good logistics planning, you can face major headaches. Imagine your products stuck in customs for weeks or customers getting their orders late.
To avoid these problems, plan your freight, customs, and fulfillment costs and times well in advance. Efficient logistics can reduce delays, lower costs, and improve customer satisfaction.
When choosing a manufacturer, consider all aspects of shipping and delivery. Think about the transportation method, packaging, storage, and handling. Also, be mindful of international shipping laws and customs regulations if you’re manufacturing overseas.
Any way you look at it, proper logistics planning can save you a lot of time, money, and stress.
#6: Payment issues
Payment issues can cause significant disruptions. Manufacturers often require a deposit before they start production, and clear agreements on payments can prevent disputes later. Consider using escrow services for added security.
Define payment terms, conditions, and milestones clearly in your contract to avoid misunderstandings and ensure timely payments. For instance, you might agree to pay a certain percentage upfront, another portion upon completion of a milestone, and the final amount upon delivery.
Regularly review and reconcile payments to avoid any discrepancies. Keeping on top of payments helps maintain a good relationship with your manufacturer and ensures a smooth production process.
Evaluating manufacturer capabilities
When evaluating manufacturers, consider their capabilities, costs, location, and reputation. Make sure they can produce your product as you imagine it and meet your quality standards.
Visit facilities, if possible, to see their operations firsthand. Look for manufacturers with experience in your industry and good reviews from other clients.
Methods to Find Manufacturers
Finding the right manufacturer requires thorough research and patience. Start by searching online, visiting trade shows, and tapping into industry networks.
Websites like Alibaba, ThomasNet, and industry forums are great resources. Don’t rush this process—take your time to gather information and compare options.
Build a list of potential manufacturers and narrow it down based on your criteria. Look at factors like their production capacity, lead times, quality control measures, and pricing.
Reach out to them with detailed RFQs and evaluate their responses. The right manufacturing partner will align with your needs and help you bring your product to life successfully.
Again – we can’t emphasize this enough – don’t rush! Patience is your friend here.
Finding a Manufacturer – 14 Sites You Can Use
When it comes time to find a manufacturer, you will need to do a lot of industry-specific research to find the right one. We highly recommend that you read more information relevant to your industry before starting a business relationship with a manufacturer.
That said, we’ve compiled a list of manufacturing websites that you can use to start finding manufacturers. Our original sources are Shopify and Small Biz Trends.
- ThomasNet
- Maker’s Row
- MFG
- Kompass
- Shopify Dropshipping
- Alibaba
- AliExpress
- IndiaMart
- Sourcify
- Core77 Design Firm Directory
- Industrial Designers Society of America
- Upwork
- JobShop.com
- IndustryNet
Final Thoughts
Finding the right manufacturer can be the key to turning your dream product into a reality. Remember, thorough research and clear communication are your best tools.
Be patient and meticulous in your search, and don’t rush into decisions. A good manufacturing partner will align with your needs and contribute significantly to your product’s success.
The holiday rush is great for eCommerce. But what do you do when it’s done? How can you turn one-off holidays into steady post-holiday eCommerce sales?
That’s a big question and there are a lot of ways you can answer it. In this guide, we’ve compiled a list of tips to help you do just that.
Below, you will find 23 suggestions on how to achieve steady post-holiday sales, broken down into actionable tips. If you follow some of these tips, you can ratchet up your post-holiday sales and lock in continued growth for your eCommerce business.
Marketing Strategies
If you want to drive sales, you need a great marketing plan. Of course, there are a million ways you can draw attention to your products. You will want to focus on targeted campaigns that have your market in mind.
Here are a few tips to inspire you.
#1: Create targeted email campaigns.
If you want emails to sell, you need to customize your pitch to your recipient. The best way to do that is by segmenting your email list based on customer behavior and preferences.
For example, separate customers who bought gifts from those who purchased items for themselves. That factor alone tells you a lot about their intent behind purchasing.
Once you do that, you can send personalized emails with relevant product recommendations and exclusive offers tailored to each segment. Use engaging subject lines and clear calls to action to increase open and click-through rates.
Timing is key. You will want to send emails when customers are most likely to engage, such as early morning or late evening. When in doubt, though, most email software can help you pick the right time.
You may also consider using automated email workflows to follow up with customers who clicked on links but did not make a purchase.
#2: Use social media for promotion.
Run post-holiday promotions on social media platforms. No matter how you choose to do this, you will want to use eye-catching visuals and engaging captions to attract attention.
Here are a few specific ideas you can implement:
- Offer limited-time discounts and exclusive deals to your followers.
- Collaborate with influencers to expand your reach and drive traffic to your website
- Track the performance of your campaigns to optimize your strategy.
- Use platform-specific features like Instagram Stories, Facebook Ads, and X/Twitter polls to engage your audience.
- Create interactive content such as contests and giveaways to increase participation and visibility.
Social media is all about building up a relationship with your audience. Give them reasons to be excited!
#3: Offer exclusive post-holiday discounts.
Create special discounts available only after the holiday season. Use scarcity tactics, such as limited-time offers, to encourage quick purchases. Promote these discounts through email marketing, social media, and your website.
Highlight the savings customers can enjoy by shopping now rather than later. Additionally, consider creating a sense of urgency by showing low stock levels for discounted items.
If you want to go a step further, you can use countdown timers on product pages to emphasize the limited availability and encourage immediate action.
#4: Launch a New Year sale event.
Organize a sale event to celebrate the New Year. You can offer significant discounts on popular products and create bundled deals to increase average order value. This is the perfect excuse to start selling again, even during the post-holiday slowdown.
You can then the event through all your marketing channels, including email, social media, and your website. You might also consider hosting live streams or virtual events to showcase your products, if you want to provide a more interactive experience.
#5: Implement a referral program.
Encourage your customers to refer friends and family by offering rewards for successful referrals. Provide incentives such as discounts or free products for both the referrer and the referee.
You can also promote your referral program through email, social media, and your website to maximize participation. If you really want to lean into this strategy, you can use referral tracking software to more easily manage and reward referrals.
#6: Work with influencers for promotions.
Start by finding influencers who share your brand values and have a loyal, active following. Give them unique discount codes to share with their audience. This can help you attract new customers and increase sales.
Focus on building long-term relationships with these influencers. That way, not only will you make a key marketing ally, but it will also help you keep the brand message consistent. Also, encourage them to create authentic, personalized content showing how they use your products in their everyday lives. This approach makes their promotions more genuine and relatable to their followers.
And when in doubt, always pick with influencers who seem more genuine. They tend to keep their followers happy for longer!
Customer Engagement
The holidays are a great time to win new customers. But if you really want to succeed in the long run, you need to engage with your customers after the holiday rush. That’s how you keep customers loyal and ready to make repeat purchases.
Below, you will find tips on how to do that.
#7: Personalize follow-up emails.
Send personalized follow-up emails to customers who made purchases during the holidays. Thank them for their business and recommend products based on their previous purchases.
Use dynamic content – even if it’s something as simple as adding their first name – to tailor the email to each recipient. This will increase the likelihood of engagement and repeat sales. You can also mention specific items they bought and suggest complementary products.
In those emails, include special offers or discounts just for them to make them feel valued and appreciated. Keep the tone friendly and conversational, making sure your message feels like a genuine thank you rather than a generic marketing email.
#8: Offer loyalty rewards for repeat purchases.
Implement a loyalty program that rewards customers for repeat purchases. One way to do this is to offer points for every dollar spent, which can be redeemed for discounts or free products.
Promote the benefits of your loyalty program through email marketing, on your website, and in-store if applicable. Create different tiers in your loyalty program to encourage customers to spend more to reach higher levels of rewards. Then you can send regular updates about their points balance and remind them of the benefits they can unlock.
#9: Collect user-generated content (UGC).
There is no marketing better than word of mouth. So you need to give customers a reason to start talking!
Ask customers to share photos and reviews of their purchases on social media. Create a branded hashtag to make it easy to find and share this content. Offer incentives like discounts or entries into a giveaway for those who share their content.
UGC is just a fancy way of talking about things that customers say about you online. Once you have UGC, you can feature it on your website and social media. This helps build trust and can encourage fence-sitters to make purchases for the first time.
You can also share user stories and photos in your marketing emails. This will help you show real customers enjoying your products. It’s great promotion, yes, but it can also build a sense of community too!
#10: Provide exceptional customer service.
Make sure your customer service team is responsive and helpful. Address any post-holiday issues or questions promptly. The two weeks after Christmas are especially critical.
Providing exceptional customer service can turn one-time buyers into loyal customers and generate positive word-of-mouth referrals. You can even salvage a lot of returns too, since good return processes can lead to people who are willing to come back again in the future as customers.
For that reason, you need to train your team to handle common post-holiday issues. That includes all the usual post-holiday problems like returns, exchanges, and shipping inquiries. Empathy and efficiency go a long way here.
Once problems are resolved, you can then follow up with customers to make sure they are satisfied with the solution. After all, a follow up email after a problem is a good excuse to stay in touch with a potential long-term customer.
#11: Host a social media contest.
Run a contest on your social media platforms to engage your audience. Contests can increase brand visibility and drive traffic to your website. Set clear and simple rules to make it easy for people to join. Promote the contest through all your marketing channels and remind your followers regularly until the contest ends.
As part of the contest, you can ask participants to share photos, videos, or stories related to your products. Be sure to offer attractive prizes to bring new people on-board, of course!
Last but not least, be sure to announce winners publicly. This is a great way to build excitement and encourage future participation.
You can use Gleam.io and Rafflepress to help you do this.
#12: Share holiday-themed content to keep the festive spirit.
Continue sharing holiday-themed content even after the holidays are over. Share stories, recipes, or tips related to the season. This keeps the festive spirit alive and gives customers a reason to keep paying attention to your brand.
You can post content that reflects on the holiday season. That might mean talking about customer holiday experiences with your products or showing behind-the-scenes looks at how your team celebrated.
The vibe you want to go for is nostalgic and heartwarming. These themes evoke positive emotions and will help keep your audience connected to that fleeting festive feeling. And again, it’s another reason to stay in touch after the holiday rush!
Website Optimization
Optimizing your website is key to providing a smooth shopping experience. After all, nothing can break a potential sale like a slow, broken, hard-to-use website.
A little time spent on site improvements can lead to increased sales and higher conversion rates. Here’s how to make it happen!
#13: Make your website with mobile users in mind.
Make sure your website looks great and works well on mobile devices. After all, many – if not most – customers shop on their phones. Use a responsive design that adjusts to different screen sizes.
Compress images to reduce loading times and make sure buttons are easy to tap. Test your website on various devices like phones and tablets to be sure it performs well.
Regularly check for any issues and fix them quickly. Don’t forget to check your navigation menus too. You want users to be able to find what they want quickly and easily.
#14: Update product listings with post-holiday offers.
Give your product listings a makeover to highlight post-holiday discounts and promotions. Use clear, concise descriptions and high-quality images to showcase your products.
Mention any limited-time offers or special deals to encourage quick purchases. Make your listings stand out with eye-catching graphics and bold text for important details.
Keep the content fresh by regularly updating the listings with new deals and relevant seasonal promotions. This keeps customers interested and coming back for more.
#15: Improve site speed and performance.
A fast-loading website is crucial for keeping customers around. Regularly monitor your website’s performance with tools like Google PageSpeed Insights. This will let you address any issues promptly. That way, the shopping experience stays smooth.
Every second counts. For that matter, every tenth of a second counts! Even a slight delay can lead to lost sales.
When in doubt, follow these rules:
- Compress your images
- Use a content delivery network (CDN)
- Minify your code
These three tips alone will dramatically improve site performance if you haven’t done them already.
#16: Enhance the checkout process for ease.
If you haven’t already done this, double check your checkout process. It needs to be really easy to buy. You want as little friction as possible.
For one, offer guest check out. Customers don’t want to make accounts. Don’t make them.
Provide clear instructions and multiple payment methods. That way, customers don’t have to look for their credit card if they know their PayPal password by heart.
Test the checkout process yourself to identify any potential pain points and eliminate them. A hassle-free checkout is the easiest way to increase sales.
Don’t give people a reason to abandon their carts!
#17: Use A/B testing to find effective strategies.
Experiment with different website elements using A/B testing. Try out different headlines, images, and calls to action to see what works best.
Analyze the results to determine which variations perform the best. Implement the winning strategies to improve your website’s conversion rate.
Make a regular habit of this. It’s a good way to make sure your site experience is constantly getting better.
And if you need a tool to get started? Consider VWO.
#18: Add a live chat feature for immediate assistance.
Roll out a live chat feature on your website to provide real-time assistance to customers. This can help resolve any issues or questions they have while shopping, leading to higher conversion rates.
As you do this, be sure your live chat is staffed with knowledgeable and friendly representatives. Offer 24/7 support if possible to cater to all customers. By being available to help immediately, you can prevent lost sales and boost customer satisfaction.
Inventory Management
One of the problems of post-holiday eCommerce is inventory management. If you’re smart about how you handle it, though, you can get rid of your overstock and prevent stockouts at the same time.
Here are a few tips and tricks to help you manage your inventory.
#19: Highlight overstocked items with special deals.
Identify overstocked items that are taking up valuable space. Promote these products with special deals to move them quickly. Offer discounts or bundle them with popular products to create attractive offers.
Highlight these deals prominently on your website and through various marketing channels like email newsletters and social media posts. Use eye-catching graphics and persuasive language to draw attention to these offers.
This not only helps clear excess inventory but also brings in customers looking for great deals.
#20: Bundle products to increase average order value.
Create product bundles that offer a better value than purchasing items individually. This strategy can increase your average order value and help move slower-selling items.
Combine popular products with less popular ones to create appealing bundles. Promote these bundles on your website’s homepage, in product descriptions, and through email marketing campaigns.
Use phrases like “best value” or “exclusive bundle” to entice customers. Bundles can also make great gift options, providing added convenience for shoppers and boosting sales.
#21: Introduce limited-time offers to create urgency.
Use limited-time offers to create a sense of urgency and encourage quick purchases. Highlight these offers prominently on your website, in marketing materials, and across social media platforms. Another trick you can use are countdown timers, which can emphasize limited availability and stop people from procrastinating.
Use phrases like “while supplies last” or “only a few left” to enhance the urgency. Limited-time offers can be applied to overstocked items, new arrivals, or seasonal products, making them a versatile tool in your marketing strategy.
#22: Promote seasonal products with creative marketing.
Market seasonal products with creative campaigns that resonate with your audience. Use holiday themes, seasonal colors, and storytelling to make your promotions more engaging.
And yes, while this might seem like it’s more of a holiday marketing tactic than a post-holiday marketing tactic, it still works in January and February. Winter-themed items still work well in January. And Christmas red isn’t all that different from Valentine’s red.
Just like with the BFCM season, post-holiday seasonal promotions can include limited-edition products, themed packaging, or special discounts, all designed to attract customers and boost sales.
It doesn’t have to be complex either. Just think of how much revenue Starbucks has made just by using holiday-themed cups!
#23: Restock popular items quickly.
Monitor your inventory levels closely and restock popular items promptly to meet customer demand. Be sure to communicate regularly with suppliers to lock in quick turnaround times.
You will also want to keep customers informed about restocked items through email newsletters, social media updates, and website notifications. Use phrases like “back in stock” or “just restocked” to create excitement and drive repeat purchases.
Offering a pre-order option for out-of-stock items can also maintain customer interest and lock in immediate sales once the items are available again.
Final Thoughts
Boosting post-holiday eCommerce sales takes a mix of a lot of tactics. In our list, we discussed targeted marketing, smart customer engagement, optimized websites, and efficient inventory management. But, of course, there are many more ways that you can secure post-holiday sales that we didn’t even mention.
We hope you find these tips useful and that you’re able to use them to keep sales strong long after the holidays are over!
International eCommerce is an exciting opportunity for businesses to reach customers around the world. But how do you provide high-quality shipping service to the world at large? You need to build a fulfillment network.
Making a fulfillment network requires connecting multiple regional or national 3PLs (third-party logistics providers) through software. Doing this properly can make a big difference to backend store operations. But that doesn’t mean it’s easy to start!
To help you get started, we’ve put together this step-by-step guide to help you build a top-notch fulfillment network.
Why Establish a Fulfillment Network?
A fulfillment network is a system of logistics providers that handle storage, packing, and shipping of products. As mentioned earlier, 3PL providers are crucial in eCommerce since they can take care of these logistics functions without the eCommerce store owner’s constant input.
A single fulfillment center is a partner. Multiple fulfillment centers working together is a network. Having a network helps businesses scale operations and make sure products reach customers efficiently.
When set up properly, a multi-location fulfillment network offers three key advantages:
- Faster Delivery Times: Localized 3PLs can ship products quickly to nearby customers. For instance, if you have a 3PL in Germany, your customers in Europe will receive their orders much faster.
- Reduced Shipping Costs: Strategically placed 3PLs minimize shipping distances and costs. This means if you have a 3PL in the US and another in Australia, you can serve customers in those regions without paying exorbitant shipping fees.
- Improved Customer Satisfaction: Faster deliveries and lower shipping costs make customers happy. When customers get their orders on time and don’t have to pay high shipping fees, they are more likely to shop with you again.
Put more simply, if you have the right warehouses in the right locations, you can ship your orders to far more places for much cheaper.
The 2 Parts of a Fulfillment Network
To create a successful international fulfillment network, you need to focus on two main components. The first component are 3PLs, who will handle the physical act of shipping. The second component is software, which will send each order to the right 3PL.
#1: Regional/National 3PLs
To build a fulfillment network, you need different 3PLs to act as nodes.
When selecting 3PLs, consider factors such as:
- Location: Choose 3PLs that are strategically located to cover your key markets. For example, if you sell a lot in Asia, you could have a 3PL in Hong Kong or Singapore.
- Reliability: Partner with 3PLs known for their reliability and good track record. Check reviews and ask for references.
- Cost: Make sure the 3PLs offer competitive pricing without compromising on quality.
- Services Offered: Look for 3PLs that provide a range of services, from storage and packing to shipping and returns management.
You want to be strategic with where 3PLs are located. For instance, a US-based eCommerce business might work with 3PLs in New York, Los Angeles, and Miami to cover the entire country with cost-efficient two-day shipping.

#2: Fulfillment Software
Having different 3PLs is a huge part of building a fulfillment network. But when the orders come in, someone – or something – needs to divide up the work. Software can do that for you.
Here is what you would need to consider when choosing software:
- Order Routing: The software should automatically route orders to the nearest 3PL to the customer. For example, if a customer in the UK places an order, the software should route it to your UK 3PL.
- Inventory Management: Keep track of stock levels across all your 3PLs. This will help you avoid stockouts and overstocking.
- Real-Time Tracking: Provide customers with real-time tracking of their orders. Nervous customers like to check their order status. Being transparent with them will help build trust.
The right fulfillment software, such as Orderhive or Cin7, to name some examples, can help streamline operations. When set up correctly, this can seamlessly divide up orders, sending them to the warehouses best equipped to handle them.
How To Build Your International Fulfillment Network in 5 Steps
Building an efficient international fulfillment network is obviously a large project. But you can still break it down into smaller, more manageable tasks.
Here are five straightforward steps you can follow to get started.
#1: Research and Select Regional/National 3PLs
Start by identifying potential 3PL partners in the regions you want to serve. Research companies that have a good reputation and offer the services you need, such as storage, packing, and shipping. Look for companies that are known for reliability and efficiency.
- Evaluate Capabilities: Make sure the 3PLs can handle your product types and volumes. For example, if you sell electronics, ensure the 3PL has experience in handling and shipping such items.
- Negotiate Contracts: Once you find suitable 3PLs, negotiate contracts and service level agreements (SLAs). Clear SLAs help set expectations and ensure that both parties understand performance standards.
Choosing the right 3PLs helps you lay a strong foundation for your fulfillment network. No matter how well you set up your software, if something goes wrong with the physical shipping process, the result is the same: late packages that cost too much to ship!
#2: Choose the Right Fulfillment Software
Next, you need to select order routing software that can manage your network efficiently. Explore popular options like Salesforce, ShipStation, NetSuite, and others.
A few factors you will need to consider include:
- Compatibility: Ensure the software works well with your existing systems. That includes your eCommerce platform and other existing inventory software you use.
- Scalability: Choose software that can grow with your business. As your order volume increases, the software should be able to handle the extra load without slowing down.
- Ease of Use: The software should be user-friendly for your team, making it easy to manage orders and track shipments.
#3: Integrate 3PLs with Your Fulfillment Software
Set up integrations between your 3PLs and your order routing software. You want seamless data exchange. That’s how you make sure orders get processed smoothly.
Set up the software to route orders based on factors like location, stock levels, and shipping costs. For example, an order from a customer in France should be routed to your European 3PL, while an order from Australia should go to your Australian 3PL.
Once you do this, you can use the software to automate and streamline your fulfillment process. This reduces errors and speeds up deliveries.
#4: Test the Network
This is not a flashy tip, but it’s expensive to ignore it! Before launching your network fully, you need to test it carefully.
Steps in the testing process include:
- Simulate Orders: Create test orders in your system to simulate actual customer purchases. Test various scenarios, such as different regions and shipping methods. You want to make sure the network can handle all possibilities.
- Run Pilot Programs: Start with a small group of real orders to gauge performance. Watch key metrics like delivery times, accuracy, and customer satisfaction.
- Collect Data: Gather data from test and pilot orders to identify any issues or bottlenecks. Use this information to refine your network before a full rollout.
During your testing process, you might find out, for example, that orders to Asia are taking too long. This could lead you to choose a different 3PL in that region or adjust your order routing rules.
#5: Launch and Monitor the Network
After testing, you can roll out the fulfillment network. For best results, gradually scale up operations to include all regions and handle more orders. You want to make sure all 3PLs and software are fully integrated and operational.
Again, you will need to use your fulfillment software to track performance metrics like delivery times and order accuracy. This is, ultimately, about making sure items get to the right people in the right place, on-time and intact.
Keep an eye on this data and that will help you track trends and see what can be improved. Keep tweaking order routing rules and stay in touch with your 3PL partners. Optimization and communication go a long way!
Common Fulfillment Network Challenges
Building and maintaining an international fulfillment network can be quite challenging. But if you’re smart about how you approach it on a strategic level, your main concern will be handling day-to-day operational issues.
Here are some common obstacles and how to overcome them.
#1: Complex Logistics Coordination
Managing multiple 3PLs across various regions can get complicated. Each 3PL might have different systems and processes, making coordination a headache.
Using centralized fulfillment software as we’ve stated earlier will help you coordinate logistics seamlessly. The main thing you need to do once selecting and rolling out good software is to regularly test and monitor it.
With enough order volume, small quirks in routing can lead to big additional expenses in postage. It’s worth making a habit of routinely monitoring your order routing software to make sure it’s working well.
#2: Customs and Regulatory Compliance
Different countries have varied customs regulations and compliance requirements. This can be a hassle to navigate, especially if you’re shipping to multiple countries.
Work with 3PLs that know how to handle international shipping and customs. They can keep your company compliant and help you avoid costly delays.
#3: Cost Management
Shipping internationally can be expensive, with fluctuating costs due to factors like fuel prices, tariffs, and currency exchange rates. To keep shipping costs down, make sure your order routing is optimized to choose the most cost-effective route. This is one of the biggest things you will want to get right.
Once you have enough leverage, it might also be smart to negotiate favorable rates with the 3PLs in your network. If you ship enough orders with them, they will likely want to keep you as a client and may be more flexible. Those price breaks can add up!
#4: Inventory Management
Keeping track of inventory across multiple locations can be tough. You need to know exactly what’s in stock at each 3PL to avoid stockouts and overstocking.
To that end, the best thing you can do is make sure your order routing software also has robust inventory management functions. This is something worth vetting before you commit wholeheartedly to using a system as a core piece of your fulfillment network.
#5: Technology Integration
Fulfillment networks are built on computer networks. That means keeping up a smooth data exchange between your system and your 3PLs. But ask any IT person you know, and they’ll tell you – different systems don’t always communicate well with each other.
From time to time, run and test and make sure all your 3PL integrations are working properly. The last thing you want to see is orders going out late because of some obscure technical hiccup. Much better to be proactive here!
#6: Customer Satisfaction
You know what it’s like to get a package late! As you can imagine, any delays and errors in fulfillment can negatively impact customer satisfaction. Customers expect fast and accurate deliveries, and any glitch can make them mad.
Use your fulfillment software to track how long orders take to be processed and delivered. If you see delays, look into the problem and address the root cause, such as switching to a faster 3PL or improving your order processing system.
Final Thoughts
For large eCommerce shops, having a well-connected fulfillment network is incredibly important. Having the right software and the right 3PLs is what makes it possible to ship across the world quickly and cost-effectively.
If you set up your fulfillment network properly, you can keep customers happy and expand your global reach. All while keeping costs down too!
Yes, setting up a fulfillment network is a huge task. But if you break it down into its two main parts – picking the right software and picking the right warehouses, it’s a lot easier to understand.
Don’t let the complexity scare you. There are a lot of good software options and a lot of good 3PLs in the world. If you find the right ones to work with, you can get a fulfillment network built out in record time.
Kickstarter campaigns are usually international. And when it comes to international shipping, customs clearance and brokerage are key parts of the process.
If you’re shipping Kickstarter orders internationally, make no bones about it – you’re in global trade. That means you need to understand customs to avoid delays, extra costs, and legal trouble.
This guide will help you handle customs clearance and brokerage for your campaign with minimal hassle. In it, we will cover:
- What goes into customs clearance
- Who pays for customs
- The 3 main strategies for handling customs
- Best practices for handling customs
- Finding the right customs broker
By the end of this article, you’ll know how to handle customs clearance and brokerage for your campaign. That way, you can focus on the fun part – raising funds and turning your ideas into physical products!
What is Customs Clearance?
Customs clearance is a process where customs authorities inspect and approve goods entering a country. It involves several steps, like checking documents, calculating duties, and inspecting goods.
The concept of customs clearance exists for a number of reasons, but the main two reasons are very simple. Countries don’t want to let unsafe or illegal goods get in through the borders. And they want to make sure they get their fair share of taxes.
If you are shipping internationally, you’ll hear certain terms come up again and again. Some key terms you will want to know include:
- Tariffs: Taxes imposed on imported goods.
- Harmonized System (HS) Codes: Numerical codes used to classify products for customs purposes.
- Import Duties: Taxes paid on imported goods based on their value, weight, or quantity.
Because customs, as a concept, exists primarily for taxation and safety, you need the right documents to get your goods over borders. Documentation is incredibly crucial for customs clearance.
Important documents include the commercial invoice, bill of lading, packing list, and certificate of origin. Making sure these documents are accurate and complete helps prevent delays and extra costs. Each country has different customs rules, so it’s important to know the specific requirements of the country you’re importing to.
Who Pays For Customs & When?
When it comes to Kickstarter campaigns, you often hear about customs through backer complaints. If you’ve followed enough campaigns, you’ve probably seen comments along the lines of “I thought this campaign had EU-friendly shipping! Why am I paying this extra bill?”
But customs fees are actually applied at two main points in the supply chain. Here’s how that works:
1. Initial Customs Fees During Import to Warehousing Country
For many Kickstarter creators, goods are manufactured abroad and shipped to a fulfillment center. Upon arrival in the warehousing country, customs fees are charged based on the value of the imported goods.
For example, when goods are shipped from China to the U.S., the creator pays customs duties upon entry into the U.S. These fees are determined by the value of the inventory and are necessary to legally bring goods into the country. This is the first point at which customs fees are applied.
If you have backed a lot of campaigns but never run any, you might not know about this. That’s because the fees assessed here never go to the backers. If anyone pays them, it’s the creator.
2. Secondary Customs Fees During International Shipping to Customers
Once the rewards are stored in a warehouse, they are often shipped internationally to customers. At this point, customs fees can be applied again.
This second set of customs fees is charged by the destination country and is usually based on the value of the shipped goods. Exceptions to this rule include low-value shipments, domestic shipments, and shipments covered by free trade agreements.
If you, for example, ship a Kickstarter reward from the US to the UK, the recipient in the UK will probably need to pay a customs charge. In a lot of cases, what that comes down to is their local carrier – let’s say Royal Mail, for example’s sake – gives the recipient a bill. When that bill is paid, they get their reward.
There are ways to handle this that don’t require backers paying for customs. We’ll discuss that in the next section.
3 Strategies For Handling Kickstarter Customs
How you handle customs is important. Backers don’t like having to pay extra fees if they can avoid it. But sometimes, it just doesn’t make sense to go out of your way – as a creator – to account for all the customs regulations of all the countries in all the world.
So bearing that in mind, there are three strategies you can use to handle customs fees.
1. Making Backers Pay Customs Fees
One simple option is to have your customers pay the customs fees upon delivery. While this might sound unappealing, many international customers are used to this practice.
This approach is simple for the business but can irritate backers, especially if they are unaware of these additional charges. But just because it might cause some backers to grumble, that doesn’t mean you should write this off entirely. For many small campaigns, this may very well be the only practical way to handle customs.
If you do this, please make sure you communicate this policy clearly. This is the best way to avoid negative feedback.
2. Storing Inventory in Multiple Countries
Another strategy is to minimize international shipping and customs fees by storing inventory in multiple countries. Creators of highly successful campaigns can afford to maintain warehouses in key regions like the U.S., Europe, and Asia. That means they can provide domestic shipping within those areas.
To do this, the creator would split their freight shipments to multiple warehouses. So they would pay multiple bills to multiple countries to import bulk inventory. But individual backers in those countries or regions (like the EU) would not have bills on their individual orders.
The idea of paying multiple bills on multiple freight shipments might sound unappealing, but it’s worth noting that when you import bulk inventory into a country, you pay a tax on the manufacturing price. But when backers receive individual orders, they pay tax on the retail price. That’s a HUGE difference in most cases.
Taking this approach reduces the frequency of international shipments and the associated customs fees. However, it is often impractical for smaller businesses due to the high costs of managing multiple warehouses.
3. Using Delivery Duty Paid (DDP) Shipping
If you can’t justify having multiple warehouses, the next most customer-friendly option is to use Delivery Duty Paid (DDP) shipping. In doing that, the creator takes responsibility for paying all customs fees on behalf of the backer.
This method means that customers receive their packages without any additional charges. It improves the customer experience by eliminating surprises and making the purchase process smoother.
The key issue with this method is that creators have to pay for international shipping plus customs. Those fees can really add up to a huge total with enough backers. It’s great if you don’t have many international shipments to send, but it’s simply not reasonable if you have a large volume of orders going overseas.
5 Best Practices for Customs Clearance
No matter which strategy you use for customs, there are some best practices that stay constant. Here are a few simple rules you can follow that will help you reduce the risk of things going wrong.
1. Do your paperwork correctly
Having accurate and complete documents is vital for customs clearance. To restate: important documents include the commercial invoice, bill of lading, packing list, and certificate of origin.
Make sure all documents are filled out correctly and include necessary details like product descriptions, HS codes, and declared values. Incorrect or incomplete paperwork can lead to delays, fines, or even shipment rejections.
Basically – dot your I’s and cross your T’s.
2. Follow import and export regulations
Every country has its own import and export rules. Get to know the specific requirements of the countries you’re shipping to and from. This means understanding restricted or banned items, packaging and labeling needs, and any special certifications required.
Complying with these regulations will make your life generally easier.
3. Don’t be afraid to hire a customs broker
Customs brokers are experts in navigating customs procedures. They can help prepare your documents, calculate duties and taxes, and make sure you follow all regulations.
Choosing an experienced customs broker can save time, reduce errors, and speed up the clearance process. Don’t be afraid to hire help if you need it!
4. Use technology and automation to cut down on grunt work
Using technology and automation can make customs clearance easier. Many modern customs solutions offer features like automated document preparation, real-time tracking, and integration with shipping platforms. These tools help reduce manual work, minimize errors, and give you better visibility into your shipments’ status.
5. When in doubt, communicate like you’re an open book
Clear communication with everyone involved in the customs process is crucial. This includes suppliers, freight forwarders, and customs brokers. Make sure everyone knows their responsibilities and deadlines.
If you have questions, ask them. If you think someone might need to know certain information, make sure they know it. Err on the side of over-communication.
Choosing the Right Customs Broker
You are able to book your own freight. And if you work with the post office and other carriers like UPS and FedEx, you can also send international shipments without too much trouble.
But if you’re worried about customs clearance, it might be a good idea to hire a helping hand. Should you choose to do that, here are a few tips to make sure you find the right partner.
1. Find an experienced broker
Look for a broker who has lots of experience with shipments like yours. They should know the rules and needs of the countries you trade with. An experienced broker can offer area expertise and help you avoid common customs traps.
2. Learn about their services
A broker with a wide range of services can simplify your logistics. Besides customs clearance, many brokers offer freight forwarding, warehousing, and distribution. Choosing a broker that provides end-to-end solutions saves time and reduces the hassle of dealing with multiple service providers.
3. Review costs
Cost matters, but it shouldn’t be your only concern. Compare pricing from different brokers but also think about the value they offer. A cheaper broker might not give you the same level of service or expertise as a pricier one. Look for transparent pricing with no hidden fees.
4. Look at reviews
Check the broker’s reputation and customer reviews. Positive feedback and a good reputation usually mean reliable, high-quality service. Ask other businesses for references and search for online reviews to see how satisfied their customers are.
5. Check out their tech system
It’s important to find a person you like working with. But it’s also wise to make sure you like their software too, since you’ll probably work with that more than the actual person.
Look for brokers who offer online tracking, automated documentation, and integration with your systems. These features streamline the customs process and give you real-time shipment updates.
Final Thoughts
If you run a Kickstarter campaign, you will probably ship internationally. That means you will need to know how to handle customs clearance and brokerage.
Getting packages across country borders is intimidating and complex. But once you understand the logic and the reasoning behind the rules, it’s easier to deal with.
Before you launch your campaign, make a decision about how you plan to handle customs. Figure out who will pay for customs and figure out if you will be hiring help.
As intimidating as international shipping can be, don’t let it scare you away from launching the product of your dreams. This is just a logistical hurdle to clear along the way. You can do it, as have so many others before you!
The holiday season is a wonderful opportunity for eCommerce businesses to shine. It’s a time when shoppers are eagerly looking for gifts and deals, and are in a generally festive mood. If you’re smart about how you handle holiday promotions, you can pick up a ton of new customers, some of which you might keep for a long time!
To help you do that, we’ve made a list of 31 proven holiday promotion ideas. Take some of the ones you like and they will help your eCommerce store thrive this coming holiday season!
Early Preparation
Start planning your holiday promotions early to stay ahead of the competition and capture more customers. Early preparation helps you organize your campaigns better.
That means you’ll have enough stock to meet the holiday demand. If you want to succeed, you need to get a head start to maximize your holiday sales potential.
#1: Offer pre-holiday sneak peeks.
Generate excitement by showcasing upcoming holiday products early. Share sneak peeks on your website and social media to build anticipation and build up early interest in your offerings.
One way you could do this is to tease your customers with a glimpse of a limited-edition holiday item or a special bundle. It’s a tried and true technique! Early previews create buzz and encourage customers to plan their purchases, and that leads to higher engagement and sales.
Another example: you could post a sneak peek video on Instagram to showcase a holiday-themed gift set. For the loyal customers following you Instagram, this could make them eager to grab it as soon as it launches.
#2: Implement early bird discounts.
Reward early shoppers with special discounts. Offering early bird discounts encourages customers to make their holiday purchases sooner, boosting your early sales and reducing the last-minute rush.
For instance, you could offer a 10% discount for orders placed before December 1st. Early bird deals can also help you gauge the popularity of your products and adjust your inventory accordingly. That way, you can be sure you’re well-stocked for the peak shopping season.
#3: Host a holiday preview sale.
Organize a special sale event to preview holiday items. A holiday preview sale gives customers a chance to buy exclusive products before they’re available to the general public.
This strategy can create a sense of urgency and exclusivity, driving more traffic to your store. As an example, you could host an online event where loyal customers can access new holiday merchandise a week before the official release.
This not only boosts sales but also strengthens customer loyalty.
#4: Create VIP exclusive offers.
Make your loyal customers feel special with VIP-only deals. Send exclusive offers to your VIP customers, and you’ll likely see repeat purchases as a result. VIP deals can include early access to sales, special discounts, or unique holiday bundles that are not available to regular customers.
For example, a VIP email could offer a 20% discount on a new holiday collection, available only to your most loyal patrons. Not only will this incentivize customers to buy, but they’ll probably look forward to your next email too!
Email Marketing
According to Litmus, the average ROI for email marketing is $36 per every dollar spent. Saying that’s an excellent return on investment is a massive understatement.
Any way you look at it, email marketing is a great way to make sales and keep in touch with your audience. The trick is provide the right people with the right messages at the right time. This comes down to segmenting your audience by behavior and interest, and figuring out what offers they’re most interested in.
Here are some tips on how you can use email marketing to your advantage over the holidays.
#5: Launch a 12 Days of Deals campaign.
One easy way to excite your customers is to run a 12 Days of Deals email campaign. Each day, offer a different promotion or discount to keep customers returning to your store. This strategy builds excitement and encourages repeated visits, increasing the chances of multiple purchases.
For instance, on Day 1, you could offer 15% off all sweaters. On Day 2, a buy-one-get-one-free deal on accessories.
But it also serves another purpose – you get a chance to run 12 different deals. Seeing who clicks on which emails and who makes purchases can help you segment your audience. Then you can use that to make better emails in the future.
#6: Curate gift guides by price.
Some of the people on your mailing list might be shopping for others. To engage them, you can create gift guides sorted by price to help customers find the perfect gifts within their budget.
Send these guides via email to make holiday shopping easier for your subscribers. Price-based gift guides can simplify the decision-making process, which takes away one more barrier to making a purchase.
For example, you could have sections like “Gifts Under $25,” “Gifts Under $50,” and “Luxury Gifts” to help shoppers quickly find what they need.
#7: Send a holiday countdown series.
Sometimes, it helps to create an event, if only so you have something to celebrate. Online stores do this really well with countdown series.
Send regular emails counting down to a big holiday sale or event, offering sneak peeks and exclusive deals along the way. Countdown series create a sense of urgency and excitement. And, of course, this drives more traffic to your store.
Think about it: you could send an email each day of December leading up to Christmas, each with a special offer or a new product highlight.
#8: Promote exclusive email subscriber discounts.
If you’re new to email marketing, sometimes, priority 1 is just building up the mailing list. So you need to give people an opt-in incentive.
A simple way to do this is to reward your email subscribers with exclusive discounts. Offer special deals only available to your email list to encourage sign-ups and loyalty. Exclusive email discounts can make your subscribers feel valued and increase the likelihood of repeat purchases.
One way you could do this is to offer a 25% discount code in your holiday newsletter. Then all you have to do is make it available only to those who have subscribed to your emails.
Social Media Engagement
Social media is great for reaching a broad audience and creating interactive and engaging content. You can use a bunch of strategies to keep your followers excited about your holiday promotions.
Here are a few simple ideas to get your wheels turning.
#9: Run a social media advent calendar.
Create a social media advent calendar, sharing a new deal or promotion each day leading up to the holidays. It gives customers the perfect excuse to check your store every day.
When you do this, your customers can wake up each day to a new surprise offer. It’s like opening a little gift every morning.
To give you some ideas, Day 1 could feature a 20% discount on all accessories, while Day 2 offers a free gift with any purchase.
#10: Host holiday-themed contests.
Boost engagement by hosting holiday-themed contests on your social media platforms. Contests can include photo submissions, caption contests, or holiday trivia, offering prizes to the winners.
Picture your followers competing to post the best holiday-themed photo or coming up with the funniest caption for a festive image. Contests create a fun and interactive way to engage with your audience and promote your products.
For instance, a “Best Holiday Decor” contest could encourage customers to showcase their decorations, with the winner receiving a shopping spree.
#11: Collaborate with influencers for exclusive promotions.
Partner with influencers to reach a broader audience with exclusive promotions. Influencers can help you tap into their followers’ trust and loyalty, driving more traffic and sales to your store.
There are a lot of ways you can do this, but one common way is to provide special discount codes for influencers. This helps with tracking the success of your partnership as well. You can also work together on giveaways or sponsored content.
Imagine your favorite influencer announcing a 15% discount code exclusively for their followers. This not only drives sales but also enhances your brand’s credibility.
When in doubt, work with influencers that feel genuine. They tend to last longer!
#12: Share user-generated holiday content.
Nothing your marketing team can say will ever be as powerful as what your actual customers say.
So with that in mind, encourage your customers to share their holiday experiences with your products on social media. Share user-generated content (UGC) on your platforms to build a sense of community and authenticity.
UGC is the perfect example of social proof. Good UGC makes your brand more credible and can pull in new shoppers. For example, reposting a customer’s photo of your product under their Christmas tree shows real-life usage and satisfaction, encouraging others to buy.
Website Optimization
Slow websites ruin sales. Your site needs to be a lean, mean selling machine for the coming holidays.
Here are some tips on how you can optimize your website, improve the shopping experience, and increase your conversion rate.
#13: Create holiday-themed landing pages.
Design landing pages with holiday themes to capture the festive spirit. To do this, use holiday graphics, colors, and messaging to make these pages appealing.
Picture a homepage decked out in red and green with twinkling lights and snowflakes. It’s the perfect way to instantly put visitors in the holiday shopping mood. It’s no wonder that holiday-themed landing pages can not only improve engagement, but also make your promotions more memorable.
#14: Offer gift wrapping options at checkout.
Provide gift wrapping services at checkout to make holiday shopping easier for customers. This added convenience can increase your average order value and make your store a go-to destination for holiday shoppers.
Think about a busy parent completing their holiday shopping in one go. They would no doubt be relieved to know that their gifts will arrive beautifully wrapped and ready to place under the tree. Convenience is, itself, a product worth selling!
#15: Highlight limited-time offers with countdown timers.
Use countdown timers to create urgency for limited-time offers. Displaying the remaining time for a deal encourages customers to act quickly, boosting conversion rates and driving more sales during the holiday season.
So think about a timer ticking down. Imagine it showing only 30 minutes left to get 30% off your purchase. If you’re like many people, then that might be enough to push you to make that decision fast!
#16: Optimize for mobile shoppers.
Make sure your website is mobile-friendly to cater to the increasing number of mobile shoppers. Think from the customer’s perspective – if you’re trying to shop on your phone but the website keeps crashing or loading slowly, would you really stick around to finish the purchase? Most would not.
A responsive design and fast loading times can enhance the shopping experience for mobile users, leading to higher sales. Make sure your site runs smoothly on mobile devices to keep those sales rolling in.
In-Store and Online Integration
Do you have both physical and online locations? You can integrate your online and in-store experiences to provide a seamless shopping journey. This approach can drive traffic to both your physical and online stores, maximizing sales opportunities.
#17: Promote Buy Online, Pick Up In-Store (BOPIS) options.
Encourage customers to buy online and pick up in-store (BOPIS). This option combines the convenience of online shopping with the immediacy of in-store pickup, appealing to last-minute holiday shoppers.
Imagine a customer buying a gift online during their lunch break and picking it up on their way home—super convenient and time-saving. But don’t forget the added bonus – when the customer comes in to pick up their item, they may very well make another purchase!
#18: Offer special in-store discounts for online followers.
Reward your online followers with exclusive in-store discounts. Promote these offers on your social media channels to drive foot traffic to your physical locations and increase in-store sales.
For example, you could announce on Instagram that followers who show a specific post at checkout get 20% off their in-store purchase.
#19: Host live shopping events on social media.
Engage customers with live shopping events on social media platforms. Show off your holiday products, offer exclusive deals, and interact with viewers in real-time to create a fun and engaging shopping experience.
As an example, wouldn’t it be neat to have a live video where a host walks through the store? Along the way, they could highlight special holiday items, answer questions, and give out discount codes to viewers. It would be like a personal shopping experience from the comfort of home.
Customer Loyalty
Paying attention to customer loyalty during the holidays can lead to repeat business and long-term relationships over the course of the next year. So if you’re serious about maximizing long-term customer value, think about loyalty programs and exclusive offers. You want to give customers a reason to keep coming back.
#20: Launch a holiday rewards program.
Introduce a holiday rewards program to incentivize repeat purchases. Offer points or discounts for every purchase, encouraging customers to shop more frequently during the holiday season.
Imagine every time you buy something, you earn points that can be redeemed for discounts or free items. It’s like getting a little gift every time you shop. For example, “Earn 10 points for every dollar spent, and get $10 off once you reach 100 points.”
#21: Offer bonus points for purchases during the holiday season.
Reward customers with bonus loyalty points for purchases made during the holiday season. This strategy can increase sales and encourage customers to choose your store for their holiday shopping.
Picture this: you’re already earning points, but during the holidays, you get double or even triple points for every purchase. It’s a great incentive to do all your holiday shopping in one place.
For instance, “Double points on all purchases from December 1st to December 31st!”
#22: Provide exclusive deals for returning customers.
Offer special deals exclusively for returning customers. Showing appreciation for their loyalty can strengthen your relationship and also make them more likely to shop with you again.
Have you ever gotten an email that says, “Thanks for being a loyal customer! Here’s a special 20% off just for you.” If so, it probably made you feel valued and more inclined to return.
Upselling and Cross-Selling
Smart use of upselling and cross-selling techniques during the normal sales process can help you increase your average order value. And it doesn’t have to be at your customer’s expense either! You can suggest relevant products and make enticing bundles, both of which could make for an even better shopping experience.
But that’s just the surface – check out some of the ideas below for more inspiration.
#23: Bundle products for holiday specials.
Create special holiday bundles that combine complementary products at a discounted price. Bundling products can increase the perceived value and encourage customers to spend more.
For instance, “Holiday Bundle: Get a scarf, hat, and gloves set for just $29.99.” That’s a pretty good deal overall, and if your customer is already shopping for gloves, there’s a good chance they need a hat too, even if they would have otherwise forgotten.
#24: Suggest complementary products at checkout.
Recommend complementary products at checkout to enhance the shopping experience and increase sales. Displaying helpful suggestions can prompt customers to add more items to their cart. For example, if someone buys a French press, you can always suggest a coffee grinder and a nice whole-bean blend. That way they can actually use the product they just bought!
If you need another example, then consider the following. You’re buying a laptop, and at checkout, you see suggestions for a laptop bag and a mouse. If you’re working on the go, then both of those purchases would make a lot of sense. And having the suggestions delivered right to you would be very convenient.
Six magic words to keep in mind here: “People who bought this also bought…”
#25: Create themed product bundles.
Develop themed product bundles that cater to different holiday needs and preferences. If you do this well, then your themed bundles can attract customers looking for unique and convenient gift options.
Imagine a “Winter Wonderland” bundle with a snow globe, a holiday mug, and a cozy blanket. It’s an attractive package that’s perfect for the season. Perhaps it’s a great fit for Secret Santa for that coworker you don’t know all that well.
Post-holiday strategies
When the holidays end, the sales don’t have to. If you play your cards right, you can still keeps sales up even even after the holidays. To do this, you need strategic promotions and offers.
With that in mind, here are some post-holiday strategies to help clear out excess inventory and keep customers engaged.
#26: Promote post-holiday clearance sales.
Encourage customers to continue shopping with post-holiday clearance sales. Discounting leftover holiday stock can attract bargain hunters and help you quickly clear inventory. That way, you make some sales and room for new products.
#27: Offer coupons for January shopping.
Provide customers with coupons valid for January purchases. This strategy encourages repeat business and helps maintain sales momentum into the new year. Customers appreciate the savings, and it keeps your store top of mind.
For example, you could always give out coupons that say “Save 20% on your January purchase!” Or you could say something like “New Year, New Deals: 15% off your first purchase in January!”
This is a hard strategy to mess up, so you have lots of options.
#28: Encourage gift card purchases with a post-holiday bonus.
Promote gift card purchases by offering a bonus. For example, offer a small bonus gift card for every gift card purchased. This tactic can drive immediate sales and encourage future visits to your store.
Wouldn’t it be great, for example, to buy a $50 gift card and get an extra $10 gift card for free?
#29: Send thank you emails with exclusive New Year deals.
Show appreciation by sending thank you emails to holiday shoppers. Include exclusive deals for the new year to encourage continued patronage. A personalized thank you can strengthen customer relationships and foster loyalty.
This could take the form of an email that says, “Thank you for shopping with us this holiday season! Here’s a special offer just for you.” Then you have the perfect chance to slip in something like: “Exclusive New Year Deal: 20% off your next purchase!”
#30: Organize an exclusive event for top shoppers.
Reward your top shoppers with an exclusive event. This could be an early access sale or a special appreciation event. Exclusivity makes customers feel valued and can turn them into long-term loyal patrons.
You could send out an invitation to a VIP shopping event with early access to new arrivals and special discounts. For example, you could use copy like: “Join us for an exclusive VIP shopping event! Early access and 25% off new collections.”
#31: Provide special offers to newsletter subscribers.
Give your newsletter subscribers special offers as a post-holiday thank you. Exclusive discounts or early access to sales can boost engagement and reward your loyal audience, which naturally encourages them to stay subscribed.
That could look like getting an email with a special discount code just for being a subscriber. For example, “Thank you for subscribing! Enjoy 20% off your next purchase.”
Final Thoughts
Many long-term customers will come to your store for the first time because of the holidays. Their guards will be down and they simply need to get gifts for others. It’s an excuse to take a chance on new stores.
But statistically speaking, some of them will want to stick around for a long time. It’s in your best interest to do everything you can to promote your store to get tons of new customers during the shopping frenzy at the end of the year.
Take a few of these holiday promotion ideas and run with them. You might be surprised how big of a difference they can make!
Ecommerce is exciting because you can sell practically anything to anyone. The internet makes that possible! But actually getting people to make purchases and keeping your eCommerce conversion rate up – that’s harder than it looks.
Your conversion rate—the percentage of visitors who make a purchase—is a critical metric for your online store’s success. So improving it can unlock tremendous growth and profitability.
In this guide, we list 36 proven strategies to boost your conversion rate. These strategies cover a number of topics, including website design, user experience, marketing tactics, and customer engagement. But they’re all ultimately aimed at one thing – boosting your eCommerce conversion rate.
Website Design Improvements
A well-designed website can significantly enhance user engagement and conversion rates. Below, you will find some actionable tips to make your website shine so that you can increase sales.
#1: Use high-quality images and videos.
High-quality visuals will help show off your products effectively. When people shop online, they can’t inspect items like they could in the store. So you need to give them the evidence they need to feel comfortable making a purchase.
To do this, use professional photos and videos to highlight product features and benefits, making your offerings more appealing to potential customers. For example, if you sell clothing, show detailed images of the fabric and stitching. Include videos of the clothing being worn to give customers a better idea of how it looks in real life.
#2: Simplify navigation.
Make it easy for visitors to find what they’re looking for. Use clear categories, intuitive menus, and a search bar to help users navigate your site effortlessly, thus improving their overall experience.
Think about how you organize your closet. You want everything in its place and easy to find. The same goes for your website. Label sections clearly and avoid clutter.
#3: Optimize for mobile devices.
Make sure your website is mobile-friendly. A significant portion – some even say the majority – of traffic comes from mobile users. So be sure to use responsive design principles so you can provide a great experience across all devices. Doing so will boost conversions in general, but especially on mobile devices.
Imagine you’re shopping on your phone and the site isn’t loading properly. Frustrating, right? Avoid this by making sure images resize correctly and buttons are easy to tap.
#4: Implement fast loading times.
Speed is crucial for user retention. That is why you must optimize your website’s performance. You can do this by compressing images, using efficient coding practices, and – if needed – setting up a content delivery network (CDN) to ensure a quick loading time.
No one likes waiting around for a page to load. It’s like standing in a long line at a store. Keep things moving quickly to keep your customers happy.
#5: Use attractive and functional design elements.
Be sure to use visually appealing design elements that also enhance functionality. Use clear calls to action (CTAs), easy-to-read fonts, and a cohesive color scheme to create an engaging user experience
When you build an eCommerce store, sometimes it’s helpful to thing about what you’d do if you were making a physical store. So imagine walking into a well-decorated store with signs pointing you to the best deals. That’s what your website should feel like.
For the digital equivalent of that, use bright buttons for important actions like “Buy Now” or “Sign Up”.
Enhancing User Experience (UX)
Improving UX can lead to higher customer satisfaction and increased conversion rates. After all, who doesn’t want to use a website that provides a good experience?
To help you do that, here are some tips to keep your users happy and coming back for more.
#6: Offer guest checkout options.
Allow customers to make purchases without creating an account. Guest checkout simplifies shopping because it reduces friction and cart abandonment. As a result, this leads to higher conversion rates.
Think about how annoying it is when you have to fill out endless forms just to buy something simple. You need to make it easy for your customers to check out quickly.
#7: Streamline the checkout process.
To go a bit further into that last point, it’s a good practical to generally minimize the number of steps in your checkout process. When possible, use single-page checkout. And if you can’t manage that, reduce the number of form fields users have to fill out to make the process quicker and more user-friendly.
Shopping online needs to be easier than using a drive-thru. You get in, you get out. So keep it simple and fast!
#8: Provide multiple payment options.
Offer a variety of payment methods to cater to different customer preferences. Include options like credit/debit cards, PayPal, and digital wallets to increase the likelihood of completed purchases.
Some people prefer using their credit card, but others might prefer PayPal or Apple Pay. Give them choices to make it easy.
#9: Use exit-intent popups.
Sometimes, if you offer users the right incentive, you can keep them from leaving your site. To do this, use exit-intent popups to recapture attention from visitors before they leave your site. With them, you can offer discounts, free shipping, or special deals to encourage them to complete their purchase.
If the user is about to leave, then you really have nothing to lose. So giving an offer like “10% off” right before they leave might just be enough to make a sale you would otherwise have lost.
#10: Make sure your website is accessible.
Make your site is accessible to all users, including those with disabilities. To do that, use alt text for images, make sure they can use keyboard navigation, and follow web accessibility guidelines to provide an inclusive experience.
Not only will this make your site look good, but it will also help increase sales. Even users without disabilities benefit from accessibility tweaks.
#11: Display customer reviews and testimonials.
Marketing copy is important, but it only goes so far. Customer reviews and testimonials, on the other hand, will help you build trust and credibility in a way buzzwords never could.
It’s really not surprising – positive feedback from satisfied customers can influence potential buyers’ decisions and increase conversion rates. Just imagine you’re shopping online and see glowing reviews about a product. If you were leaning toward buying it, but were still on the fence, then seeing that review might just make your decision for you.
When you get good reviews, display them prominently on product pages, homepages, and landing pages. And if you don’t have good reviews, come up with a system to collect them more easily!
#12: Offer limited-time promotions.
Procrastination kills sales. But you can fight back by creating urgency with limited-time promotions.
Flash sales, countdown timers, and exclusive deals can motivate customers to make quick purchasing decisions, increasing your conversion rates. Picture a big website banner saying, “Hurry, only 2 hours left for 50% off!” It makes you want to buy now, doesn’t it?
Even simple phrases like “Limited stock” or “Offer ends soon” go a long way toward creating a sense of urgency.
#13: Use upselling and cross-selling.
When a customer buys one product from you, there’s a good chance you can get them to buy another. So encourage customers to buy more by recommending related or higher-end products.
Done properly, upselling and cross-selling techniques can increase the average order value and overall sales. For instance, if someone is buying a camera, suggest a high-end lens or a protective case. You make more money, and your customer has a better overall experience as a result.
#14: Roll out a loyalty program.
“Every time you make a purchase, you earn 1 point for every dollar spent. Once you reach 100 points, you’ll get $10 off on your next purchase.”
Loyalty programs work like a charm. That’s why companies ranging from retail giants like Kohl’s to airlines like Delta use them. And, indeed, so do a lot of small eCommerce shops.
Just like these bigger companies, you can reward your repeat customers with a loyalty program. The concept is simple – just offer points, discounts, or exclusive perks. As a natural result, this will incentivize repeat purchases and keep customers loyal for a long time.
#15: Conduct email marketing campaigns.
Use targeted email marketing campaigns to reach your audience. Send personalized offers, product recommendations, and abandoned cart reminders to drive conversions and increase sales.
Imagine receiving an email that says, “Hey, we noticed you left something in your cart. Here’s 10% off to complete your purchase!”
It feels personal and encourages you to take action.
Using Data & Feedback
What your users do on your website tells you a lot about how well it’s working. Analyzing data and customer feedback can help you increase sales, if you do it right.
Here are some tips on how you can do that.
#16: Set up conversion tracking.
You don’t have to start big here. Even using Google Analytics and Shopify’s built-in data will help you monitor and analyze your site’s performance.
Priority one should be setting up conversion tracking. Once you do this, you can see which business strategies lead to sales and which ones don’t.
Other useful metrics include bounce rate, session duration, and conversion paths. This can help you see how long people spend on your site and where they go while there.
#17: Analyze user behavior with heatmaps.
If you want to step up your data analysis game, then you can use heatmaps to visualize how visitors interact with your site. One favorite tool of ours is Hotjar, but there are many good options out there.
Heatmaps are great visual indicators of how people behave online. If a button is red-hot, it means it’s getting lots of attention.
You can use heat maps to identify areas of high engagement, as well as potential issues. The big question you should ask yourself is: “are people clicking where I think they ought to?”
And if the answer is no – you make changes!
#18: Regularly A/B test key elements.
The concept of A/B testing couldn’t be simpler. All you do is you take two version of something, like a headline, call to action, or product page. You run each version by part of your audience, and you see what performs best.
When you do this, it gives you a way to see what people really respond to. It’s a great way to get out of your head and see what people like in the real word.
If you want a tool to help you do this, then we recommend you check out VWO.
#19: Gather and implement customer feedback.
Another way you can collect feedback is through surveys, focus groups, and even asking directly. No matter how you do it, you can use this information to understand customer needs and preferences and make sensible changes to your store. Do this often enough and it can really help you improve shopping experience and increase conversions.
If you need a tool to run surveys to people in your target market, then check out PickFu.
Advanced Conversion Strategies
Conversion rate optimization is a deep rabbit hole. This is for good reason – anything you can do to increase the odds that people make a purchase can and will increase your profitability.
With that in mind, here are some time-tested tips to help you further dial in your conversion rates.
#20: Personalize user experiences.
Ecommerce can feel cold in a way that in-person retail doesn’t. The missing ingredient? A human being who can observe your behavior and guess what you are looking for.
But you can still personalize eCommerce experiences, even if you can’t talk to your individual customers as they shop. Watching what they do on your site can help you determine which products to recommend. If you collect someone’s email address, then you can make educated guesses about what kind of products they might need even when they’re not on your site.
This is a pretty complex subject, so we’ve included an interview with an expert below if you want to get into the weeds on this.
#21: Optimize product pages for conversions.
Unlike physical stores, eCommerce stores are not populated with salespeople. Instead, your product pages will have to do their jobs. So all the information that customers need to make their decisions needs to be spelled out on the page.
That includes specs, uses, and real-life images. Your product pages will perform best if you have detailed descriptions, high-quality images, and meaningful customer reviews.
And, of course, make sure your call to action – probably “add to cart” is very easy to spot.
#22: Use dynamic pricing strategies.
In some cases, it makes sense to adjust prices in real-time based on demand, competition, and other factors. For situations where it is appropriate, dynamic pricing can help maximize sales and profits by offering competitive prices that appeal to shoppers.
Gas stations do this all the time with the fluctuating price of gas, as does Uber during busy events with “surge pricing.”
But that doesn’t necessarily mean having wildly different prices from week to week like with gas or periodically bumping up prices by huge amounts like Uber. In fact, one way to do this is simple and intuitive – adjust prices during sales or holidays to attract more buyers.
#23: Use chatbots for instant customer service.
You can use chatbots to provide instant assistance to visitors. Chatbots can answer common questions, guide users through the buying process, and resolve issues quickly, improving customer satisfaction and conversion rates.
Unlike with physical commerce, customers can’t walk into a store and immediately expect someone to help. But if you set your chatbots up well, they can do this for you online.
They can answer questions like, “What’s your return policy?” or “Can you recommend a product for my needs?”
Are chatbots perfect? No! But they can answer a lot of common questions that can save you and your staff a bit of time everyday.
Trust and Reassurance
Purchasing online is an act of trust. Everything you can do to give people a reason to trust you will help increase your odds of making a sale.
Here are some specific tips on how you can increase your perceived trustworthiness.
#24: Provide money-back guarantees.
Offer a money-back guarantee to reduce purchase risk for customers. Knowing they can get a refund if unsatisfied can increase their confidence and willingness to buy.
If you were buying a new gadget online, but were unsure if it’ll meet your needs, then seeing a “30-Day Money-Back Guarantee” would probably settle your nerves. You might think, “Well, if it doesn’t work out, I can always get my money back.”
This kind of assurance can push hesitant buyers to make a purchase.
#25: Include trust signals.
Display trust badges, secure payment icons, and certifications prominently on your site. Trust signals reassure customers that their transactions are safe and your business is reliable.
Seeing familiar words, logos, and phrases like “Visa,” “MasterCard,” or “Secure Checkout” can make customers feel more secure. Likewise, reviews and testimonials can put people at ease as well.
And if that feels like very basic advice, consider what’s it’s like when you go to a store and these things are absent. It’s not comfortable!
#26: Highlight best-selling items.
Your best-selling items are probably best-sellers for a reason. So show off your best-selling products – they’re likely to get purchases!Anything you sell a lot of is also likely to have more social proof which can help influence purchase decisions.
Imagine walking into a bookstore and seeing a section labeled “Best Sellers.” You’re probably immediately go toward these books because you’d assume they must be good if so many people are buying them.
Online, you can do the same by featuring “Top Sellers” or “Customer Favorites” sections.
#27: Add a progress indicator during checkout.
You want to actively eliminate reasons customers don’t want to complete their checkout. But if customers don’t know how long checking out will take, that’s tough to do. One easy way around this is to include a progress bar showing how many steps remain
Simply put, a progress bar can reduce anxiety, making the process feel quicker and encouraging completion.
#28: Enhance product descriptions.
This is an incredibly detailed topic, so we recommend you check out our guide on eCommerce copywriting. Bottom line – if you know how to write good descriptions, you’re going to sell a lot more.
#29: Offer free shipping.
Provide free shipping to reduce purchase friction. So if you offer free shipping, make it immediately obvious to customers. High shipping costs are a common reason for cart abandonment.
#30: Create urgency with countdown timers.
Use countdown timers for limited-time offers and flash sales. Creating a sense of urgency can drive immediate action and increase conversion rates by encouraging customers to make quick decisions.
Picture a big, ticking clock on your website that says, “Only 2 hours left for 50% off!” This makes people feel they need to buy right now before the deal disappears.
(This works wonders during Black Friday sales!)
#31: Implement live customer support.
If you can manage it, offer live chat support to assist customers in real-time. Live support can help answer questions, resolve issues, and guide customers through the purchasing process, enhancing their overall experience.
Consider in-person shopping again for a moment. If you’re in a store and need help finding a product and friendly staff member immediately comes to assist you, you’re then a lot more likely to walk out of that store with shopping bags in hand.
#32: Optimize for voice search.
Be sure your site is optimized for voice search by using natural language and long-tail keywords. With the rise of voice-activated devices, optimizing for voice search can capture additional traffic and improve conversions.
But how do you do this, exactly?
Think about how you ask questions to Siri or Alexa. Instead of using terms like “running shoes,” you use full sentences, like “Where can I buy affordable running shoes?”
If your website is written in a natural way, then you will be more likely to pick up searches who use queries like this.
#33: Use retargeting strategies.
Sometimes people just need to be reminded that you exist. So you can use retargeting campaigns to re-engage with visitors who left your site without making a purchase.
To do this, show targeted ads on other platforms to remind them of their interest and encourage them to return and complete their purchase.
Let’s say someone visited your site, looked at a cool gadget, but didn’t buy it. Later, they see an ad for that exact gadget while browsing Facebook. It reminds them of what they liked and might push them to finally make that purchase.
#34: Create video product reviews.
Videos show what copywriting can only say.
If you really want to impress shoppers, then produce video reviews to show your products in action. Videos give people a more comprehensive understanding of the product they’re thinking about buying. As a result, customers have more reasons to trust you.
For example, a video showing someone unboxing and using a new tech gadget can answer potential buyers’ questions. Plus, it can highlight the product’s features in a way pictures and text can’t.
Customer engagement
Building strong customer relationships is crucial for boosting conversion rates and fostering loyalty. Here are some tips to create a loyal customer base.
#35: Create a sense of community around your brand.
Develop a community through social media groups, forums, and events where customers can interact and share their experiences. Encouraging a sense of belonging can enhance customer loyalty and increase repeat purchases.
Think about popular brands like Apple or Nike. They have huge communities of fans who love to share tips, show off their latest purchases, and stay updated on new releases. Create spaces where your customers can connect and engage with each other and your brand.
#36: Offer flexible payment plans.
Sometimes paying for everything upfront is just too much. So provide flexible payment options like installment plans or buy now, pay later services. Flexible payment plans make high-ticket items more affordable and accessible, encouraging customers to complete their purchases.
Let’s say you want to buy a pricey laptop, but it’s out of your immediate budget. If the store offers a payment plan, you can pay in smaller chunks over time, making it much easier to afford. This can be a godsend for customers on a budget.
Final Thoughts
Improving your eCommerce conversion rate requires patience and commitment to continual testing and refinement. But sometimes, when you don’t know where to start, a list of tips is exactly what you need.
We hope the strategies outlined in this guide inspire you to touch up your eCommerce store and increase conversion rates!
Understanding the customs clearance process is extremely important if you want to import goods into the USA. The last thing you want is to have your goods impounded at the border.
Clearing customs involves complex regulations and requirements that importers must follow. If you don’t comply, you could be looking at delays, penalties, and additional costs.
Knowing the customs procedures will help you make sure that goods are imported smoothly and efficiently. That way, you can maintain your supply chain and keep customers happy.
In this article, we’ll break down the import process, step by step.
Step-by-Step Guide to the Import Process
Importers must meet basic requirements set by Customs & Border Protection (CBP). That includes proper documentation, accurate classification of goods, and adherence to import regulations. Here is what you need to know in order to import goods.
Step 1: Obtain a Customs Bond
A customs bond is a financial guarantee to the CBP. When you get one, you’re saying that you will comply with all import regulations and pay any duties, taxes, and fees.
To obtain a customs bond, you can contact a surety company or a licensed customs broker. This bond is necessary for most import transactions. Getting one ensures that all legal obligations are met. You need a customs bond if you want your goods to pass through customs.
There are two types of customs bonds: single-entry and continuous. A single-entry bond covers one-time shipments, making it ideal for small or infrequent imports. On the other hand, a continuous bond is perfect for frequent importers as it covers all shipments over a year, saving both time and money.
Step 2: Properly Classify Your Goods
Using the Harmonized Tariff Schedule (HTS), you need to classify your goods accurately. Proper classification determines the tariffs and taxes applicable to your imports. Misclassification can lead to fines and delays.
To classify your goods, consult the HTS and seek assistance from a customs broker if needed. Accurate classification is essential for compliance and cost management. That way, you pay the correct duties and avoid legal issues.
For instance, if you are importing electronic gadgets, you need to find the specific HS Code that matches each item to determine the exact duty rate. Misclassifying items could result in paying higher tariffs or facing penalties. This can disrupt your business operations and increase costs.
Step 3: Prepare and Submit Required Documentation
Essential documents for importing include the Bill of Lading, Commercial Invoice, and Packing List. These documents must be completed accurately and submitted to the CBP.
Double check to be sure all details are correct and consistent across documents to avoid processing delays. Submissions can be made electronically via the Automated Commercial Environment (ACE) or manually, depending on the requirements.
Your documents have to be done right. Rushing through documentation is asking for a rough import process. As an example, if the Commercial Invoice lists 500 units of a product, the Packing List should also reflect this exact quantity. Any discrepancy can trigger delays and additional inspections, complicating the import process.
Using ACE for electronic submissions not only speeds up the process but also provides real-time tracking of your submission status. That makes it easier to manage.
Step 4: Determine Entry Type
There are different types of entry for imported goods: Formal Entry and Informal Entry. Formal Entry is required for goods valued over $2,500 or items subject to regulations and quotas. Informal Entry is for goods valued under $2,500, typically for personal or low-risk commercial items.
The type of entry depends on the value, nature, and use of the goods. Selecting the correct entry type will help you comply with customs regulations and avoid unnecessary delays or penalties during the import process.
For example, if you’re importing high-value electronics worth $10,000, you’ll need to file a Formal Entry. This requires additional documentation and adherence to more stringent regulations compared to importing a small batch of handcrafted goods worth $1,500, which would qualify for Informal Entry.
Step 5: Calculate and Pay Duties and Taxes
Duties and taxes are calculated based on the Harmonized Tariff Schedule (HTS) classification of your goods. Each classification has a corresponding duty rate. To calculate the duties, multiply the value of your goods by the applicable duty rate.
Let’s run through an example. If the duty rate for your imported textiles is 5% and the total value is $20,000, you’ll owe $1,000 in duties. Paying this amount promptly helps ensure your goods clear customs without delays.
Payments to the CBP can be made electronically through the Automated Commercial Environment (ACE) or by other CBP-approved methods. If you use ACE, it will help you accurately calculate and pay duties and taxes. That way, your goods cruise across the border.
Step 6: Arrange for Inspection and Release of Goods
CBP may inspect your goods to ensure compliance with regulations. If your shipment is selected for inspection, the CBP will notify you. Prepare by having all necessary documents ready and ensuring your goods are correctly labeled and packaged.
Inspections can be random or based on risk assessments. Cooperating fully with the inspection process and addressing any issues promptly can help expedite the release of your goods.
For example, if you’re importing food products, make sure all items are labeled with ingredients and expiration dates as required. If the CBP decides to inspect your shipment, having everything in order can prevent long delays.
Should any issues arise, promptly provide additional information. If there are discrepancies, correct them. This can help speed up the release of your goods.
9 Common Pitfalls and How to Avoid Them
Customs clearance can be complicated. There are some mistakes that happen again and again for new and experienced importers alike.
Here are some common ones along with tips on how to avoid them.
#1: Incorrect Classification
Always double-check HTS codes. Misclassification can lead to fines and delays. Use CBP resources or consult a customs broker for accurate classification. For example, if you misclassify electronics as toys, you could face hefty fines and long delays while the error is corrected. Make sure you use the right code by cross-referencing CBP’s guidelines or seeking help from a broker.
#2: Incomplete Documentation
Make sure all forms are filled out accurately and completely. Missing or incorrect information can cause delays. Double-check documents before submission.
For instance, if your Commercial Invoice is missing the total value of goods or has incorrect quantities listed, your shipment could be held up at customs. Take the extra time to verify every detail on your forms.
#3: Ignoring CBP Notices
Respond promptly to any CBP communication. Failure to address notices can result in penalties or shipment holds.
If you receive a notice regarding additional documentation or clarification, respond quickly. Ignoring such notices can lead to your goods being held indefinitely or even seized.
#4: Improper Packaging
Use compliant and secure packaging. Non-compliant packaging can lead to inspection delays or damage claims.
As an example, if you’re shipping fragile items like glassware, using inadequate packaging can result in breakage, leading to claims and delayed processing. Make sure your packaging meets CBP standards and is robust enough to protect your goods.
#5: Failure to Pay Duties
Pay all required fees on time. Late payments can incur fines and delay the release of your goods.
If you fail to pay the calculated duties by the deadline, your goods will not be released until the payment is made. This could cause significant delays in your supply chain.
#6: Neglecting Inspection Procedures
Be prepared for potential inspections. Have all necessary documents and be ready to cooperate with CBP officers.
If your shipment is selected for inspection, having everything in order, like proper labeling and documentation, can expedite the process. Cooperation and readiness can make the inspection smooth and swift.
#7: Overlooking Entry Types
Choose the correct entry type for your goods. Incorrect selection can lead to processing delays and additional scrutiny.
For instance, if you incorrectly file a high-value shipment as an Informal Entry, you could face extra scrutiny and processing time. Understand the distinctions and file appropriately to avoid complications.
#8: Lack of Insurance
Protect your shipment with appropriate insurance. Insurance can cover potential losses or damages during transit. If your goods are lost or damaged during shipping, having insurance means you won’t bear the full financial brunt of the loss. It’s a small investment for peace of mind.
#9: Ignoring Import Restrictions
Make sure your goods comply with all import restrictions and regulations. Restricted items can be seized or returned.
For example, certain chemicals and pharmaceuticals require specific permits and adherence to strict regulations. Ignoring these can result in your goods being confiscated and heavy fines imposed.
Tips to Use Technology to Speed Up Customs Clearance
Smart use of technology can significantly streamline the customs clearance process. Various tools and software are available to simplify and automate different aspects of importing goods.
The Automated Commercial Environment (ACE) is an important platform provided by the CBP. It allows for electronic submission of documents, real-time tracking, and communication with customs officials.
Additionally, customs management software like Descartes and ONESOURCE Global Trade offer comprehensive solutions for managing compliance, documentation, and duty calculations.
Automated solutions provide lots of benefits, including reducing human error, speeding up document processing, and ensuring compliance with regulations.
These systems can alert you to missing or incorrect information, helping to avoid delays and penalties. For example, if you submit a document with an incorrect HTS code, the software can flag the error and prompt you to correct it before submission, preventing delays.
Real-time tracking allows you to monitor the status of your shipments and quickly address any issues that arise. Imagine being able to see exactly where your shipment is and knowing immediately if it’s stuck at a port, enabling you to take swift action to resolve any problems.
Where possible, avoid manual paperwork. Using the latest tech can keep your import processes efficient in terms of both time and money. Plus, you can cut down on the hassle. It’s worth the slight learning curve of using new software.
Final Thoughts
Understanding and following the customs clearance process is mission-critical for importing goods into the USA. Key steps include obtaining a customs bond, properly classifying goods, preparing documentation, determining entry types, calculating and paying duties, and arranging for inspections.
Attention to detail counts for a lot here. As long as you are thorough and careful, you can see your products through the import process and clear customs without unnecessary trouble.
Additional Resources
For more information, visit these resources: